×
ToyotaParts- Hello
- Login or Register
- Quick Links
- Live Chat
- Track Order
- Parts Availability
- RMA
- Help Center
- Contact Us
- Shop for
- Toyota Parts
- Scion Parts
My Garage
My Account
Cart
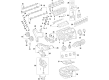
OEM Toyota Solara Intake Valve
Engine Intake Valve- Select Vehicle by Model
- Select Vehicle by VIN
Select Vehicle by Model
orMake
Model
Year
Select Vehicle by VIN
For the most accurate results, select vehicle by your VIN (Vehicle Identification Number).
2 Intake Valves found


Toyota Solara Valve, Intake Part Number: 13711-0H010
$16.60 MSRP: $23.10You Save: $6.50 (29%)Ships in 1-2 Business Days
Toyota Solara Valve, Intake Part Number: 13711-20020
$14.33 MSRP: $19.94You Save: $5.61 (29%)Ships in 1-2 Business Days
Toyota Solara Intake Valve
Choose genuine Intake Valve that pass strict quality control tests. You can trust the top quality and lasting durability. Shopping for OEM Intake Valve for your Toyota Solara? Our website is your one-stop destination. We stock an extensive selection of genuine Toyota Solara parts. The price is affordable so you can save more. It only takes minutes to browse and find the exact fit. Easily add to cart and check out fast. Our hassle-free return policy will keep you stress-free. We process orders quickly for swift delivery. Your parts will arrive faster, so you can get back on the road sooner.
The Intake Valve in Toyota Solara s is very vital in the economic and efficient engine operation as it controls the amounts of air and fuel required for burn. When these valves fail, the engine power is therefore brought down and combustion operation is affected. For outright replacement of damaged intake valves, special tools such as the valve spring remover, compressor etc are needed. This includes compressing the valve spring, taking out the retainer clips and fitting the new valve without the ruining the guide or the seal. To avoid situations when the valve can become loose, proper installation is necessary for assisting the efficient work of the engine.
Toyota Solara Intake Valve Parts and Q&A
- Q: How to service and repair the Exhaust Valve and Intake Valve clearance on Toyota Solara?A:The procedure to service and repair valve clearance begins with disconnection of the front wheel RH and front fender apron seal RH followed by engine No.1 cover sub-assembly extraction and subsequent removal of spark plug and ventilation hoses and engine wire and cylinder head cover sub-assembly. Perform this operation by disconnecting the engine wire harness clamp and taking out the 8 bolts and 2 nuts and removing cylinder head cover and gasket. Align the timing shaft marks on bearing caps No.1 and No.2 with the marks on the sprocket and camshaft while placing the No.1 cylinder at TDC compress by rotating the crankshaft pulley until it meets timing chain cover mark 0. Test the valve clearance under cold conditions by measuring each valve lifter to camshaft distance with a feeler gauge and note down any measurements beyond the approved range for adjustment shim selection. Continue the clockwise crankshaft rotation for 1 revolution of 360° to establish the No. 4 cylinder at TDC/compression and then measure the clearances once more. When installing the cylinder head cover you must first remove existing FIPG packing then apply the specified Toyota Genuine Adhesive 1344 or Three Bond 1344 or an equivalent product to designated areas of the seal while cleaning away the contact surface oil before installing within 5 minutes of application time and ignoring engine startup for two hours after installation. When installing the cylinder head cover use 8 bolts and 2 nuts which need a torque of 11 Nm (110 kgf-cm, 8 ft. lbs.) for A bolts while B bolts require 14 Nm (143 kgf-cm, 10 ft. lbs.) and applying 11 Nm (110 kgf-cm, 8 ft. lbs.) torque to the nut. Put the spark plug in position before tightening it to 19 Nm (194 kgf-cm, 14 ft. lbs.). Place the front wheel on the right side and check for any oil leaks.

Related Toyota Solara Parts
 Toyota Solara Timing Belt
 Toyota Solara Harmonic Balancer
 Toyota Solara Camshaft
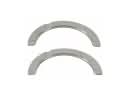 Toyota Solara Crankshaft Thrust Washer
 Toyota Solara Cylinder Head
 Toyota Solara Cylinder Head Gasket
 Toyota Solara Oil Pan
 Toyota Solara Piston Ring Set
 Toyota Solara Rod Bearing
 Toyota Solara Timing Chain
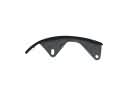 Toyota Solara Timing Chain Guide
 Toyota Solara Timing Cover