×
ToyotaParts- Hello
- Login or Register
- Quick Links
- Live Chat
- Track Order
- Parts Availability
- RMA
- Help Center
- Contact Us
- Shop for
- Toyota Parts
- Scion Parts
My Garage
My Account
Cart
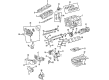
OEM Toyota Solara Timing Cover
Engine Timing Cover- Select Vehicle by Model
- Select Vehicle by VIN
Select Vehicle by Model
orMake
Model
Year
Select Vehicle by VIN
For the most accurate results, select vehicle by your VIN (Vehicle Identification Number).
12 Timing Covers found


Toyota Solara Cover, Timing Belt, Upper Inner Part Number: 11323-20030
$175.20 MSRP: $250.15You Save: $74.95 (30%)Ships in 1-2 Business Days


Toyota Solara Timing Cover Part Number: 11310-0H011
$237.76 MSRP: $339.47You Save: $101.71 (30%)Ships in 1-3 Business Days


Toyota Solara Cover, Timing Belt, Lower Part Number: 11321-0A020
$50.18 MSRP: $69.84You Save: $19.66 (29%)Ships in 1 Business Day


Toyota Solara Timing Cover, Lower Part Number: 11302-74040
$70.61 MSRP: $99.11You Save: $28.50 (29%)Ships in 1-3 Business Days

Toyota Solara Timing Cover, Upper Outer Part Number: 11303-74050
$74.05 MSRP: $103.95You Save: $29.90 (29%)Ships in 1-3 Business Days


Toyota Solara Timing Cover, Upper Outer Part Number: 11303-20040
$91.00 MSRP: $127.73You Save: $36.73 (29%)Ships in 1-3 Business Days
Toyota Solara Timing Cover Part Number: 11310-0H010
$237.76 MSRP: $339.47You Save: $101.71 (30%)Ships in 1-3 Business DaysToyota Solara Timing Cover Part Number: 11310-28070
$256.64 MSRP: $366.42You Save: $109.78 (30%)Ships in 1-3 Business DaysToyota Solara Timing Cover, Lower Part Number: 11302-0A020
$55.56 MSRP: $77.32You Save: $21.76 (29%)Ships in 1-3 Business Days

Toyota Solara Timing Cover, Upper Inner Part Number: 11304-74060

Toyota Solara Cover, Timing Belt, Lower Part Number: 11321-0A010

Toyota Solara Front Cover Part Number: 11322-0A020
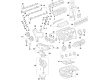
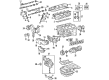
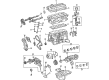
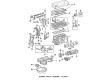
Toyota Solara Timing Cover
Choose genuine Timing Cover that pass strict quality control tests. You can trust the top quality and lasting durability. Shopping for OEM Timing Cover for your Toyota Solara? Our website is your one-stop destination. We stock an extensive selection of genuine Toyota Solara parts. The price is affordable so you can save more. It only takes minutes to browse and find the exact fit. Easily add to cart and check out fast. Our hassle-free return policy will keep you stress-free. We process orders quickly for swift delivery. Your parts will arrive faster, so you can get back on the road sooner.
Toyota Solara Timing Cover is another part of the Solara car that helps in making and sustaining it as a superb car among other Toyota brands. Meant for the shielding of the engine's timing mechanism, which may either be a timing belt, timing chain, or the cam belt, the Timing Cover is made using hard wearing materials including; aluminum, plastic or steel. This sort of car design offers the needed protection to the delicate teeth of the timing system and by extension the overall efficiency and safety of the Toyota Solara automobiles. It means that Compatibility with a number of Solara models, the first generation of which produced from 1998 to 2008 and the second generation of which was produced exclusively in 2005, Underlines the importance of the Timing Cover in the line. Most of the Toyota Solara Timing Covers come with gaskets that add to the protection of the engine to guarantee performance. Thus, the Timing Cover is well-known for its reliability, however, those individuals owning Toyota Solara should remember about timely maintenance and the necessity of responding to the complications as soon as possible. Hence, the Toyota Solara Timing Cover is unique in the automotive market because of its sturdy construction and protective functionalities to vehicle owners who desire to optimize their car's performance. This focus on safety and efficiency of the vehicle is amply reflected in this Toyota Solara Timing Cover in regards to Toyota's enduring commitment to quality and creative mechanics in the automotive industry.
Toyota Solara Timing Cover Parts and Q&A
- Q: How to replace the timing cover or timing chain case oil seal on Toyota Solara?A:Before performing the replacement on the timing gear case or timing chain case oil seal you need to take out 3 bolts from the front wheel RH, front fender apron seal RH, engine cover sub-assembly No.1 and engine moving control rod with bracket. Engine mounting stay No.2 RH and engine mounting bracket No.2 RH must be taken out next before removing both the fan and generator V belt. Start by using Special Service Tool: 09960-10010 (09962-01000, 09963-01000) to loosen the pulley bolt but finish removal with Special Service Tool: 09950-40011 (09951-04010, 09952-04010, 09953-04030, 09954-04010, 09955-04041, 09957-04010, 91111-51014). You can remove the timing gear case or timing chain case oil seal with the help of Special Service Tool: 09308-10010 and 09950-60010 (09951-00200). Install new oil seals by applying MP grease to their lips keeping them clear from foreign contaminants then use Special Service Tool: 09223-22010 and strike the oil seal with a hammer until it reaches equal height with the rear oil seal retainer edge and remove all excess grease from the crankshaft. The crankshaft pulley installation requires using Special Service Tool: 09960-10010 (09962-01000, 09963-01000) to insert the pulley bolt while aligning the pulley key with the key groove and torquing to a tightness of 170 Nm (1,733 kgf-cm, 125 ft. lbs.). The procedure calls for mounting engine bracket No.2 RH with 52 Nm torque (531 kgf-cm, 38 ft. lbs.) and engine mounting stay No.2 RH with 64 Nm (653 kgf-cm, 47 ft. lbs.) torque while the engine moving control rod with bracket requires 3 bolts torqued to 64 Nm (653 kgf-cm, 47 ft. lbs.). The procedure ends by fitting the front wheel right-hand side unit while inspecting for engine oil leakage.

Related Toyota Solara Parts
 Toyota Solara Oil Filter
 Toyota Solara Timing Belt
 Toyota Solara Valve Cover Gasket
 Toyota Solara Crankshaft Gear
 Toyota Solara Crankshaft Seal
 Toyota Solara Cylinder Head Gasket
 Toyota Solara Dipstick Tube
 Toyota Solara Rod Bearing
 Toyota Solara Timing Chain
 Toyota Solara Timing Chain Tensioner
 Toyota Solara Valve Stem Seal
 Toyota Solara Variable Timing Sprocket