×
ToyotaParts- Hello
- Login or Register
- Quick Links
- Live Chat
- Track Order
- Parts Availability
- RMA
- Help Center
- Contact Us
- Shop for
- Toyota Parts
- Scion Parts
My Garage
My Account
Cart
OEM 2004 Toyota Solara Timing Cover
Engine Timing Cover- Select Vehicle by Model
- Select Vehicle by VIN
Select Vehicle by Model
orMake
Model
Year
Select Vehicle by VIN
For the most accurate results, select vehicle by your VIN (Vehicle Identification Number).
4 Timing Covers found


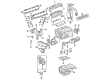
2004 Toyota Solara Cover, Timing Belt, Lower
Part Number: 11321-0A020$50.18 MSRP: $69.84You Save: $19.66 (29%)Ships in 1 Business DayProduct Specifications- Other Name: Timing Cover
- Manufacturer Note: (L)
- Position: Lower
- Replaces: 11321-20030
- Part Name Code: 11322A
- Item Weight: 0.60 Pounds
- Item Dimensions: 9.2 x 6.9 x 1.7 inches
- Condition: New
- Fitment Type: Direct Replacement
- SKU: 11321-0A020
- Warranty: This genuine part is guaranteed by Toyota's factory warranty.


2004 Toyota Solara Cover, Timing Belt, Upper Inner
Part Number: 11323-20030$171.54 MSRP: $242.83You Save: $71.29 (30%)Ships in 1-2 Business DaysProduct Specifications- Other Name: Timing Cover
- Position: Upper Inner
- Part Name Code: 11322C
- Item Weight: 2.30 Pounds
- Item Dimensions: 34.0 x 8.4 x 8.7 inches
- Condition: New
- Fitment Type: Direct Replacement
- SKU: 11323-20030
- Warranty: This genuine part is guaranteed by Toyota's factory warranty.


2004 Toyota Solara Timing Cover, Upper Outer
Part Number: 11303-20040$91.00 MSRP: $127.73You Save: $36.73 (29%)Ships in 1-3 Business DaysProduct Specifications- Other Name: Cover Sub-Assembly, Timing Chain; Engine Timing Cover, Outer Upper; Front Cover; Upper Timing Cover; Outer Timing Cover; Cover, Timing Belt
- Manufacturer Note: (J)
- Position: Upper Outer
- Replaces: 11303-0A031, 11303-0A030
- Part Name Code: 11322B
- Item Weight: 1.30 Pounds
- Item Dimensions: 11.2 x 9.0 x 2.9 inches
- Condition: New
- Fitment Type: Direct Replacement
- SKU: 11303-20040
- Warranty: This genuine part is guaranteed by Toyota's factory warranty.

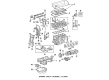
2004 Toyota Solara Timing Cover
Part Number: 11310-0H010$237.76 MSRP: $339.47You Save: $101.71 (30%)Ships in 1-3 Business DaysProduct Specifications- Other Name: Cover Assembly, Timing Chain Or Belt; Engine Timing Cover; Front Cover; Cover Sub-Assembly, Timing Chain Or Belt
- Part Name Code: 11302
- Item Weight: 6.80 Pounds
- Item Dimensions: 12.7 x 9.9 x 2.7 inches
- Condition: New
- Fitment Type: Direct Replacement
- SKU: 11310-0H010
- Warranty: This genuine part is guaranteed by Toyota's factory warranty.
2004 Toyota Solara Timing Cover
Looking for affordable OEM 2004 Toyota Solara Timing Cover? Explore our comprehensive catalogue of genuine 2004 Toyota Solara Timing Cover. All our parts are covered by the manufacturer's warranty. Plus, our straightforward return policy and speedy delivery service ensure an unparalleled shopping experience. We look forward to your visit!
2004 Toyota Solara Timing Cover Parts Q&A
- Q: How to replace the timing cover or timing chain case oil seal on 2004 Toyota Solara?A: Begin the procedure to replace the timing gear case or timing chain case oil seal by unbolting the three clips from the front wheel RH and the front fender apron seal RH along with the engine cover sub-assy No.1 and engine moving control rod with bracket. The replacement process begins by taking out engine mounting stay No.2 RH and engine mounting bracket No.2 RH and progressing to fan and generator V belt elimination. First loosen the crankshaft pulley bolt with Special Service Tool: 09960-10010 (09962-01000, 09963-01000) before removing it with Special Service Tool: 09950-40011 (09951-04010, 09952-04010, 09953-04030, 09954-04010, 09955-04041, 09957-04010, 91111-51014). Use Special Service Tool: 09308-10010 and 09950-60010 (09951-00200) to extract the timing gear case or timing chain case oil seal. Installation begins with applying MP grease to the new oil seal against its lip and ensuring foreign substances stay away. Special Service Tool: 09223-22010 together with a hammer allows personnel to tap in the oil seal until it reaches flush with the rear oil seal retainer edge before wiping off excess grease from the crankshaft. The crankshaft pulley reinstallation requires alignment of the pulley set key with its key groove while using Special Service Tool: 09960-10010 (09962-01000, 09963-01000) to insert the pulley bolt until it reaches 170 Nm (1,733 kgf-cm, 125 ft. lbs.) torque. The service procedure includes reattaching the fan and generator V belt and engine mounting bracket No.2 RH along with its specific torque of 52 Nm (531 kgf-cm, 38 ft. lbs.) and adding engine mounting stay No.2 RH with 64 Nm (653 kgf-cm, 47 ft. lbs.) torque followed by engine moving control rod with bracket bolt attachment torque at 64 Nm (653 kgf-cm, 47 ft. lbs.). The last step requires reinstalling the right-hand front wheel followed by a leak inspection of engine oil.
Related 2004 Toyota Solara Parts
 2004 Toyota Solara Timing Belt
 2004 Toyota Solara Cam Gear
 2004 Toyota Solara Camshaft Seal
 2004 Toyota Solara Cylinder Head
 2004 Toyota Solara Dipstick Tube
 2004 Toyota Solara Engine Mount Torque Strut
 2004 Toyota Solara Piston
 2004 Toyota Solara Piston Ring Set
 2004 Toyota Solara Timing Chain
 2004 Toyota Solara Timing Chain Guide
 2004 Toyota Solara Timing Cover Gasket
 2004 Toyota Solara Valve Stem Seal