×
ToyotaParts- Hello
- Login or Register
- Quick Links
- Live Chat
- Track Order
- Parts Availability
- RMA
- Help Center
- Contact Us
- Shop for
- Toyota Parts
- Scion Parts
My Garage
My Account
Cart
OEM Toyota RAV4 Camshaft
Cam- Select Vehicle by Model
- Select Vehicle by VIN
Select Vehicle by Model
orMake
Model
Year
Select Vehicle by VIN
For the most accurate results, select vehicle by your VIN (Vehicle Identification Number).
18 Camshafts found


Toyota RAV4 Camshaft Part Number: 13502-74030
$363.98 MSRP: $533.43You Save: $169.45 (32%)Ships in 1-3 Business Days


Toyota RAV4 Camshaft Part Number: 13501-28060
$343.78 MSRP: $503.81You Save: $160.03 (32%)

Toyota RAV4 Camshaft Part Number: 13502-28010
$356.95 MSRP: $523.11You Save: $166.16 (32%)Ships in 1-3 Business Days

Toyota RAV4 Camshaft Part Number: 13501-28010
$359.56 MSRP: $526.93You Save: $167.37 (32%)Ships in 1-3 Business Days
Toyota RAV4 Camshaft Part Number: 13502-F0020
$362.05 MSRP: $530.60You Save: $168.55 (32%)Ships in 1-3 Business Days
Toyota RAV4 Camshaft Part Number: 13501-F0030
$362.05 MSRP: $530.60You Save: $168.55 (32%)Ships in 1-3 Business Days
Toyota RAV4 Camshaft Part Number: 13502-36030
$372.95 MSRP: $546.56You Save: $173.61 (32%)Ships in 1-3 Business Days
Toyota RAV4 Camshaft Part Number: 13501-36050
$383.28 MSRP: $561.70You Save: $178.42 (32%)Ships in 1-3 Business Days
Toyota RAV4 Camshaft Sub-Assembly Part Number: 13053-31031
$458.52 MSRP: $671.96You Save: $213.44 (32%)Ships in 1-3 Business Days
Toyota RAV4 Camshaft Part Number: 13502-31061
$541.61 MSRP: $793.74You Save: $252.13 (32%)Ships in 1-3 Business Days
Toyota RAV4 Camshaft Part Number: 13501-31091
$537.30 MSRP: $787.41You Save: $250.11 (32%)Ships in 1-3 Business Days
Toyota RAV4 Camshaft Sub-Assembly Part Number: 13054-31061
$533.55 MSRP: $781.93You Save: $248.38 (32%)Ships in 1-3 Business Days
Toyota RAV4 Camshaft Part Number: 13053-31061
$541.61 MSRP: $793.74You Save: $252.13 (32%)Ships in 1-3 Business Days
Toyota RAV4 Camshaft Part Number: 13502-28030
$323.51 MSRP: $461.90You Save: $138.39 (30%)Ships in 1-3 Business Days
Toyota RAV4 Camshaft Part Number: 13502-F0010
$349.49 MSRP: $499.00You Save: $149.51 (30%)Ships in 1-3 Business DaysToyota RAV4 Camshaft Part Number: 13501-F0010
$349.49 MSRP: $499.00You Save: $149.51 (30%)Ships in 1-3 Business Days

Toyota RAV4 Camshaft Part Number: 13501-74050

Toyota RAV4 Camshaft Part Number: 13501-28040
$359.22 MSRP: $526.44You Save: $167.22 (32%)
Toyota RAV4 Camshaft
Choose genuine Camshaft that pass strict quality control tests. You can trust the top quality and lasting durability. Shopping for OEM Camshaft for your Toyota RAV4? Our website is your one-stop destination. We stock an extensive selection of genuine Toyota RAV4 parts. The price is affordable so you can save more. It only takes minutes to browse and find the exact fit. Easily add to cart and check out fast. Our hassle-free return policy will keep you stress-free. We process orders quickly for swift delivery. Your parts will arrive faster, so you can get back on the road sooner.
Toyota RAV4 Camshaft Parts and Q&A
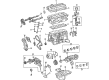
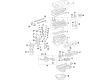
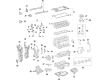
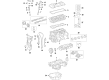
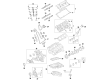
- Q: How to remove the camshaft on Toyota RAV4?A:One must begin camshaft removal from the 2AR-FE engine by removing the negative battery cable then waiting at least 90 seconds until the SRS system disables. After disconnecting the timing chain cover you should proceed with the next step. The No. 1 cylinder needs to align with TDC/compression by inserting the crankshaft pulley bolt temporarily during which you rotate the crankshaft clockwise before removing the pulley bolt. The procedure to remove the timing chain guide starts with bolt removal followed by taking out the No. 1 chain tensioner assembly and letting the plunger extend while rotating the stopper plate counterclockwise to unlock it. Push the plunger into the tensioner then set the lock by moving the stopper plate clockwise and inserting a pin into its hole. Finally, remove the two bolts and chain tensioner and gasket. First remove the slipper bolt to release the chain tensioner slipper before proceeding to remove the chain sub-assembly and No. 1 chain vibration damper through its two bolts. To remove the bolt along with the camshaft timing gear from the hexagonal camshaft section use a wrench while taking caution not to damage either the cylinder head or spark plug tube and refrain from breaking down the camshaft timing gear. Repetition of this method must occur for the exhaust gear assembly of camshaft timing. Use a screwdriver to gently separate the cylinder head from the camshaft housing while removing 20 bearing cap bolts stocked in a particular sequence and ensure you do not scar the contact areas. The process requires removal of the camshaft bearing cap through sequential removal of 11 bearing cap bolts and subsequent removal of 5 bearing caps before arranging the parts in correct order. To start the repair process one must first remove the oil control valve filter followed by the No. 1 camshaft bearing before taking out the No. 1 and No. 2 camshafts. Follow the last step by taking out the No. 2 camshaft bearing and both the 16 valve rocker arms along with the 16 valve lash adjusters from the cylinder head while properly arranging all components.
- Q: How to install the camshaft on Toyota RAV4?A:Begin the camshaft installation by setting the camshaft timing gear first if reusing it to the advanced position after unlocking the pin or installing a fresh one after the camshafts reach their positions. During camshaft building verify that the timing gear assembly stays prevented from clock-wise rotation. The No. 1 knock pin on the camshaft must align precisely with the timing gear's pin hole so the camshaft does not have space between itself and the camshaft flange. Use hand pressure to fix each camshaft before tool-free installation of the timing gear bolt to protect the lock pin. Run air pressure on the timing gear assembly counterclockwise as you apply vinyl tape to block the oil paths and clean the camshaft journal with non-residue solvent. Return the valve lash adjuster assembly to its original positions before installing both its external rubber pieces and tape. Engine oil must be applied to the tips of each lash adjuster and valve stem caps just before valve rocker arm installation. Start with the installation of No. 1 and No. 2 camshaft bearings before adding the oil control valve filter. After cleaning the camshaft journals along with the housing and bearing caps add engine oil before installing the No. 1 and No. 2 camshafts. Install the camshaft bearing bolts while confirming their position placement to permit smooth camshaft rotation. Seal packing should be added to the camshaft housing before inserting the knock pins while the housing must be torqued according to specification. The installation requires the camshaft timing gear assembly and the camshaft timing exhaust gear assembly to be secured with specified torque values. Fill the specified oil hole with 50 cc of engine oil after making sure the lash adjusters contain enough lubrication. To set the No. 1 cylinder at TDC position temporarily install the crankshaft pulley bolt for rotating the crankshaft. Implement the chain vibration damper together with the chain sub-assembly while maintaining proper alignment between marking plates and timing positions. Follow the torque procedure to fasten the chain and set both the chain tensioner slipper and No. 1 chain tensioner assembly. After placing the timing chain guide verify the correct location of the No. 1 cylinder at TDC once again. Complete the procedure by installing the timing chain cover before reconnecting the negative battery terminal and doing the Reset Memory process if the engine assembly received replacement.


Related Toyota RAV4 Parts
 Toyota RAV4 Timing Chain
 Toyota RAV4 Oil Filler Cap
 Toyota RAV4 Camshaft Bearing
 Toyota RAV4 Crankshaft Seal
 Toyota RAV4 Dipstick Tube
 Toyota RAV4 Exhaust Valve
 Toyota RAV4 Intake Valve
 Toyota RAV4 Piston
 Toyota RAV4 Rod Bearing
 Toyota RAV4 Spool Valve
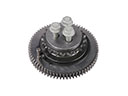 Toyota RAV4 Timing Idler Gear
 Toyota RAV4 Valve Stem Seal