×
ToyotaParts- Hello
- Login or Register
- Quick Links
- Live Chat
- Track Order
- Parts Availability
- RMA
- Help Center
- Contact Us
- Shop for
- Toyota Parts
- Scion Parts
My Garage
My Account
Cart
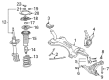
OEM Toyota MR2 Spyder Control Arm
Suspension Arm- Select Vehicle by Model
- Select Vehicle by VIN
Select Vehicle by Model
orMake
Model
Year
Select Vehicle by VIN
For the most accurate results, select vehicle by your VIN (Vehicle Identification Number).
2 Control Arms found


Toyota MR2 Spyder Lower Control Arm, Driver Side Part Number: 48069-19156
$257.08 MSRP: $367.06You Save: $109.98 (30%)Ships in 1-3 Business Days
Toyota MR2 Spyder Lower Control Arm, Passenger Side Part Number: 48068-19176
$257.08 MSRP: $367.06You Save: $109.98 (30%)Ships in 1-3 Business Days
Toyota MR2 Spyder Control Arm
Choose genuine Control Arm that pass strict quality control tests. You can trust the top quality and lasting durability. Shopping for OEM Control Arm for your Toyota MR2 Spyder? Our website is your one-stop destination. We stock an extensive selection of genuine Toyota MR2 Spyder parts. The price is affordable so you can save more. It only takes minutes to browse and find the exact fit. Easily add to cart and check out fast. Our hassle-free return policy will keep you stress-free. We process orders quickly for swift delivery. Your parts will arrive faster, so you can get back on the road sooner.
Toyota MR2 Spyder Control Arm is one of the parts that greatly contribute towards the enhancement of the vehicle and its efficiency. Within the structure of the Toyota MR2 Spyder, the Control Arm is a component that connects the frame of the car to turning wheels, and it helps to support the suspension system in order to allow the wheels to move accordingly when adjusting to the roads' surfaces. This functionality is crucial for keeping the wheels correctly aligned and its suspension geometry important to know for the sporty transformation of the Toyota MR2 Spyder. The lower control arms of MR2 Spyder in most cases use components that are extremely durable in steel, iron or aluminum but are light in weight. Interestingly, some of the Toyota MR2 Spyder came with Control Arms having extra high rating designed for improved handling that have reinforced bushing and ball joints that would be adequate for daily use as well as racing. The Toyota MR2 Spyder model was manufactured between 1999 and 2007, and nowadays, it is possible to find compatible models of Control Arm essential for the car. This flexibility not only improves the performance and safety of the car but proves the car model Toyota MR2 Spyder in automotive industry. Given the fact that the Toyota MR2 Spyder is itself a well designed and well built car it's not surprising that manufacturers like SP Performance have produced parts such as the Spyder Control Arm that are extremely beefy and give a real strong suggestion of the quality that is intrinsic in a Toyota.
Toyota MR2 Spyder Control Arm Parts and Q&A
- Q: How to service and repair the rear lower Control Arm and strut rod on Toyota MR2 Spyder?A:Service technicians should start the repair of rear lower suspension and strut components by removing engine under cover panels. Start by removing the strut rod through the process of bolting out 2 bolts and 2 nuts while keeping nuts static and tightly bolting the rods to 78 Nm (796 kgf-cm, 58 ft. lbs.) after suspension stabilization. The No. 1 lower suspension arm requires removal by disassembling 2 bolts and 2 nuts followed by torquing bolt A to 87 Nm (887 kgf-cm, 64 ft. lbs.) and bolt B to 103 Nm (1,051 kgf-cm, 76 ft. lbs.) - maintenance procedures must exclude turning the nuts while post-stabilization torque applications should be made. The installation procedure for the No. 2 lower suspension arm requires marking both the cam plate and suspension member before removing the nut, cam plate and cam bolt that need to be torqued to 87 Nm (887 kgf-cm, 64 ft. lbs.) when completed. The technician should remove the nut which requires 49 Nm (500 kgf-cm, 36 ft. lbs.) torque before applying a new nut and torquing it once suspension stability has been achieved. The removal of the No. 2 lower suspension arm requires the application of Special Service Tool: 09610-20012. Installation follows the opposite steps of removal and you should inspect rear wheel alignment after setup.
- Q: How to service and repair the front control arm on Toyota MR2 Spyder?A:Begin front control arm service by taking out the front wheel along with the stabilizer bar link by unthreading it from the stabilizer bar. Safeguard the stud using a 5 mm hexagon wrench because the ball joint follows the nut's rotation. The service begins by removing the Brake Caliper and disc through removal of its two bolts followed by safe caliper maintenance. The ABS speed sensor connector requires removal before proceeding to disconnect the front axle hub by removing its 4 bolts and separating the axle hub assembly and dust cover from each other. The lower suspension arm requires removal from the steering knuckle through disconnection of the cotter pin and nut while using Special Service Tool: 09628-62011 to disconnect the arm. Disassemble the system by taking out the 4 bolts, nut, suspension member brace and front lower suspension arm but never turn the nut. Check for damage in the ball joint boot before testing the ball joint rotation with the stud's 5 cycles of flipping motion. Follow this by measuring the turning torque using a torque wrench set to 0.59 - 3.43 Nm (6 - 35 kgf-cm, 5.2 - 30 inch lbs.). To install the new lower suspension arm it requires use of Special Service Tool: 09710-26011 (09710-05061) along with a wooden block and press to press in a new washer. The lower suspension arm and suspension member brace should be secured temporarily by 4 bolts and nut before stabilizing the suspension before bolting torque tests begin. Use tool 09710-26011 (09710-05061) coupled with a wooden block and Special Service Tool: 09710-26011 to torque bolt A to 73 Nm (745 kgf-cm, 54 ft. lbs.), bolt B to 87 Nm (887 kgf-cm, 64 ft. lbs.) and bolts C to 75 Nm (765 kgf-cm, 55 ft. lbs.). Connect the lower suspension arm to the steering knuckle with the nut before torquing it to 98 Nm (1,000 kgf-cm, 72 ft. lbs.) and follow by adding a new cotter pin that requires further nut tightening to 60 degrees when the holes are not properly aligned. Install the dust cover then the axle hub using 4 bolts that must receive torque of 56 Nm (571 kgf-cm, 41 inch lbs.) before reconnecting the ABS speed sensor and attaching the disc and brake caliper with 2 bolts at 109 Nm (1,112 kgf-cm, 80 ft. lbs.). To complete the procedure install the stabilizer bar link together with 3 retainers and 2 cushions to the lower suspension arm before torquing a nut to 18 Nm (184 kgf-cm, 13 ft. lbs.). Finally connect the stabilizer bar link to the stabilizer bar with the nut torquing to 44 Nm (449 kgf-cm, 32 ft. lbs.) using a 5 mm hexagon wrench if required and finish assembly by installing the front wheel and torquing it to 103 Nm (1,050 kgf-cm, 76 ft. lbs.).


Related Toyota MR2 Spyder Parts
 Toyota MR2 Spyder Bump Stop
 Toyota MR2 Spyder Camber and Alignment Kit
 Toyota MR2 Spyder Coil Spring Insulator
 Toyota MR2 Spyder Coil Springs
 Toyota MR2 Spyder Control Arm Bolt
 Toyota MR2 Spyder Steering Knuckle
 Toyota MR2 Spyder Strut Housing
 Toyota MR2 Spyder Strut Mounts
 Toyota MR2 Spyder Sway Bar Bracket
 Toyota MR2 Spyder Sway Bar Bushing
 Toyota MR2 Spyder Sway Bar Link
 Toyota MR2 Spyder Sway Bars
Browse Toyota MR2 Spyder Control Arm by Years
2005
2004
2003
2002
2001
2000