×
ToyotaParts- Hello
- Login or Register
- Quick Links
- Live Chat
- Track Order
- Parts Availability
- RMA
- Help Center
- Contact Us
- Shop for
- Toyota Parts
- Scion Parts
My Garage
My Account
Cart
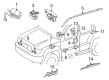
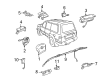
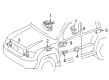
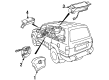
OEM Toyota Land Cruiser Air Bag
Air Bag Module- Select Vehicle by Model
- Select Vehicle by VIN
Select Vehicle by Model
orMake
Model
Year
Select Vehicle by VIN
For the most accurate results, select vehicle by your VIN (Vehicle Identification Number).
25 Air Bags found


Toyota Land Cruiser Knee Inflator Module, Black, Lower Passenger Side
Part Number: 73990-60011-C0$810.04 MSRP: $1187.12You Save: $377.08 (32%)Ships in 1-3 Business Days
Toyota Land Cruiser Inflator Curtain, Driver Side
Part Number: 62180-60030$1325.10 MSRP: $1941.95You Save: $616.85 (32%)Ships in 1-3 Business Days
Toyota Land Cruiser Knee Inflator Module, Flaxen
Part Number: 73990-60010-A1$822.85 MSRP: $1205.90You Save: $383.05 (32%)Ships in 1-3 Business Days
Toyota Land Cruiser Knee Inflator Module, Lower Passenger Side
Part Number: 73990-60011-A0$820.42 MSRP: $1202.33You Save: $381.91 (32%)Ships in 1-3 Business DaysToyota Land Cruiser Knee Air Bag, Beige, Passenger Side
Part Number: 73990-60010-E0$934.83 MSRP: $1370.01You Save: $435.18 (32%)Ships in 1-3 Business DaysToyota Land Cruiser Inflator Curtain, Passenger Side
Part Number: 62170-60040$1325.10 MSRP: $1941.95You Save: $616.85 (32%)Ships in 1-3 Business Days
Toyota Land Cruiser Knee Air Bag, Beige, Driver Side
Part Number: 73900-60010-E0$996.86 MSRP: $1460.91You Save: $464.05 (32%)Ships in 1-3 Business Days
Toyota Land Cruiser Passenger Air Bag
Part Number: 73960-60160$685.68 MSRP: $1004.86You Save: $319.18 (32%)Ships in 1-3 Business Days
Toyota Land Cruiser Side Impact Inflator Module, Passenger Side
Part Number: 73910-60020$392.93 MSRP: $575.84You Save: $182.91 (32%)Ships in 1-3 Business DaysToyota Land Cruiser Knee Inflator Module, Beige, Lower Passenger Side
Part Number: 73990-60011-E1$747.39 MSRP: $1095.30You Save: $347.91 (32%)Ships in 1-3 Business Days
Toyota Land Cruiser Air Bag Assembly, Instrument Panel Passenger W/O Door
Part Number: 73960-60170$584.06 MSRP: $855.95You Save: $271.89 (32%)Ships in 1-3 Business DaysToyota Land Cruiser Passenger Air Bag
Part Number: 73960-60120$751.70 MSRP: $1101.62You Save: $349.92 (32%)Ships in 1-3 Business Days
Toyota Land Cruiser Knee Inflator Module, Lower Driver Side
Part Number: 73900-60090-A0$820.42 MSRP: $1202.33You Save: $381.91 (32%)Ships in 1-3 Business DaysToyota Land Cruiser Air Bag Assembly, Instrument Panel, Lower, Driver Side
Part Number: 73900-60090-C0$807.54 MSRP: $1183.46You Save: $375.92 (32%)Ships in 1-3 Business Days
Toyota Land Cruiser Inflator Curtain, Driver Side
Part Number: 62180-60140$1111.61 MSRP: $1629.08You Save: $517.47 (32%)Ships in 1-3 Business DaysToyota Land Cruiser Knee Inflator Module, Flaxen, Lower Passenger Side
Part Number: 73990-60011-A1$822.85 MSRP: $1205.90You Save: $383.05 (32%)Ships in 1-3 Business DaysToyota Land Cruiser Knee Inflator Module, Beige, Lower Driver Side
Part Number: 73900-60090-E0$744.96 MSRP: $1091.74You Save: $346.78 (32%)Ships in 1-3 Business Days
Toyota Land Cruiser Inflator Curtain, Driver Side
Part Number: 62180-60060$1097.76 MSRP: $1608.78You Save: $511.02 (32%)Ships in 1-3 Business DaysToyota Land Cruiser Knee Inflator Module, Flaxen, Lower Driver Side
Part Number: 73900-60090-A2$820.42 MSRP: $1202.33You Save: $381.91 (32%)Ships in 1-3 Business Days
| Page 1 of 2 |Next >
1-20 of 25 Results
Toyota Land Cruiser Air Bag
Choose genuine Air Bag that pass strict quality control tests. You can trust the top quality and lasting durability. Shopping for OEM Air Bag for your Toyota Land Cruiser? Our website is your one-stop destination. We stock an extensive selection of genuine Toyota Land Cruiser parts. The price is affordable so you can save more. It only takes minutes to browse and find the exact fit. Easily add to cart and check out fast. Our hassle-free return policy will keep you stress-free. We process orders quickly for swift delivery. Your parts will arrive faster, so you can get back on the road sooner.
Toyota Land Cruiser Air Bag Parts and Q&A
- Q: How should the front passenger Air Bag assembly be inspected after a collision on Toyota Land Cruiser?A:Visual inspection of the front passenger Air Bag assembly must happen as soon as possible after an automobile accident. Start the inspection by examining the system diagnostic results. Check for surface or grooved portion discoloration and cuts or cracks in the front passenger Air Bag during visual inspection when it remains installed in the vehicle unless the vehicle did not suffer collision damage to the Air Bags. Any detected defects in the front passenger Air Bag must require installing a new replacement. Check the Air Bag directly for cuts/creaks/discoloration while inspecting for connector damage on the instrument panel and its reinforcement when dealing with vehicles that experienced collisions without deploying the Air Bag. The technician should substitute front passenger Air Bags with fresh units whenever defects are detected. Set the correct protocols for both Air Bag removal and installation whenever you modify the front passenger Air Bag system.
- Q: How to remove and reinstall the side Air Bag from the front seat on Toyota Land Cruiser?A:Follow this method to detach the side Air Bag starting with the front seat removal through elimination of the 4 seat track covers and 4 bolts before disconnecting the power seat and side Air Bag connector without harming the Air Bag wire harness. The seatback board requires removal using a sequential process starting with letter "A" followed by "B" according to displayed illustrations. Moving forward with the operation remove the Seat Cushion outer shield through screw removal and connector separation of four assembly points. To detach the front seat inner belt begin by untightening the clamp followed by discharging the connector then unfastening the bolt and inner belt. The seat cushion inner shield becomes accessible after unfastening three screws followed by unfastening the screw holding the lower seat cushion shield. Remove the front seat cushion shield by extracting its screw and proceed to remove the assembly through 4 bolt and clamping removal. To decommission the seatback assembly first detach its hog rings then release its hook before removing 4 bolts and disconnecting all connectors. Proper handling of the Air Bag connector protects it from harm so you must first remove two screws and the RH reclining adjuster inside shield before you disconnect the side Air Bag connector. Start by unwiring the headrest supports and then proceed to the armrest removal through hog rings, clamps and 2 bolt removal. Install the lumber support using two bolts before adding the seatback cover with pad to the seatback frame through new hog rings and clamps and two bolts applied at 4.7 N.m (48 kgf.cm, 42 in.lbf). Install 2 headrest supports before placing the Air Bag connector on the inner seat adjuster and installing the RH reclining adjuster inside shield at the correct position. Use 4 bolts to connect the seatback assembly at 43 N.m (440 kgf.cm, 32 ft.lbf) torque yet insist on replacement when damage occurs or when the assembly makes contact with any material. First connect the connectors and put the hook into its place. Finally, install new hog rings. The installation of the armrest should begin at 37 N.m (380 kgf.cm, 27 ft.lbf) torque setting and complete with the headrest afterward. The seat cushion assembly requires four bolts installation at 21 N.m (210 kgf.cm, 15 ft.lbf) while simultaneously connecting the wire harness clamp. The automotive professional should install the front seat cushion shield using a screw first followed by installing the lower seat cushion shield using screws. To install the front seat inner belt start by clamping it and connecting its connector along with berating the bolt to 42 N.m (430 kgf.cm, 31 ft.lbf). Fasten the seat cushion outer shield connector ends before securing it with 4 screws then set back the seatboard and reposition the front seat while connecting the connectors and torquing 4 bolts up to 42 N.m (430 kgf.cm, 31 ft.lbf) before restoring the 4 track covers.


Related Toyota Land Cruiser Parts
 Toyota Land Cruiser Air Bag Control Module
 Toyota Land Cruiser Air Bag Sensor
 Toyota Land Cruiser Antenna
 Toyota Land Cruiser Antenna Cable
 Toyota Land Cruiser Clock Spring
 Toyota Land Cruiser Cooling Fan Module
 Toyota Land Cruiser Dimmer Switch
 Toyota Land Cruiser Distributor Cap
 Toyota Land Cruiser Engine Control Module
 Toyota Land Cruiser Headlight Relay
 Toyota Land Cruiser Spark Plug Wire
 Toyota Land Cruiser Turn Signal Switch