×
ToyotaParts- Hello
- Login or Register
- Quick Links
- Live Chat
- Track Order
- Parts Availability
- RMA
- Help Center
- Contact Us
- Shop for
- Toyota Parts
- Scion Parts
My Garage
My Account
Cart
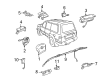
OEM 2007 Toyota Land Cruiser Air Bag
Air Bag Module- Select Vehicle by Model
- Select Vehicle by VIN
Select Vehicle by Model
orMake
Model
Year
Select Vehicle by VIN
For the most accurate results, select vehicle by your VIN (Vehicle Identification Number).
3 Air Bags found

2007 Toyota Land Cruiser Inflator Curtain, Driver Side
Part Number: 62180-60030$1325.10 MSRP: $1941.95You Save: $616.85 (32%)Ships in 1-3 Business DaysProduct Specifications- Other Name: Air Bag Assembly, Curtain Shield; Curtain Air Bag, Left; Head Air Bag; Air Bag Assembly, Curtain Shield, Driver Side
- Position: Driver Side
- Part Name Code: 62180A
- Item Weight: 11.40 Pounds
- Item Dimensions: 49.2 x 19.4 x 9.7 inches
- Condition: New
- Fitment Type: Direct Replacement
- SKU: 62180-60030
- Warranty: This genuine part is guaranteed by Toyota's factory warranty.
2007 Toyota Land Cruiser Inflator Curtain, Passenger Side
Part Number: 62170-60040$1325.10 MSRP: $1941.95You Save: $616.85 (32%)Ships in 1-3 Business DaysProduct Specifications- Other Name: Air Bag Assembly, Curtain Shield; Curtain Air Bag, Right; Head Air Bag; Air Bag Assembly, Curtain Shield, Passenger Side
- Position: Passenger Side
- Part Name Code: 62170A
- Item Weight: 12.10 Pounds
- Item Dimensions: 47.8 x 19.3 x 10.0 inches
- Condition: New
- Fitment Type: Direct Replacement
- SKU: 62170-60040
- Warranty: This genuine part is guaranteed by Toyota's factory warranty.

2007 Toyota Land Cruiser Passenger Air Bag
Part Number: 73960-60160$685.68 MSRP: $1004.86You Save: $319.18 (32%)Ships in 1-3 Business DaysProduct Specifications- Other Name: Air Bag Assembly, Instrument Panel; Instrument Panel Air Bag, Upper; Passenger Inflator Module; Air Bag Assembly, Instrument Panel Passenger W/O Door
- Part Name Code: 73960A
- Item Weight: 8.30 Pounds
- Item Dimensions: 16.1 x 12.0 x 8.0 inches
- Condition: New
- Fitment Type: Direct Replacement
- SKU: 73960-60160
- Warranty: This genuine part is guaranteed by Toyota's factory warranty.
2007 Toyota Land Cruiser Air Bag
Looking for affordable OEM 2007 Toyota Land Cruiser Air Bag? Explore our comprehensive catalogue of genuine 2007 Toyota Land Cruiser Air Bag. All our parts are covered by the manufacturer's warranty. Plus, our straightforward return policy and speedy delivery service ensure an unparalleled shopping experience. We look forward to your visit!
2007 Toyota Land Cruiser Air Bag Parts Q&A
- Q: What precautions should be taken when arming and disarming the Air Bag system to ensure safety on 2007 Toyota Land Cruiser?A: The use of seat accessories or modification of upholstery covering the front seat areas should be avoided because it stops the front passenger Air Bag from accurate activation which can result in fatal injuries. Unsafe service techniques on this vehicle with its Supplemental Restraint System (SRS) components can cause unexpected activation of its steering pad and front passenger Air Bag and side Air Bag and curtain shield Air Bag and front seat belt pretensioner. A service maintenance period must await 90 seconds of inactivity after switching OFF the ignition and negative terminal battery removal to stop accidental SRS component deployment. The replacement of the occupant classification ECU combined with the occupant classification sensor along with the seat cushion cover pad and cover needs to happen as one complete unit. Furthermore, SRS parts must never encounter heat or fire during servicing. The diagnosis of SRS part malfunctions starts with confirming DTC error codes before working on the negative (-) battery terminal. The inspection of SRS components is necessary after a minor collision while Air Bag sensors need removal when the repair area threatens the sensors. New SRS components should always be used during replacements while avoiding any disassembly or repair attempts and requiring replacement for dropped or defective SRS components. The utilization of high impedance ohmmeter/voltmeter devices (minimum 10 kohms/V) assists in electrical troubleshooting with SRS parts according to attached information labels. Checking the SRS warning light is crucial when finishing SRS part installations because the negative (-) terminal battery switch clears all memory storage automatically yet requires prior note-taking and after-repair customization adjustment. The installation or adjustment of Air Bag sensors must wait for ninety seconds following negative terminal (-) detachment. All Air Bag sensor connectors require proper installation and the repair process must exclude the use of sensors that have suffered drops. If Air Bags fail to open during a crash you should examine DTCs through the SRS warning light followed by sensor replacement in all cases where Air Bags have activated. The identification feature of SRS connectors is yellow and these components contain protective mechanisms that support safe connections and discourage unintentional disconnection. The user needs to release the lock button and perform connector elevation with extreme care for steering pad, front passenger Air Bag, curtain shield Air Bag, and front seat outer belt. The lock button must be completely pressed downward until you hear a clicking sound before reconnection. The lock slider on the front seat side Air Bag needs to slide into position for disconnecting and should automatically return after reconnecting. The procedure to disengage and reconnect front Air Bag sensors as well as side Air Bag sensors and rear Air Bag sensors includes grasping the outer connector locking sleeve before sliding it off followed by ensuring its natural position during reinstallation and verifying a secure fit by listening for the click sound.
Related 2007 Toyota Land Cruiser Parts
 2007 Toyota Land Cruiser Air Bag Control Module
 2007 Toyota Land Cruiser Air Bag Sensor
 2007 Toyota Land Cruiser Antenna
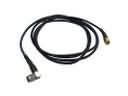 2007 Toyota Land Cruiser Antenna Cable
 2007 Toyota Land Cruiser Clock Spring
 2007 Toyota Land Cruiser Dimmer Switch
 2007 Toyota Land Cruiser Engine Control Module
 2007 Toyota Land Cruiser Headlight Relay
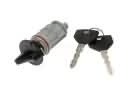 2007 Toyota Land Cruiser Ignition Lock Cylinder
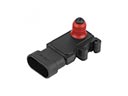 2007 Toyota Land Cruiser MAP Sensor
 2007 Toyota Land Cruiser Turn Signal Flasher
 2007 Toyota Land Cruiser Turn Signal Switch