×
ToyotaParts- Hello
- Login or Register
- Quick Links
- Live Chat
- Track Order
- Parts Availability
- RMA
- Help Center
- Contact Us
- Shop for
- Toyota Parts
- Scion Parts
My Garage
My Account
Cart
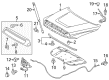
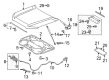
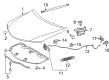
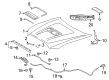
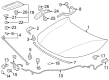
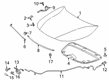
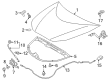
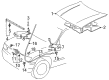
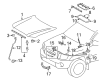
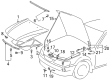
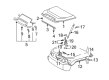
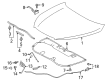
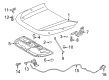
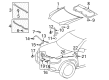
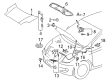
OEM Toyota Hood
Engine Hood- Select Vehicle by Model
- Select Vehicle by VIN
Select Vehicle by Model
orMake
Model
Year
Select Vehicle by VIN
For the most accurate results, select vehicle by your VIN (Vehicle Identification Number).
143 Hoods found


Toyota Hood, Front Part Number: 53301-0C050
$441.73 MSRP: $647.36You Save: $205.63 (32%)Product Specifications- Other Name: Hood Sub-Assembly; Hood Panel, Front
- Position: Front


Toyota Hood, Front Part Number: 53301-35200
$383.96 MSRP: $562.70You Save: $178.74 (32%)Ships in 1-3 Business DaysProduct Specifications- Other Name: Hood Sub-Assembly; Hood Panel, Front
- Position: Front
- Replaces: 53301-35220


Toyota Hood, Front Part Number: 53301-04051
$384.07 MSRP: $562.86You Save: $178.79 (32%)Ships in 1-3 Business DaysProduct Specifications- Other Name: Hood Sub-Assembly; Hood Panel, Front
- Position: Front
- Replaces: 53301-04050


Toyota Hood, Front Part Number: 53301-06150
$395.20 MSRP: $579.16You Save: $183.96 (32%)Ships in 1-3 Business DaysProduct Specifications- Other Name: Hood Sub-Assembly; Hood Panel, Front
- Position: Front


Toyota Hood, Front Part Number: 53301-04220
$407.68 MSRP: $597.46You Save: $189.78 (32%)Product Specifications- Other Name: Hood Sub-Assembly; Hood Panel, Front
- Position: Front


Toyota Hood, Front Part Number: 53301-12B50
$305.92 MSRP: $436.78You Save: $130.86 (30%)Ships in 1-3 Business DaysProduct Specifications- Other Name: Hood Sub-Assembly; Hood Panel, Front
- Manufacturer Note: W/O(PNC 53301B)
- Position: Front
- Replaces: 53301-12B60


Toyota Hood, Front Part Number: 53301-02480
$305.92 MSRP: $436.78You Save: $130.86 (30%)Ships in 1-2 Business DaysProduct Specifications- Other Name: Hood Sub-Assembly; Hood Panel, Front
- Position: Front
- Replaces: 53301-12B70


Toyota Hood, Front Part Number: 53301-47120
$333.64 MSRP: $476.37You Save: $142.73 (30%)Ships in 1-3 Business DaysProduct Specifications- Other Name: Hood Sub-Assembly; Hood Panel, Front
- Position: Front


Toyota Hood, Front Part Number: 53301-04030
$347.87 MSRP: $509.80You Save: $161.93 (32%)Ships in 1-3 Business DaysProduct Specifications- Other Name: Hood Sub-Assembly; Hood Panel, Front
- Position: Front


Toyota Hood, Front Part Number: 53301-35210
$369.89 MSRP: $542.07You Save: $172.18 (32%)Ships in 1-2 Business DaysProduct Specifications- Other Name: Hood Sub-Assembly; Hood Panel, Front
- Position: Front
- Replaces: 53301-35230


Toyota Hood, Front Part Number: 53301-04210
$381.46 MSRP: $559.04You Save: $177.58 (32%)Product Specifications- Other Name: Hood Sub-Assembly; Hood Panel, Front
- Position: Front

Toyota Hood, Front Part Number: 53301-04200
$381.46 MSRP: $559.04You Save: $177.58 (32%)Ships in 1-3 Business DaysProduct Specifications- Other Name: Hood Sub-Assembly; Hood Panel, Front
- Position: Front


Toyota Hood, Front Part Number: 53301-02050
$386.57 MSRP: $566.52You Save: $179.95 (32%)Ships in 1-3 Business DaysProduct Specifications- Other Name: Panel Sub-Assembly, Hood; Hood Panel, Front; Hood Sub-Assembly
- Position: Front

Toyota Hood, Front Part Number: 53301-04230
$408.36 MSRP: $598.46You Save: $190.10 (32%)Ships in 1-3 Business DaysProduct Specifications- Other Name: Hood Sub-Assembly; Hood Panel, Front
- Position: Front


Toyota Hood, Front Part Number: 53301-35190
$417.44 MSRP: $611.77You Save: $194.33 (32%)Ships in 1-3 Business DaysProduct Specifications- Other Name: Hood Sub-Assembly; Hood Panel, Front
- Position: Front


Toyota Hood, Front Part Number: 53301-0E110
$429.36 MSRP: $629.23You Save: $199.87 (32%)Ships in 1-3 Business DaysProduct Specifications- Other Name: Hood Sub-Assembly; Hood Panel, Front
- Position: Front
- Replaces: 53301-0E120


Toyota Hood, Front Part Number: 53301-0R080
$439.23 MSRP: $643.70You Save: $204.47 (32%)Ships in 1-3 Business DaysProduct Specifications- Other Name: Hood Sub-Assembly; Hood Panel, Front
- Position: Front
- Replaces: 53301-42150


Toyota Hood, Front Part Number: 53301-0E050
$448.88 MSRP: $657.85You Save: $208.97 (32%)Ships in 1-3 Business DaysProduct Specifications- Other Name: Hood Sub-Assembly; Hood Panel, Front
- Position: Front
- Replaces: 53301-48120


Toyota Hood, Front Part Number: 53301-52251
$157.56 MSRP: $223.03You Save: $65.47 (30%)Ships in 1-3 Business DaysProduct Specifications- Other Name: Hood Sub-Assembly; Hood Panel, Front
- Position: Front
- Replaces: 53301-52260, 53301-52261, 53301-52250


Toyota Hood, Front Part Number: 53301-52370
$195.13 MSRP: $278.60You Save: $83.47 (30%)Ships in 1-3 Business DaysProduct Specifications- Other Name: Hood Sub-Assembly; Hood Panel, Front
- Position: Front
| Page 1 of 8 |Next >
1-20 of 143 Results
Toyota Hood
OEM parts deliver unmatched quality you can rely on. They pass extensive quality control inspections. Toyota produces them to the official factory specifications. This process helps prevent defects and imperfections. So you can get exceptional lifespan and a flawless fit. Need new OEM Toyota Hood? You'll love our wide selection of genuine options. Shop in minutes and skip the hunt. Our prices are unbeatable, you'll save time and money. It's easy to shop and find the right piece. Our committed customer service team gives professional help from start to finish. Every part includes a manufacturer's warranty. We ship quickly, your parts will arrive fast at your door.
Toyota Hood is a part that protects the engine and also cuts air to enhance efficiency and protect critical components. Established in 1937 and operating on all continents, Toyota manufactures automobiles with a lean production process that reduces wastage, enables rapid repairs on the assembly line, and provides durability that enables their odometers to keep climbing without even dramatizing it. Toyota continues to take hybrid technology to its limit, combining an improved Hybrid Synergy Drive with plug-in RAV4 that travels 42 electric miles before the gasoline engine kicks on. The adjustable TNGA platform lowers the center of gravity, expands tracks, increases torsional rigidity, and aligns both the geometry of the suspension to ensure that Toyota vehicles corner flatter, ride more smoothly, and brake more precisely and consistently at high speed. Proprietors declare their compliments to Toyota about their poverty at the pump, their reliability that cannot be shaken. Hood is made of steel, aluminum, or high-tech composites and it does not dent, dissipates heat, and reduces the front-axle mass to achieve equal steering feel. Strategic creases direct air over the wipers and glass to slogs Hood slashes, works up the wind roar and conserves fuel on long highway runs. Internal bracing allows Hood to bend in an intended pattern as it hits the front, absorbing energy before it can pose any harm to the occupants of the cabin. Huge hinge travel and an easy-to-open latch imply that Hood can open quickly and allow quick fluid checks and rapid roadside inspections.
Toyota Hood Parts and Q&A
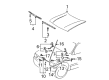
- Q: How to remove, install, and adjust the Hood on Toyota MR2?A:To disarm the HOOD well, use a pencil or paint to draw alignment marks on the upper flange of the hinge then dismantle the mounting bolts of hinge to hood then lastly take off the hood. As for the installation, place the hood and level it according to the marks made before, and fasten and tighten the upper hinge to hood mounting bolts. For adjustment, slacken the side hinge bolts in order to move the hood either forward or backward and in either direction as desired. Movement of the rear edge up or down is controlled by turning of the cushions and the front edge movement can be controlled by adding or removing the number of shims to the hinge-to-body mounting bolts.

Related Toyota Parts
 Toyota Emblem
 Toyota Bumper
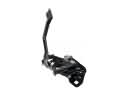 Toyota Hood Latch
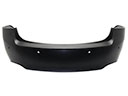 Toyota Bumper Cover
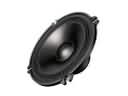 Toyota Car Speakers
 Toyota Hood Release Cable
 Toyota Instrument Cluster
 Toyota Lift Support
 Toyota Windshield Washer Nozzle
 Toyota A/C Switch
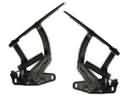 Toyota Hood Hinge
 Toyota Instrument Panel Light Bulb
Browse Toyota Hood by Models
Tacoma 4Runner Camry Tundra Corolla RAV4 Highlander Prius Sienna Land Cruiser Pickup FJ Cruiser 86 Sequoia T100 Avalon Celica Supra Yaris Matrix MR2 Solara Venza GR86 Echo C-HR Cressida Grand Highlander Paseo Previa Prius C Prius Prime bZ4X Corolla Cross Corolla iM Crown Crown Signia GR Corolla Mirai MR2 Spyder Prius V Starlet Tercel Yaris iA Prius Plug-In GR Supra Prius AWD-e RAV4 Prime