×
ToyotaParts- Hello
- Login or Register
- Quick Links
- Live Chat
- Track Order
- Parts Availability
- RMA
- Help Center
- Contact Us
- Shop for
- Toyota Parts
- Scion Parts
My Garage
My Account
Cart
OEM Toyota Highlander Parking Brake Shoe
Emergency Parking Brake Shoe- Select Vehicle by Model
- Select Vehicle by VIN
Select Vehicle by Model
orMake
Model
Year
Select Vehicle by VIN
For the most accurate results, select vehicle by your VIN (Vehicle Identification Number).
14 Parking Brake Shoes found


Toyota Highlander Parking Brake, Driver Side
Part Number: 46590-33020$38.59 MSRP: $53.71You Save: $15.12 (29%)Ships in 1-2 Business Days

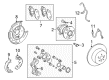
Toyota Highlander Parking Brake Shoes, Driver Side
Part Number: 46590-0E010$32.01 MSRP: $44.56You Save: $12.55 (29%)Ships in 1 Business Day
Toyota Highlander Parking Brake, Passenger Side Or Center
Part Number: 46550-33020$34.64 MSRP: $48.22You Save: $13.58 (29%)Ships in 1-2 Business Days

Toyota Highlander Parking Brake Shoes, Passenger Side Or Center
Part Number: 46550-0E010$29.98 MSRP: $41.73You Save: $11.75 (29%)Ships in 1-3 Business Days

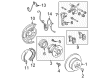
Toyota Highlander Shoe Assembly, Parking Brake, Passenger Side Or Center
Part Number: 46540-20070$34.64 MSRP: $48.22You Save: $13.58 (29%)Ships in 1-2 Business Days

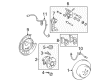
Toyota Highlander Parking Brake Shoes, Driver Side
Part Number: 46590-48030$32.01 MSRP: $44.56You Save: $12.55 (29%)Ships in 1-3 Business Days
Toyota Highlander Parking Brake Shoes, Driver Side
Part Number: 46590-0E040$32.01 MSRP: $44.56You Save: $12.55 (29%)Ships in 1-3 Business Days

Toyota Highlander Parking Brake Shoes, Passenger Side Or Center
Part Number: 46550-48030$32.01 MSRP: $44.56You Save: $12.55 (29%)Ships in 1-3 Business Days

Toyota Highlander Parking Brake Shoes
Part Number: 46540-48030$34.28 MSRP: $47.72You Save: $13.44 (29%)Ships in 1-2 Business Days
Toyota Highlander Shoe Assembly, Parking Brake, Passenger Side Or Center, Rear
Part Number: 46540-48010$29.15 MSRP: $40.57You Save: $11.42 (29%)Ships in 1-3 Business Days
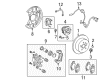
Toyota Highlander Parking Brake Shoes
Part Number: 46540-48040$39.54 MSRP: $55.05You Save: $15.51 (29%)Ships in 1-3 Business Days
Toyota Highlander Parking Brake Shoes, Driver Side
Part Number: 46590-0E020$35.72 MSRP: $49.71You Save: $13.99 (29%)Ships in 1-3 Business DaysToyota Highlander Parking Brake Shoes, Passenger Side Or Center
Part Number: 46550-0E040$32.01 MSRP: $44.56You Save: $12.55 (29%)Ships in 1-2 Business DaysToyota Highlander Parking Brake Shoes, Passenger Side Or Center
Part Number: 46550-0E020$35.72 MSRP: $49.71You Save: $13.99 (29%)Ships in 1-3 Business Days
Toyota Highlander Parking Brake Shoe
Choose genuine Parking Brake Shoe that pass strict quality control tests. You can trust the top quality and lasting durability. Shopping for OEM Parking Brake Shoe for your Toyota Highlander? Our website is your one-stop destination. We stock an extensive selection of genuine Toyota Highlander parts. The price is affordable so you can save more. It only takes minutes to browse and find the exact fit. Easily add to cart and check out fast. Our hassle-free return policy will keep you stress-free. We process orders quickly for swift delivery. Your parts will arrive faster, so you can get back on the road sooner.
Toyota Highlander Parking Brake Shoe Parts and Q&A
- Q: How to overhaul the parking brake shoe on Toyota Highlander?A:Start the parking brake shoe overhaul by dissolving the rear wheel then unfastening the rear disc Brake Caliper assembly LH using two bolts while maintaining attachment of the flexible hose. Secure matchmarks between the rear disc and axle hub before removing the disc but adjust the shoe when the wheel becomes easily spinable. A brake drum gauge should be used to measure the inside diameter of the rear disc where the measurement must fall within 190 mm (7.480 inch) and 191 mm (7.520 inch). Proceed by utilizing needle-nose pliers to remove the 2 parking brake shoe return tension springs No.1 before extracting the parking brake shoe strut LH with its compression spring. The parking brake shoe assembly LH No.1 must be removed through the step of disassembling hold down springs followed by disconnection of the parking brake shoe return spring No.2. When performing the repair sequence remove parking brake shoe adjusting screw set and return tension spring No.2 followed by parking brake shoe assembly LH No.2 while being cautious about disconnection of Parking Brake Cable No.3. The process for 4WD drive types begins with sensor separation of the speed rear LH component before removing the rear axle shaft LH nut with Special Service Tool: 09930-00010 and extracting the rear axle hub & bearing assembly LH. Unfasten the parking brake shoe hold down spring pin No.1 and C-washer using a screwdriver to inspect the parking brake shoe lining thickness because replacement is required if it measures less than 1.0 mm (0.039 inch). Examine the shoe lining contact with the brake disc before applying lining material if required. Insert the parking brake shoe type C washer before measuring its clearance using a feeler gauge until it reaches less than 0.35 mm (0.014 inch). Afterward, install the parking brake shoe lever LH and its shim together with a new C-washer. Spread high temperature grease on contact points of the backing plate followed by installation of the parking brake shoe hold down spring pin No.1 and finally attach the rear axle hub and bearing assembly LH with the rear axle shaft LH nut. Begin with speed sensor rear LH reinstallation followed by connecting parking brake cable No.3 to its shoe lever to complete installation of assembly No.2 parking brake shoe LH along with all its holding components. Install high temperature grease on the parking brake shoe adjusting bolt and piece before adding a return tension spring No.2 and adjusting screw set to each parking brake shoe assembly. Start with the installation of the parking brake shoe assembly LH No.1 alongside its hold down components before adding the parking brake shoe strut LH together with its compression spring. Use needle-nose pliers to install the 2 return tension springs No.1 while performing a check for proper installation and eliminating all oil and grease from contact surfaces. Inspect the bearing backlash and axle hub deviation of 4WD drive types before reinstalling the rear disc by aligning matchmarks. First adjust the parking brake shoe clearance by putting on the hub nuts then removing the hole plug and rotating the adjuster to lock the disc followed by a smooth disc rotation with 8 notches until the brake drag examination is completed before hole plug reinstallation. To complete the job, attach the rear disc brake caliper assembly LH with 2 bolts reaching 78 Nm (800kgf-cm, 58 ft. lbs.) and then install the wheel at 103 Nm (1,050kgf-cm, 76 ft. lbs.). Confirm the ABS speed sensor signal and check parking brake pedal travel for 4WD drive types.

Related Toyota Highlander Parts
 Toyota Highlander ABS Pump And Motor Assembly
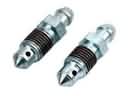 Toyota Highlander Brake Bleeder Screw
 Toyota Highlander Brake Booster Vacuum Hose
 Toyota Highlander Brake Caliper Bracket
 Toyota Highlander Brake Disc
 Toyota Highlander Brake Line
 Toyota Highlander Brake Pad Set
 Toyota Highlander Brake Shoe Set
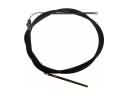 Toyota Highlander Parking Brake Cable
 Toyota Highlander Wheel Cylinder Repair Kit
 Toyota Highlander Wheel Hub
 Toyota Highlander Wheel Stud