×
ToyotaParts- Hello
- Login or Register
- Quick Links
- Live Chat
- Track Order
- Parts Availability
- RMA
- Help Center
- Contact Us
- Shop for
- Toyota Parts
- Scion Parts
My Garage
My Account
Cart
OEM 2004 Toyota Highlander Parking Brake Shoe
Emergency Parking Brake Shoe- Select Vehicle by Model
- Select Vehicle by VIN
Select Vehicle by Model
orMake
Model
Year
Select Vehicle by VIN
For the most accurate results, select vehicle by your VIN (Vehicle Identification Number).
3 Parking Brake Shoes found


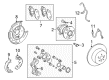
2004 Toyota Highlander Parking Brake Shoes, Driver Side
Part Number: 46590-0E010$32.01 MSRP: $44.56You Save: $12.55 (29%)Ships in 1 Business DayProduct Specifications- Other Name: Shoe Assembly, Parking Brake; Parking Brake Shoe, Rear Left; Shoes; Shoe Assembly, Parking Brake, Driver Side; Parking Brake Shoe
- Position: Driver Side
- Replaces: 46590-48010
- Part Name Code: 46590
- Item Weight: 4.40 Pounds
- Item Dimensions: 10.9 x 8.1 x 4.1 inches
- Condition: New
- Fitment Type: Direct Replacement
- SKU: 46590-0E010
- Warranty: This genuine part is guaranteed by Toyota's factory warranty.


2004 Toyota Highlander Parking Brake Shoes, Passenger Side Or Center
Part Number: 46550-0E010$29.98 MSRP: $41.73You Save: $11.75 (29%)Ships in 1-3 Business DaysProduct Specifications- Other Name: Shoe Assembly, Parking Brake; Parking Brake Shoe, Rear Right; Shoes; Shoe Assembly, Parking Brake, Passenger Side Or Center; Parking Brake Shoe
- Position: Passenger Side Or Center
- Replaces: 46550-48010
- Part Name Code: 46550
- Item Weight: 4.20 Pounds
- Item Dimensions: 10.6 x 8.7 x 3.9 inches
- Condition: New
- Fitment Type: Direct Replacement
- SKU: 46550-0E010
- Warranty: This genuine part is guaranteed by Toyota's factory warranty.

2004 Toyota Highlander Shoe Assembly, Parking Brake, Passenger Side Or Center, Rear
Part Number: 46540-48010$29.15 MSRP: $40.57You Save: $11.42 (29%)Ships in 1-3 Business DaysProduct Specifications- Other Name: Shoe Assembly, Parking Brake; Shoe Assembly, Parking Brake, Driver Side; Parking Brake Shoe
- Position: Rear
- Replaces: 46540-0T010
- Item Weight: 1.20 Pounds
- Item Dimensions: 10.8 x 8.2 x 4.1 inches
- Condition: New
- Fitment Type: Direct Replacement
- SKU: 46540-48010
- Warranty: This genuine part is guaranteed by Toyota's factory warranty.
2004 Toyota Highlander Parking Brake Shoe
Looking for affordable OEM 2004 Toyota Highlander Parking Brake Shoe? Explore our comprehensive catalogue of genuine 2004 Toyota Highlander Parking Brake Shoe. All our parts are covered by the manufacturer's warranty. Plus, our straightforward return policy and speedy delivery service ensure an unparalleled shopping experience. We look forward to your visit!
2004 Toyota Highlander Parking Brake Shoe Parts Q&A
- Q: How to overhaul the parking brake shoe on 2004 Toyota Highlander?A: The parking brake shoe overhaul process starts with removing the rear wheel followed by separating the rear disc brake caliper assembly LH through 2 bolt removal without needing to disconnect the flexible hose. Unpleasant resistance when removing the rear disc indicates wrong adjustment of the parking shoe. Here you should mark components before removal to note correct positions. Check the diameter of the rear disc inside mapping with a brake drum gauge which should fall between 190 mm (7.480 inch) and 191 mm (7.520 inch). Take out the 2 parking brake shoe return tension springs No.1 with needle-nose pliers before removing the parking brake shoe strut LH and its compression spring together. The service technician proceed to remove parking brake shoe assembly LH No.1 by extracting the following components: hold down spring cup No.1 along with hold down spring and hold down spring cup No.2 before removing hold down spring pin No.1 and disconnecting parking brake shoe return spring No.2. You must next remove both the parking brake shoe adjusting screw set and return tension spring No.2. To work on parking brake shoe assembly LH No.2 you should start with removing its hold down spring elements alongside the hold down spring pin No.2 and proceed by disconnecting the parking brake cable No.3 from the shoe lever while being cautious not to damage it. First free the speed sensor rear LH before removing the rear axle shaft LH nut with Special Service Tool: 09930-00010 and afterward extracting the rear axle hub & bearing assembly LH. Use a screwdriver to separate the parking brake shoe hold down spring pin No.1 along with the C-washer. You can then detach the shim and parking brake shoe lever which belong to parking brake shoe assembly LH No.2. Check shoe lining thickness using a ruler and replace it when the measurement is less than 1.0 mm (0.039 inch). Apply chalk to the brake disc and check the contact area with the shoe lining then adjust the lining if insufficient contact is detected. Install type C washer to the parking brake shoe assembly while measuring the clearance with a gauge for a value less than 0.35 mm (0.014 inch) before shim replacement. Begin the installation of the parking brake shoe lever LH and shim with a new C-washer using pliers and finish by applying high-temperature grease on the backing plate contact areas. Mount the parking brake shoe hold down spring pin No.1 before adding the rear axle hub & bearing assembly LH and the rear axle shaft LH nut. Reinsert the speed sensor rear LH and parking brake shoe assembly LH No.2 while making specific connections of parking brake cable No.3. The parking brake shoe assembly LH No.1 with all its relevant parts needs to be mounted before adding the parking brake shoe strut LH along with its compression spring. Begin the installation of 2 return tension springs No.1 by using needle-nose pliers on the front side. Verify that every component has been correctly assembled while checking for oil or grease presence on the friction areas. Check bearing backlash and axle hub deviation before installing the rear disc by matching the marks. Temporarily install hub nuts while removing the hole plug to unlock the disc so you can expand the shoes until the disc becomes completely stationary before you squeeze the adjuster to reach an 8-notch point of smooth operation before reinstalling the hole plug. Now install the hole plug when the brakes do not drag at all. The installation of the rear brake caliper assembly requires two 78 Nm (800 kgf-cm, 58 ft. lbs.) torques and the rear wheel needs reinstallation with 103 Nm (1,050 kgf-cm, 76 ft. lbs.) torque. After which step finish by inspecting the parking brake pedal travel while simultaneously checking the ABS speed sensor signal for 4WD drive type operation.
Related 2004 Toyota Highlander Parts
 2004 Toyota Highlander Backing Plate
 2004 Toyota Highlander Brake Booster Vacuum Hose
 2004 Toyota Highlander Brake Caliper Bracket
 2004 Toyota Highlander Brake Caliper Piston
 2004 Toyota Highlander Brake Disc
 2004 Toyota Highlander Brake Line
 2004 Toyota Highlander Brake Pad Set
 2004 Toyota Highlander Brake Shoe Set
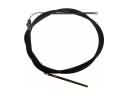 2004 Toyota Highlander Parking Brake Cable
 2004 Toyota Highlander Wheel Cylinder Repair Kit
 2004 Toyota Highlander Wheel Hub
 2004 Toyota Highlander Wheel Stud