×
ToyotaParts- Hello
- Login or Register
- Quick Links
- Live Chat
- Track Order
- Parts Availability
- RMA
- Help Center
- Contact Us
- Shop for
- Toyota Parts
- Scion Parts
My Garage
My Account
Cart
OEM Scion xB Air Bag
Air Bag Module- Select Vehicle by Model
- Select Vehicle by VIN
Select Vehicle by Model
orMake
Model
Year
Select Vehicle by VIN
For the most accurate results, select vehicle by your VIN (Vehicle Identification Number).
10 Air Bags found

Scion xB Passenger Air Bag, Upper
Part Number: 73970-12141$648.30 MSRP: $950.09You Save: $301.79 (32%)Ships in 1-3 Business Days
Scion xB Front Seat Air Bag, Driver Side
Part Number: 73920-12130$391.42 MSRP: $573.62You Save: $182.20 (32%)Ships in 1-3 Business DaysScion xB Front Seat Air Bag, Driver Side
Part Number: 73920-12100$446.33 MSRP: $654.09You Save: $207.76 (32%)Ships in 1-3 Business DaysScion xB Front Seat Air Bag, Passenger Side
Part Number: 73910-12140$395.24 MSRP: $579.24You Save: $184.00 (32%)Ships in 1-3 Business DaysScion xB Front Seat Air Bag, Passenger Side
Part Number: 73910-12110$427.09 MSRP: $625.91You Save: $198.82 (32%)Ships in 1-3 Business Days
Scion xB Inflator Curtain, Driver Side
Part Number: 62180-12120$687.89 MSRP: $1008.10You Save: $320.21 (32%)Ships in 1-3 Business DaysScion xB Inflator Curtain, Driver Side
Part Number: 62180-12070$666.09 MSRP: $976.15You Save: $310.06 (32%)Ships in 1-3 Business DaysScion xB Inflator Curtain, Passenger Side
Part Number: 62170-12120$687.89 MSRP: $1008.10You Save: $320.21 (32%)Ships in 1-3 Business DaysScion xB Inflator Curtain, Passenger Side
Part Number: 62170-12070$687.89 MSRP: $1008.10You Save: $320.21 (32%)Ships in 1-3 Business Days
Scion xB Air Bag
Choose genuine Air Bag that pass strict quality control tests. You can trust the top quality and lasting durability. Shopping for OEM Air Bag for your Scion xB? Our website is your one-stop destination. We stock an extensive selection of genuine Scion xB parts. The price is affordable so you can save more. It only takes minutes to browse and find the exact fit. Easily add to cart and check out fast. Our hassle-free return policy will keep you stress-free. We process orders quickly for swift delivery. Your parts will arrive faster, so you can get back on the road sooner.
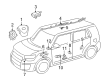
Air bags form an essential safety component of Scion xB vehicles since they deploy inflatable cushions which defend occupants by forming protective barriers that prevent impact with hard surfaces. The innovative Air Bag system comprises various elements including crash sensors together with diagnostic monitoring unit to ensure their swift activation within milliseconds following a collision. Scion xB models introduced multiple types of airbags starting from driver and passenger airbags to side-impact airbags while the recent models include ten airbag modules for improved safety features. Scion xB Air Bags have evolved through safety progressions by developing from original large designs into modern streamlined systems which now meet critical safety performance requirements. Reliable engines powering the distinctive Scion xB deliver outstanding performance together with exceptional fuel economy thus increasing the vehicle's market appeal because of its box-shaped design and compact dimensions. The Scion xB features an important Air Bag system which drives both its performance excellence and safety standards thus making it a preferred vehicle in the market. The reliable Scion xB Air Bag system builds both vehicle performance and safety features which provide drivers and passengers with a sense of security when operating the vehicle. The popularity of the automaker model as a safe and reliable choice on the market reflects its vital Air Bag system which continues to protect driver and passenger lives during road use.
Scion xB Air Bag Parts and Q&A
- Q: How to install the front passenger Air Bag assembly on Scion xB?A:A proper installation of the front passenger Air Bag assembly requires you to connect its connector to the instrument panel wire assembly and check that the buttons match in color while blocking each other securely. The next step involves hooking 10 connectors of the front passenger Air Bag until the connector side points outward before locking the assembly with 2 screws and connecting the wire harness to the instrument panel claw. The next step requires assembly of the upper instrument panel sub-assembly together with glove compartment door assembly followed by combination meter assembly and the instrument cluster finish panel assembly and its lower portion and center sub-assembly. You should place the front pillar garnish first on the left side and then on the right side. Following this step, position the front door opening trim Weather Strip on both sides. Attach the cable to the negative battery terminal by tightening it to 5.4 Nm (55 kgf-cm, 48 in-lbf) before verifying the SRS warning light.
- Q: How to remove the curtain shield Air Bag assembly on Scion xB?A:Disconnection of the negative battery cable with a 90-second waiting period is necessary to remove the curtain shield Air Bag assembly. The service technician must start by uninstalling the rear floor carpet assembly and the rear deck floor box and the deck floor boxes from both right-hand and left-hand sides. They must also take out the rear seat cushion with its cover pad sub-assembly. The curtain shield Air Bag removal process requires you to take out rear seatback assemblies from both sides and front door scuff plates and cowl side trim boards, front and rear door opening trim Weather Strips, rear door scuff plates, rear deck trim cover, luggage hold belt striker assembly, rear seat back hinge, and rear seat outer belt assemblies from both sides in sequence. Continue by removing the deck trim side panel assemblies, roof side inner garnish assemblies, Seat Belt anchor cover cap, front seat outer belt assemblies, center pillar lower and upper garnish for both sides, front pillar garnish for both sides, assist grip, visor assemblies, visor holder, room light assembly, map light assembly, instrument cluster finish center panel sub-assembly, instrument cluster finish lower panel, instrument cluster finish panel assembly, combination meter assembly, glove compartment door assembly, upper instrument panel sub-assembly, roof headlining, and finally, the curtain shield Air Bag assembly RH by removing the 4 clips, detaching the Air Bag connector with a thin-bladed screwdriver, releasing the locking button, and removing the 6 bolts. Remove the 4 clips and 4 spacers from the curtain shield Air Bag assembly but always install new ones even if the removed components maintain their condition.


Related Scion xB Parts
 Scion xB Clock Spring
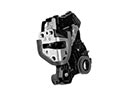 Scion xB Door Lock
 Scion xB Ignition Coil
 Scion xB Mass Air Flow Sensor
 Scion xB Vapor Canister
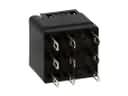 Scion xB ABS Relay
 Scion xB Air Bag Control Module
 Scion xB Air Bag Sensor
 Scion xB Antenna Mast
 Scion xB Door Jamb Switch
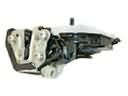 Scion xB Rear Passenger Door Handle Latch
 Scion xB Washer Pump