×
ToyotaParts- Hello
- Login or Register
- Quick Links
- Live Chat
- Track Order
- Parts Availability
- RMA
- Help Center
- Contact Us
- Shop for
- Toyota Parts
- Scion Parts
My Garage
My Account
Cart
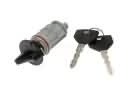
OEM Scion Dimmer Switch
Light Dimmer Switch- Select Vehicle by Model
- Select Vehicle by VIN
Select Vehicle by Model
orMake
Model
Year
Select Vehicle by VIN
For the most accurate results, select vehicle by your VIN (Vehicle Identification Number).
16 Dimmer Switches found


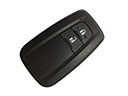
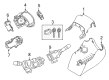
Scion Dimmer Switch Part Number: 84140-47140
$163.08 MSRP: $230.86You Save: $67.78 (30%)Ships in 1-2 Business DaysProduct Specifications- Other Name: Switch Assembly, Headlamp Dimmer; Combination Switch; Multi Purpose Switch; Headlamp Switch; Multifunction Switch; Headlamp Dimmer Switch
- Replaces: 84140-12720, 84140-12680


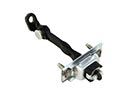
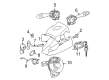
Scion Instrument Light Rheostat, Passenger Side Part Number: 84119-52030
$175.65 MSRP: $248.66You Save: $73.01 (30%)Ships in 1-2 Business DaysProduct Specifications- Other Name: Rheostat, Light Control; Instrument Panel Dimmer Switch; Rheostat
- Position: Passenger Side


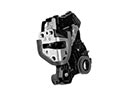
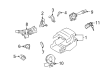
Scion Dimmer Switch Part Number: 84140-42010
$205.96 MSRP: $294.06You Save: $88.10 (30%)Ships in 1-3 Business DaysProduct Specifications- Other Name: Switch Assembly, Headlamp Dimmer; Turn Signal & Combination Lever; Combination Switch; Multi Purpose Switch; Headlamp Switch; Headlamp Dimmer Switch

Scion Dimmer Switch Part Number: 84140-52020
$82.82 MSRP: $116.25You Save: $33.43 (29%)Ships in 1-3 Business DaysProduct Specifications- Other Name: Switch Assembly, Headlamp Dimmer; Turn Signal & Combination Lever; Combination Switch; Multi Purpose Switch; Headlamp Switch; Headlamp Dimmer Switch

Scion Dimmer Switch Part Number: 84140-47120
$118.33 MSRP: $167.51You Save: $49.18 (30%)Ships in 1-3 Business DaysProduct Specifications- Other Name: Switch Assembly, Headlamp Dimmer; Combination Switch; Multi Purpose Switch; Headlamp Switch; Multifunction Switch; Headlamp Dimmer Switch
- Replaces: 84140-47070, 84140-47071

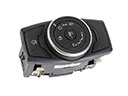
Scion Headlamp Switch Part Number: 84140-76010
$125.24 MSRP: $177.30You Save: $52.06 (30%)Ships in 1-3 Business DaysProduct Specifications- Other Name: Switch Assembly, Headlamp Dimmer; Combination Switch; Multi Purpose Switch; Multifunction Switch
- Manufacturer Note: LIGHT CONTROL SYSTEM-WITH

Scion Headlamp Switch Part Number: 84140-62020
$129.59 MSRP: $183.45You Save: $53.86 (30%)Ships in 1-3 Business DaysProduct Specifications- Other Name: Switch Assembly, Headlamp Dimmer; Combination Switch; Multi Purpose Switch; Multifunction Switch

Scion Headlamp Switch Part Number: 84140-52210
$130.18 MSRP: $184.28You Save: $54.10 (30%)Ships in 1-3 Business DaysProduct Specifications- Other Name: Switch Assembly, Headlamp Dimmer; Combination Switch; Multi Purpose Switch
- Manufacturer Note: WITH(MANUAL REMOTE CONTROL MIRROR)&FRONT FOG LAMP-WITHOUT

Scion Headlamp Switch Part Number: 84140-52141
$147.57 MSRP: $208.90You Save: $61.33 (30%)Ships in 1-3 Business DaysProduct Specifications- Other Name: Switch Assembly, Headlamp Dimmer; Combination Switch; Multi Purpose Switch
- Replaces: 84140-52140

Scion Headlamp Switch Part Number: 84140-20670
$151.33 MSRP: $214.22You Save: $62.89 (30%)Ships in 1-2 Business DaysProduct Specifications- Other Name: Switch Assembly, Headlamp Dimmer; Multi Purpose Switch

Scion Instrument Light Rheostat, Passenger Side Part Number: 84119-74020
$107.81 MSRP: $151.33You Save: $43.52 (29%)Ships in 1-3 Business DaysProduct Specifications- Other Name: Rheostat, Light Control; Instrument Panel Dimmer Switch; Rheostat
- Position: Passenger Side

Scion Instrument Light Rheostat, Passenger Side Part Number: SU003-02445
$35.56 MSRP: $46.04You Save: $10.48 (23%)Ships in 1-3 Business DaysProduct Specifications- Other Name: Switch Illumination; Instrument Panel Dimmer Switch; Rheostat; Rheostat, Light Control
- Position: Passenger Side

Scion Switch Part Number: SU003-02444
$35.56 MSRP: $46.04You Save: $10.48 (23%)Ships in 1-3 Business DaysProduct Specifications- Other Name: Switch Headlamp Leveling; Switch, Headlamp Leveling


Scion Multifunction Switch, Driver Side Part Number: SU003-02468
$43.16 MSRP: $55.88You Save: $12.72 (23%)Ships in 1-3 Business DaysProduct Specifications- Other Name: Switch Turn Dimmer Left-Hand; Combination Switch; Multi Purpose Switch; Signal Switch; Switch Assembly, Headlamp Dimmer
- Position: Driver Side


Scion Dimmer Switch, Passenger Side Part Number: 84119-35030
$148.63 MSRP: $210.40You Save: $61.77 (30%)Product Specifications- Other Name: Rheostat, Light Control; Instrument Panel Dimmer Switch; Instrument Light Rheostat; Rheostat
- Position: Passenger Side
Scion Multifunction Switch, Driver Side Part Number: SU003-04585
$43.16 MSRP: $55.88You Save: $12.72 (23%)Product Specifications- Other Name: Switch Turn Dimmer Left-Hand; Multi Purpose Switch; Signal Switch; Switch Assembly, Headlamp Dimmer
- Position: Driver Side
Scion Dimmer Switch
OEM parts deliver unmatched quality you can rely on. They pass extensive quality control inspections. Scion produces them to the official factory specifications. This process helps prevent defects and imperfections. So you can get exceptional lifespan and a flawless fit. Need new OEM Scion Dimmer Switch? You'll love our wide selection of genuine options. Shop in minutes and skip the hunt. Our prices are unbeatable, you'll save time and money. It's easy to shop and find the right piece. Our committed customer service team gives professional help from start to finish. Every part includes a manufacturer's warranty. We ship quickly, your parts will arrive fast at your door.
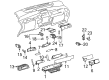
Scion Dimmer Switch allows drivers to dim cabin lights and turn beams on and off without feeling their way in the darkness. Scion disrupted the car shopping on the basis of dropping haggling, wearing outrageous colors, playing loud music during the launch festivals, and transporting numbered editions that disappeared off the lots before even the mainstream advertisements were broadcast. Scion created small rides that were open to first-time purchasers to make them unique without stretching their pocketbooks, without haggling stickers, factory customizations (teddy-neon dashboards, etc.), and schematics that were easy to modify with components and thus allowed users to be further customized. Scion was the Toyota playground where risky concepts enabled it to sell a million cars, including virtual cities over the internet to pop-up art exhibitions to sex-ed short films streaming to smartphones before it took over commuting. Scion ceased to exist in 2016, but its subversive essence continues to echo along infinitely many driveways across the globe reminding drivers that cars are canvases and that sometimes risk is rewarded with loyalty. Dimmer Switch gives the interior a smooth rocker to control brightness levels and have eyes leveled in the early mornings when doing patrols. Dimmer Switch also operates high and low exterior beams by a single stalk circuit which will resist wear and will channel signals with minimum wiring and refract power drop during the variable voltage on component loaded dashboards. Dimmer Switch comes uncoded and can be fitted in one click as it clicks directly into the factory harness therefore drivers do not waste a minute on the manual. Dimmer Switch enhances confidence in the dark since fingertips can be applied to control the light allowing the focus to be directed on steering, braking, and checking lanes.
Scion Dimmer Switch Parts and Q&A
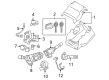
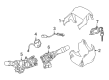
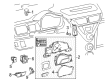
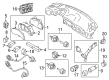
- Q: How to replace the headlamp dimmer switch assembly on Scion tC?A:The first step for headlamp dimmer switch assembly replacement involves taking out the steering column cover. After disconnecting the connector you should carefully release the claw to remove the headlamp dimmer switch assembly by maintaining control of the claw to reduce potential damages. The headlamp dimmer switch installation follows the opposite sequence of disassembly steps.
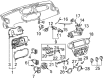
- Q: How to replace the headlamp dimmer switch assembly on Scion xB?A:A person must detach the steering column cover before starting the wiring for the headlamp dimmer switch assembly. Start by disconnecting the connector before using a taped-up screwdriver to disengage the claw for removing the headlamp dimmer switch assembly. Insert the steering column cover during the final step.