×
ToyotaParts- Hello
- Login or Register
- Quick Links
- Live Chat
- Track Order
- Parts Availability
- RMA
- Help Center
- Contact Us
- Shop for
- Toyota Parts
- Scion Parts
My Garage
My Account
Cart
OEM 2010 Toyota Yaris Air Bag Sensor
Air Bag Impact Sensor- Select Vehicle by Model
- Select Vehicle by VIN
Select Vehicle by Model
orMake
Model
Year
Select Vehicle by VIN
For the most accurate results, select vehicle by your VIN (Vehicle Identification Number).
4 Air Bag Sensors found

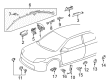
2010 Toyota Yaris Sensor Assembly, Side Air Bag, Passenger Side, Center
Part Number: 89831-0R010$98.34 MSRP: $118.58You Save: $20.24 (18%)Ships in 1-3 Business DaysProduct Specifications- Other Name: Sensor, Side Air Bag; Sensor Assembly, Side Air Bag, Driver Side; Air Bag Sensor
- Position: Center
- Replaces: 89831-28020, 89831-0T030
- Item Weight: 0.60 Pounds
- Item Dimensions: 4.5 x 2.7 x 2.2 inches
- Condition: New
- Fitment Type: Direct Replacement
- SKU: 89831-0R010
- Warranty: This genuine part is guaranteed by Toyota's factory warranty.

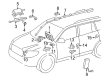
2010 Toyota Yaris Front Impact Sensor
Part Number: 89173-39375$94.20 MSRP: $113.57You Save: $19.37 (18%)Ships in 1-3 Business DaysProduct Specifications- Other Name: Sensor, Air Bag, Front; Air Bag Impact Sensor, Front; Air Bag Sensor; Front Sensor; Sensor, Air Bag, Front Passenger Side; Sensor, Air Bag, Front Driver Side
- Position: Front
- Item Weight: 1.40 Pounds
- Item Dimensions: 4.7 x 2.9 x 2.4 inches
- Condition: New
- Fitment Type: Direct Replacement
- SKU: 89173-39375
- Warranty: This genuine part is guaranteed by Toyota's factory warranty.

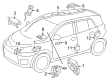
2010 Toyota Yaris Rear Sensor
Part Number: 89831-33020$108.06 MSRP: $151.68You Save: $43.62 (29%)Ships in 1-3 Business DaysProduct Specifications- Other Name: Sensor, Side Air Bag; Air Bag Impact Sensor, Rear; Air Bag Sensor; Side Impact Sensor; Side Sensor; Sensor, Air Bag, Rear Passenger Side; Sensor, Air Bag, Rear Driver Side
- Position: Rear
- Item Weight: 0.60 Pounds
- Item Dimensions: 4.5 x 2.6 x 2.1 inches
- Condition: New
- Fitment Type: Direct Replacement
- SKU: 89831-33020
- Warranty: This genuine part is guaranteed by Toyota's factory warranty.

2010 Toyota Yaris Position Sensor, Driver Side
Part Number: 89178-33040$80.57 MSRP: $113.09You Save: $32.52 (29%)Ships in 1-3 Business DaysProduct Specifications- Other Name: Sensor, Seat Position; Seat Track Position Sensor, Left; Sensor, Seat Position Air Bag
- Position: Driver Side
- Part Name Code: 89178A
- Item Weight: 0.50 Pounds
- Item Dimensions: 2.1 x 1.5 x 1.4 inches
- Condition: New
- Fitment Type: Direct Replacement
- SKU: 89178-33040
- Warranty: This genuine part is guaranteed by Toyota's factory warranty.
2010 Toyota Yaris Air Bag Sensor
Looking for affordable OEM 2010 Toyota Yaris Air Bag Sensor? Explore our comprehensive catalogue of genuine 2010 Toyota Yaris Air Bag Sensor. All our parts are covered by the manufacturer's warranty. Plus, our straightforward return policy and speedy delivery service ensure an unparalleled shopping experience. We look forward to your visit!
2010 Toyota Yaris Air Bag Sensor Parts Q&A
- Q: How to install the front Air Bag sensor for the hatchback on 2010 Toyota Yaris?A: The installation process for front Air Bag sensors on hatchback vehicles begins with turning off the ignition switch and detaching the negative terminal of the battery. Verification of disconnection is mandatory because deploying the Air Bag sensor occurs from any sensor impact. The operation must start only after waiting at least 90 seconds following the negative battery terminal disconnection. The proper installation of the Air Bag connector requires positioning the CPA into its provisionally locked state and applying force until it produces a click sound without touching the upper port of the CPA to prevent the half-connection prevention mechanism from malfunctioning. The system will be completed by installing two bolts on the front Air Bag sensor then tightening them to 9.0 Nm while verifying the sensor remains stable with manual shaking. Attach the front bumper cover while linking the negative cable to the terminal and tighten it to 5.4 Nm (55 kgf-cm, 48 in-lbf). A proper check of the SRS warning light needs to be performed for functional verification.
Related 2010 Toyota Yaris Parts
 2010 Toyota Yaris Antenna
 2010 Toyota Yaris Clock Spring
 2010 Toyota Yaris Fuse Box
 2010 Toyota Yaris Coolant Temperature Sensor
 2010 Toyota Yaris Relay
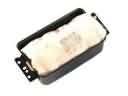 2010 Toyota Yaris Air Bag
 2010 Toyota Yaris Air Bag Control Module
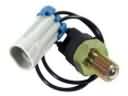 2010 Toyota Yaris Back Up Light Switch
 2010 Toyota Yaris Body Control Module
 2010 Toyota Yaris Daytime Running Light Relay
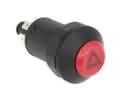 2010 Toyota Yaris Hazard Warning Switch
 2010 Toyota Yaris Mirror Switch