×
ToyotaParts- Hello
- Login or Register
- Quick Links
- Live Chat
- Track Order
- Parts Availability
- RMA
- Help Center
- Contact Us
- Shop for
- Toyota Parts
- Scion Parts
My Garage
My Account
Cart
OEM 2010 Scion xD Air Bag Sensor
Air Bag Impact Sensor- Select Vehicle by Model
- Select Vehicle by VIN
Select Vehicle by Model
orMake
Model
Year
Select Vehicle by VIN
For the most accurate results, select vehicle by your VIN (Vehicle Identification Number).
4 Air Bag Sensors found

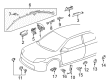
2010 Scion xD Sensor Assembly, Side Air Bag, Passenger Side, Center
Part Number: 89831-0R010$98.34 MSRP: $118.58You Save: $20.24 (18%)Ships in 1-3 Business DaysProduct Specifications- Other Name: Sensor, Side Air Bag; Sensor Assembly, Side Air Bag, Driver Side; Air Bag Sensor
- Position: Center
- Replaces: 89831-28020, 89831-0T030
- Item Weight: 0.60 Pounds
- Item Dimensions: 4.5 x 2.7 x 2.2 inches
- Condition: New
- Fitment Type: Direct Replacement
- SKU: 89831-0R010
- Warranty: This genuine part is guaranteed by Toyota's factory warranty.

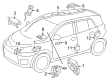
2010 Scion xD Front Impact Sensor
Part Number: 89173-39375$94.20 MSRP: $113.57You Save: $19.37 (18%)Ships in 1-3 Business DaysProduct Specifications- Other Name: Sensor, Air Bag, Front; Air Bag Impact Sensor, Front; Air Bag Sensor; Front Sensor; Sensor, Air Bag, Front Passenger Side; Sensor, Air Bag, Front Driver Side
- Position: Front
- Item Weight: 1.40 Pounds
- Item Dimensions: 4.7 x 2.9 x 2.4 inches
- Condition: New
- Fitment Type: Direct Replacement
- SKU: 89173-39375
- Warranty: This genuine part is guaranteed by Toyota's factory warranty.

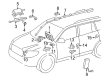
2010 Scion xD Rear Sensor
Part Number: 89831-33020$108.06 MSRP: $151.68You Save: $43.62 (29%)Ships in 1-3 Business DaysProduct Specifications- Other Name: Sensor, Side Air Bag; Air Bag Impact Sensor, Rear; Air Bag Sensor; Side Impact Sensor; Side Sensor; Sensor, Air Bag, Rear Passenger Side; Sensor, Air Bag, Rear Driver Side
- Position: Rear
- Item Weight: 0.60 Pounds
- Item Dimensions: 4.5 x 2.6 x 2.1 inches
- Condition: New
- Fitment Type: Direct Replacement
- SKU: 89831-33020
- Warranty: This genuine part is guaranteed by Toyota's factory warranty.

2010 Scion xD Position Sensor, Driver Side
Part Number: 89178-33040$80.57 MSRP: $113.09You Save: $32.52 (29%)Ships in 1-3 Business DaysProduct Specifications- Other Name: Sensor, Seat Position; Seat Track Position Sensor, Left; Sensor, Seat Position Air Bag
- Position: Driver Side
- Part Name Code: 89178A
- Item Weight: 0.50 Pounds
- Item Dimensions: 2.1 x 1.5 x 1.4 inches
- Condition: New
- Fitment Type: Direct Replacement
- SKU: 89178-33040
- Warranty: This genuine part is guaranteed by Toyota's factory warranty.
2010 Scion xD Air Bag Sensor
Looking for affordable OEM 2010 Scion xD Air Bag Sensor? Explore our comprehensive catalogue of genuine 2010 Scion xD Air Bag Sensor. All our parts are covered by the manufacturer's warranty. Plus, our straightforward return policy and speedy delivery service ensure an unparalleled shopping experience. We look forward to your visit!
2010 Scion xD Air Bag Sensor Parts Q&A
- Q: How to remove the front Air Bag sensor safely on 2010 Scion xD?A: The first step to remove the front Air Bag sensor requires disconnecting the cable from the negative battery terminal for safety reasons because some service operations impact the SRS Air Bag system. The installation steps apply equally to LH and RH side systems. Start by taking out the bumper cover from the front area. Inspection of the battery terminal should happen before starting the task because hitting the sensor could trigger an Air Bag deployment. Two bolts securing the front Air Bag sensor need removal for sensor extraction with the help of two claw disengagement. The Air Bag connector needs disconnection through backward movement of CPA and housing push, followed by a strict avoidance of wire harness pulling. First disconnect the connector from the housing but keep the housing temporarily secured. After removing the connector examine that the CPA extends after the housing opening.
Related 2010 Scion xD Parts
 2010 Scion xD Spark Plug
 2010 Scion xD Air Bag
 2010 Scion xD Air Bag Control Module
 2010 Scion xD Clock Spring
 2010 Scion xD Cruise Control Switch
 2010 Scion xD Fuel Pump Seal
 2010 Scion xD Horn
 2010 Scion xD Neutral Safety Switch
 2010 Scion xD Throttle Position Sensor
 2010 Scion xD Vapor Canister
 2010 Scion xD Windshield Wiper
 2010 Scion xD Wiper Arm