×
ToyotaParts- Hello
- Login or Register
- Quick Links
- Live Chat
- Track Order
- Parts Availability
- RMA
- Help Center
- Contact Us
- Shop for
- Toyota Parts
- Scion Parts
My Garage
My Account
Cart
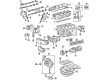
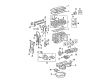
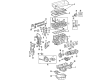
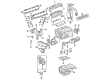
OEM 2004 Toyota Camry Camshaft
Cam- Select Vehicle by Model
- Select Vehicle by VIN
Select Vehicle by Model
orMake
Model
Year
Select Vehicle by VIN
For the most accurate results, select vehicle by your VIN (Vehicle Identification Number).
11 Camshafts found

2004 Toyota Camry Camshaft Sub-Assembly, No
Part Number: 13502-20902$549.67 MSRP: $805.55You Save: $255.88 (32%)Ships in 1-3 Business DaysProduct Specifications- Other Name: CAMSHAFT SUB-ASSY,NO; Camshaft
- Item Weight: 6.30 Pounds
- Item Dimensions: 21.7 x 3.4 x 2.9 inches
- Condition: New
- SKU: 13502-20902
- Warranty: This genuine part is guaranteed by Toyota's factory warranty.

2004 Toyota Camry Camshaft Sub-Assembly, No
Part Number: 13054-20902$549.67 MSRP: $805.55You Save: $255.88 (32%)Ships in 1-3 Business DaysProduct Specifications- Other Name: CAMSHAFT SUB-ASSY,NO; Camshaft
- Replaces: 13054-20020, 13054-0A030
- Item Weight: 6.90 Pounds
- Item Dimensions: 20.8 x 3.6 x 3.0 inches
- Condition: New
- SKU: 13054-20902
- Warranty: This genuine part is guaranteed by Toyota's factory warranty.

2004 Toyota Camry Camshaft
Part Number: 13502-28010$349.00 MSRP: $511.46You Save: $162.46 (32%)Ships in 1-3 Business DaysProduct Specifications- Other Name: Camshaft Sub-Assembly
- Replaces: 13502-0H010, 13502-0H020
- Part Name Code: 13512
- Item Weight: 4.20 Pounds
- Item Dimensions: 20.9 x 3.4 x 2.9 inches
- Condition: New
- Fitment Type: Direct Replacement
- SKU: 13502-28010
- Warranty: This genuine part is guaranteed by Toyota's factory warranty.

2004 Toyota Camry Camshaft
Part Number: 13501-28010$349.00 MSRP: $511.46You Save: $162.46 (32%)Ships in 1-3 Business DaysProduct Specifications- Other Name: Camshaft Sub-Assembly
- Manufacturer Note: (J)
- Replaces: 13501-0H010
- Part Name Code: 13511
- Item Weight: 4.50 Pounds
- Item Dimensions: 21.3 x 3.6 x 3.2 inches
- Condition: New
- Fitment Type: Direct Replacement
- SKU: 13501-28010
- Warranty: This genuine part is guaranteed by Toyota's factory warranty.

2004 Toyota Camry Camshaft
Part Number: 13501-28040$348.66 MSRP: $510.96You Save: $162.30 (32%)Ships in 1-3 Business DaysProduct Specifications- Other Name: Camshaft Sub-Assembly
- Replaces: 13501-0H020
- Part Name Code: 13511
- Item Weight: 5.20 Pounds
- Item Dimensions: 21.5 x 3.5 x 3.0 inches
- Condition: New
- Fitment Type: Direct Replacement
- SKU: 13501-28040
- Warranty: This genuine part is guaranteed by Toyota's factory warranty.

2004 Toyota Camry Camshaft Sub-Assembly
Part Number: 13053-20040$340.17 MSRP: $485.68You Save: $145.51 (30%)Ships in 1-3 Business DaysProduct Specifications- Other Name: Camshaft
- Replaces: 13053-0A040
- Part Name Code: 13053
- Item Weight: 4.40 Pounds
- Item Dimensions: 21.2 x 3.4 x 3.0 inches
- Condition: New
- Fitment Type: Direct Replacement
- SKU: 13053-20040
- Warranty: This genuine part is guaranteed by Toyota's factory warranty.

2004 Toyota Camry Camshaft
Part Number: 13501-20040$315.59 MSRP: $450.58You Save: $134.99 (30%)Ships in 1-3 Business DaysProduct Specifications- Other Name: Camshaft Sub-Assembly
- Manufacturer Note: (J)
- Replaces: 13501-0A030
- Part Name Code: 13511
- Item Weight: 4.70 Pounds
- Item Dimensions: 21.3 x 3.4 x 3.0 inches
- Condition: New
- Fitment Type: Direct Replacement
- SKU: 13501-20040
- Warranty: This genuine part is guaranteed by Toyota's factory warranty.

2004 Toyota Camry Camshaft
Part Number: 13053-20030$324.56 MSRP: $463.40You Save: $138.84 (30%)Ships in 1-3 Business DaysProduct Specifications- Other Name: Camshaft Sub-Assembly
- Manufacturer Note: (J)
- Replaces: 13053-0A030
- Part Name Code: 13053
- Item Weight: 4.80 Pounds
- Item Dimensions: 21.4 x 3.6 x 3.0 inches
- Condition: New
- Fitment Type: Direct Replacement
- SKU: 13053-20030
- Warranty: This genuine part is guaranteed by Toyota's factory warranty.

2004 Toyota Camry Camshaft
Part Number: 13502-20030$294.38 MSRP: $420.31You Save: $125.93 (30%)Ships in 1-3 Business DaysProduct Specifications- Other Name: Camshaft Sub-Assembly
- Replaces: 13502-0A040
- Part Name Code: 13512
- Item Weight: 6.30 Pounds
- Item Dimensions: 22.8 x 3.4 x 2.8 inches
- Condition: New
- Fitment Type: Direct Replacement
- SKU: 13502-20030
- Warranty: This genuine part is guaranteed by Toyota's factory warranty.
- Product Specifications
- Other Name: Camshaft Sub-Assembly
- Replaces: 13501-0A040
- Part Name Code: 13511
- Item Weight: 4.30 Pounds
- Item Dimensions: 21.5 x 3.6 x 3.0 inches
- Condition: New
- Fitment Type: Direct Replacement
- SKU: 13501-20050
- Warranty: This genuine part is guaranteed by Toyota's factory warranty.

2004 Toyota Camry Camshaft Sub-Assembly
Part Number: 13054-20030$311.39 MSRP: $444.60You Save: $133.21 (30%)Product Specifications- Other Name: Camshaft
- Replaces: 13054-0A040, 13054-0A041
- Part Name Code: 13054
- Item Weight: 5.50 Pounds
- Item Dimensions: 21.6 x 3.5 x 3.1 inches
- Condition: New
- Fitment Type: Direct Replacement
- SKU: 13054-20030
- Warranty: This genuine part is guaranteed by Toyota's factory warranty.
2004 Toyota Camry Camshaft
Looking for affordable OEM 2004 Toyota Camry Camshaft? Explore our comprehensive catalogue of genuine 2004 Toyota Camry Camshaft. All our parts are covered by the manufacturer's warranty. Plus, our straightforward return policy and speedy delivery service ensure an unparalleled shopping experience. We look forward to your visit!
2004 Toyota Camry Camshaft Parts Q&A
- Q: How to replace the camshaft (LH) on 2004 Toyota Camry?A: The procedure to replace the camshaft (LH) demands coolant drain followed by V-bank cover sub-assembly, radiator hose inlet, spark plug, and cylinder head cover sub-assembly LH removal. The service requires removal of the front wheel RH together with the front fender apron seal RH followed by removal of the V (cooler compressor to crankshaft pulley) belt No.1, vane pump V belt, engine moving control rod, engine mounting stay No.2 RH, generator bracket No.2, crankshaft pulley, timing belt No.1 cover, timing belt No.2 cover, engine mounting bracket RH, timing belt guide No.2, timing belt, timing belt idler sub-assembly No.2, camshaft timing pulley, and No.3 camshaft sub-assembly. Keep the camshaft at a level position while extraction to avoid damage after you secure the service bolt for the exhaust camshaft sub-gear (torque: 5.4 Nm) and then start by consistently unwinding the 10 bearing cap bolts in their defined sequence for bearing cap and No. 3 camshaft removal. Execute this process again for the No. 1 camshaft sub-assembly yet keep the camshaft in place and avert damaging the cylinder head. Remove the oil seal from the No. 4 camshaft before proceeding to disassemble the camshaft timing gear assembly with camshaft sub gear No.3. After installation of the camshaft timing gear assembly with camshaft sub gear No.3 a mechanic should move on to the No.1 camshaft sub-assembly while applying new engine oil on the thrust portion and journal then set the No. 4 camshaft at 90 degrees angle to the timing mark followed by oil seal lip treatment with MP grease before performing oil seal installation without seal reversal. Seal packing (Part No. 08826-00080 or equivalent) must be applied to the No. 1 bearing cap before its installation within 5 minutes in a region free of engine oil for 2 hours. Use engine oil for all bearing cap bolts before installing the 5 bearing caps and achieving equal bolt torque of 16 Nm. Keep the No.3 camshaft sub-assembly at level position while adding new engine oil and aligning the timing marks before setting it onto the cylinder head and fastening the bolts (torque: 16 Nm) before removing the service bolt. Install the timing belt No.3 cover and camshaft timing pulley before placing the timing belt idler sub-assembly No.2 with torque set to 43 Nm. Inspect the timing belt and timing belt tensioner assembly during installation together with the timing belt guide No.2, engine mounting bracket RH at 28 Nm torque level. Also install timing belt No.2 cover and timing belt No.1 cover and crankshaft pulley and generator bracket No.2 at 28 Nm torque. Finish installation with engine mounting stay No.2 RH and engine moving control rod. Start with adjusting valve clearance before installing the vane pump V belt then V (cooler compressor to crankshaft pulley) belt No.1 and checking drive belt tension before inserting the cylinder head cover sub-assembly LH and its spark plug (torque at 8.0 Nm) followed by V-bank cover sub-assembly and front wheel RH installation (torque with 103 Nm). After adding the engine coolant complete a leak inspection.
Related 2004 Toyota Camry Parts
 2004 Toyota Camry Timing Belt
 2004 Toyota Camry Oil Pan
 2004 Toyota Camry Timing Chain Tensioner
 2004 Toyota Camry Dipstick
 2004 Toyota Camry Drain Plug Washer
 2004 Toyota Camry Piston
 2004 Toyota Camry Oil Filler Cap
 2004 Toyota Camry Crankshaft Gear
 2004 Toyota Camry Crankshaft Seal
 2004 Toyota Camry Dipstick Tube
 2004 Toyota Camry Drain Plug
 2004 Toyota Camry Engine Mount Torque Strut