×
ToyotaParts- Hello
- Login or Register
- Quick Links
- Live Chat
- Track Order
- Parts Availability
- RMA
- Help Center
- Contact Us
- Shop for
- Toyota Parts
- Scion Parts
My Garage
My Account
Cart
OEM Toyota Venza Camshaft
Cam- Select Vehicle by Model
- Select Vehicle by VIN
Select Vehicle by Model
orMake
Model
Year
Select Vehicle by VIN
For the most accurate results, select vehicle by your VIN (Vehicle Identification Number).
9 Camshafts found

Toyota Venza Camshaft Part Number: 13502-F0020
$362.05 MSRP: $530.60You Save: $168.55 (32%)Ships in 1-3 Business Days
Toyota Venza Camshaft Part Number: 13501-F0030
$362.05 MSRP: $530.60You Save: $168.55 (32%)Ships in 1-3 Business Days
Toyota Venza Camshaft Part Number: 13502-36030
$372.95 MSRP: $546.56You Save: $173.61 (32%)Ships in 1-3 Business Days
Toyota Venza Camshaft Part Number: 13501-36050
$383.28 MSRP: $561.70You Save: $178.42 (32%)Ships in 1-3 Business Days
Toyota Venza Camshaft Sub-Assembly Part Number: 13053-31031
$458.52 MSRP: $671.96You Save: $213.44 (32%)Ships in 1-3 Business Days
Toyota Venza Camshaft Part Number: 13502-31061
$541.61 MSRP: $793.74You Save: $252.13 (32%)Ships in 1-3 Business Days
Toyota Venza Camshaft Part Number: 13501-31091
$537.30 MSRP: $787.41You Save: $250.11 (32%)Ships in 1-3 Business Days
Toyota Venza Camshaft Sub-Assembly Part Number: 13054-31061
$533.55 MSRP: $781.93You Save: $248.38 (32%)Ships in 1-3 Business Days
Toyota Venza Camshaft Part Number: 13053-31061
$541.61 MSRP: $793.74You Save: $252.13 (32%)Ships in 1-3 Business Days
Toyota Venza Camshaft
Choose genuine Camshaft that pass strict quality control tests. You can trust the top quality and lasting durability. Shopping for OEM Camshaft for your Toyota Venza? Our website is your one-stop destination. We stock an extensive selection of genuine Toyota Venza parts. The price is affordable so you can save more. It only takes minutes to browse and find the exact fit. Easily add to cart and check out fast. Our hassle-free return policy will keep you stress-free. We process orders quickly for swift delivery. Your parts will arrive faster, so you can get back on the road sooner.
Camshaft is one of the vital components that greatly affect the performance and durability of the Toyota Venza series. As one of the well-known industrial standards in vehicle manufacturing the camshaft controls the supply and release of intake and exhaust valves allowing adequate supply of fresh intake air and expulsion of exhaust gases. This precision is needed especially for Toyota Venza which was introduced in 2008 the car is renowned to possess Safety and Efficiency. This Camshaft comes in different varieties common to different models of the Venza car, including the first generation Venza and the facelifted one. A camshaft is usually timed with the crankshaft using timing chains or belts and it is very important in increasing the performance of an engine, which brings out the smoothness that is evident in the smooth Venza and their fuel efficiency. Also, the Camshaft complements the safety features of the car, which has been voted among the safest cars in the market, for instance, it was awarded the Top Safety Pick by the IIHS. Thus, the Camshaft can be depicted as an advantageous offering in the automotive market due to its special features like the use of iron or steel for constructing it or enhancing the lift and the duration capacity. All in all, the Camshaft plays a significant role in providing the trust, power, and protection to the car lovers of the Toyota Venza car models.
Toyota Venza Camshaft Parts and Q&A
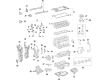
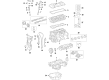
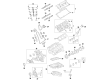
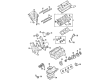
- Q: How to remove the camshaft on Toyota Venza?A:The starting point to remove the camshaft begins with timing chain cover removal. First fasten the crankshaft pulley bolt for a short time before moving the crankshaft in a clockwise direction until the marks on both the crankshaft timing gear and camshaft timing gears match; another clockwise rotation might be needed if the marks do not align correctly. Take out the crankshaft pulley bolt after its proper alignment. Next, remove the bolt and timing chain guide after which the No. 1 chain tensioner assembly requires you to extend the plunger slightly and rotate the stopper plate counterclockwise to release the lock while pushing the plunger into the tensioner followed by moving the stopper plate clockwise to set the lock until you can insert a pin into the stopper plate hole before removing the 2 bolts, chain tensioner and gasket. The procedure includes stripping the bolt and chain tensioner slipper then proceeding with the chain sub-assembly and the two bolts and chain vibration damper. Use a wrench to grasp the hexagonal camshaft portion while removing both the bolt and camshaft timing gear unit while avoiding contact between the head of the cylinders and spark plug tube and refrain from breaking down the camshaft timing gear. Repeat the procedure for the camshaft timing exhaust gear. Use a screwdriver to lightly pry the camshaft housing from the cylinder head after you loosen all 20 bearing cap bolts according to sequence and do it with great caution to prevent surface damage. Start by removing the 11 bearing cap bolts according to the specified sequence while removing afterward each of the 5 bearing caps before arranging all removed components in their proper sequential order. The maintenance process requires complete removal of the oil control valve filter alongside the No. 1 camshaft bearing then the No. 1 and No. 2 camshafts and finally the No. 2 camshaft bearing. The 16 valve rocker arms along with the corresponding 16 valve lash adjusters should then be extracted from the cylinder head space while properly organizing all removed components.
- Q: How to install the camshaft on Toyota Venza?A:Prior to setting the camshaft begin by removing the lock pin then position the timing gear assembly toward the advanced side before installation while maintaining a clockwise prevention of rotation. Place the knock pin from the No. 1 camshaft into the pin hole of the camshaft timing gear without any space between the camshaft timing gear and camshaft flange. Install the bolt onto the camshaft manually while omitting tool use to protect the lock pin from harm. Use non-residue solvent to clean the camshaft journal before applying the vinyl tape to oil paths and providing 200 kPa (2.0 kgf/cm2, 29 psi) of air pressure that should turn the camshaft timing gear assembly counterclockwise. You should first eliminate rubber pieces and tape before removing the bolt and camshaft timing gear. Check the valve lash adjuster prior to reinstalling the original positions of the 16 lash adjusters. Depending on step 15 install 16 valve rocker arms with engine oil on both lash adjuster tips and valve stem caps. After cleaning the camshaft journals and housing together with the bearing caps you should apply engine oil before installing the first and second camshafts. The marks on camshaft bearing caps need to be confirmed before inserting 11 bolts that require 16 Nm (163 kgf-cm, 12 ft-lbf) torque. Then check that the camshaft rotates smoothly. Cover the camshaft housing with seal packing that includes Toyota Genuine Seal Packing Black or Three Bond 1207B or equivalent material. Finally secure the housing with 20 bolts at 27 Nm (275 kgf-cm, 20 ft-lbf). After completing installation do not apply oil to the system until the wait period of at least 4 hours concludes. Secure the camshaft timing gear with a bolt while keeping the No. 1 camshaft knock pin aligned with the gear then tighten it to 85 Nm (867 kgf-cm, 63 ft-lbf). Install the same procedure for the No. 2 camshaft and timing exhaust gear. The installation requires 50 cc (3.1 cu. in) engine oil to be added through the oil hole while verifying that both the low-pressure chamber and oil paths of the lash adjusters contain sufficient oil volume. Temporarily install the crankshaft pulley bolt to reach TDC compression in the No. 1 cylinder by rotating the crankshaft 40 degrees counterclockwise. First secure the chain vibration damper by tightening two bolts to 21 Nm (214 kgf-cm, 15 ft-lbf) before setting the chain onto the camshaft timing gears together with the crankshaft timing sprocket and checking for proper alignment of the mark plates with the timing marks. Lay a string on the chain after securing it before rotating the intake camshaft counterclockwise to meet the timing mark. Finish by tightening the chain tensioner slipper to 21 Nm (214 kgf-cm, 15 ft-lbf). Use new gaskets when installing the No. 1 chain tensioner assembly to torque it up to 10 Nm (102 kgf-cm, 7 ft-lbf) before removing the stopper plate pin. The installation of timing chain guide requires 21 Nm torque (214 kgf-cm, 15 ft-lbf) before you check the timing marks a second time and complete the timing chain cover assembly.


Related Toyota Venza Parts
 Toyota Venza Crankshaft Seal
 Toyota Venza Crankshaft Thrust Washer
 Toyota Venza Cylinder Head
 Toyota Venza Cylinder Head Gasket
 Toyota Venza Oil Filler Cap
 Toyota Venza Oil Pan Gasket
 Toyota Venza Rocker Arm
 Toyota Venza Rod Bearing
 Toyota Venza Timing Chain
 Toyota Venza Timing Cover
 Toyota Venza Valve Cover Gasket
 Toyota Venza Valve Stem Seal