×
ToyotaParts- Hello
- Login or Register
- Quick Links
- Live Chat
- Track Order
- Parts Availability
- RMA
- Help Center
- Contact Us
- Shop for
- Toyota Parts
- Scion Parts
My Garage
My Account
Cart
OEM Toyota Venza Crankshaft Seal
- Select Vehicle by Model
- Select Vehicle by VIN
Select Vehicle by Model
orMake
Model
Year
Select Vehicle by VIN
For the most accurate results, select vehicle by your VIN (Vehicle Identification Number).
7 Crankshaft Seals found


Toyota Venza Oil Seal, Front Part Number: 90311-A0005
$19.11 MSRP: $26.60You Save: $7.49 (29%)Ships in 1-3 Business Days

Toyota Venza Rear Main Seal Part Number: 90311-A0027
$44.08 MSRP: $61.37You Save: $17.29 (29%)Ships in 1-3 Business Days

Toyota Venza Crankshaft Seal, Front Part Number: 90311-A0015
$8.11 MSRP: $11.29You Save: $3.18 (29%)Ships in 1-3 Business Days

Toyota Venza Rear Main Seal Part Number: 90311-A0020
$29.15 MSRP: $40.57You Save: $11.42 (29%)Ships in 1-2 Business Days
Toyota Venza Seal, Engine Rear Oil Part Number: 90311-89015
$29.27 MSRP: $40.74You Save: $11.47 (29%)Ships in 1 Business Day
Toyota Venza Crankshaft Seal, Front Part Number: 90311-A0033
$14.09 MSRP: $19.61You Save: $5.52 (29%)Ships in 1-3 Business Days
Toyota Venza Rear Main Seal Part Number: 90311-A0035
$41.57 MSRP: $57.87You Save: $16.30 (29%)Ships in 1-3 Business Days
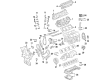
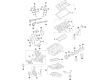
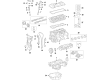
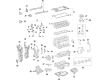
Toyota Venza Crankshaft Seal
Choose genuine Crankshaft Seal that pass strict quality control tests. You can trust the top quality and lasting durability. Shopping for OEM Crankshaft Seal for your Toyota Venza? Our website is your one-stop destination. We stock an extensive selection of genuine Toyota Venza parts. The price is affordable so you can save more. It only takes minutes to browse and find the exact fit. Easily add to cart and check out fast. Our hassle-free return policy will keep you stress-free. We process orders quickly for swift delivery. Your parts will arrive faster, so you can get back on the road sooner.
The Toyota Venza Crankshaft Seal is helping in the protection of vital parts of Toyota mid-size crossover SUV, which is accentuating its reliability and performance. This Crankshaft Seal is installed at the front of the engine to seal the crankcase and protect oil leakage, to ensure proper oil supply and reduce contact between engine parts thus reducing their friction and consequent wear. The Toyota Venza manufactured from the year 2008 requires the following compatible models; first-gen Toyota Venza built from 2008 to 2015 and the improved model released in 2012. This part, called Crankshaft Seal due to its function of sealing the crankshaft, is typically formed of metal rubber alloy and ensures the optimality of the performance and safety of a car by preventing the loss of oil, which is vital to the condition of the engine. In light of these features, it can be said that the Crankshaft Seal for the Venza has a huge role although the car has received commendation with features such as the recent Top Safety Pick by the IIHS. Due to the leading problem of a bad Crankshaft Seal is oil leakage, replacement of this part is crucial for the long-time functionality of a high-mileage Toyota Venza vehicle. However, the Toyota Venza Crankshaft Seal has a unique standout attribute in the automotive market where the design and the function of the seal are typical among the various model years; thus, the creation guarantees the drivers the top level of reliability and performance. Thus, the Toyota Venza Crankshaft Seal with the focus on improving the driving experience can be deemed as a revelation of Toyota's dedication to quality and progress.
Toyota Venza Crankshaft Seal Parts and Q&A
- Q: How to remove a crankshaft seal on Toyota Venza?A:Start the crankshaft main bearing seal removal process by disassembling the engine with its associated transaxle. The procedure for 2WD requires removal of automatic transaxle assembly but for AWD the automatic transaxle assembly needs additional removal. Special Service Tool: 09213-54015 91551-80650 enables users to hold the crankshaft pulley and remove the 8 bolts along with the front drive plate spacer and drive plate and ring gear sub-assembly and rear drive plate spacer. A screwdriver can remove the rear engine oil seal after its lip is first cut off with a knife but users must tape the screwdriver tip for protection. Caution is required during this operation to protect both the crankshaft surface and the oil seal press fit hole from harm.
- Q: How to install the rear Crankshaft Seal on Toyota Venza?A:The first step to install the rear crankshaft oil seal requires application of MP grease to the lip of a new oil seal while ensuring both foreign matter stays away from the lip and MP grease avoids the dust seal. Special Service Tools 09223-15030 and 09950-70010 with a hammer will help install the oil seal into position until its surface matches the cylinder block and crankcase edges. Keep the lip free of foreign matter and avoid hitting at any angle. After positioning Special Service Tool: 09213-54015 and 91551-80650 on the crankshaft clean all bolts and their installation holes before installing the front drive plate spacer while its pin faces the crankshaft pin hole. Maintain an equivalent of 2 or 3 bolt threads on the drive plate end with Toyota Genuine Adhesive 1324 or Three Bond 1324 while tightening the 8 bolts to a torque of 98 Nm (999 kgf-cm, 72 ft-lbf) until evenly distributed. The installation of the automatic transaxle should be performed for 2WD while the appropriate AWD installation procedure needs to be followed. Place the engine together with transaxle assembly for installation.


Related Toyota Venza Parts
 Toyota Venza Automatic Transmission Filter
 Toyota Venza Cam Gear
 Toyota Venza Cylinder Head Gasket
 Toyota Venza Dipstick Tube
 Toyota Venza Engine Mount
 Toyota Venza Oil Pan Gasket
 Toyota Venza Oil Pump
 Toyota Venza Oil Pump Gasket
 Toyota Venza Piston
 Toyota Venza Spool Valve
 Toyota Venza Timing Chain
 Toyota Venza Valve Cover Gasket