×
ToyotaParts- Hello
- Login or Register
- Quick Links
- Live Chat
- Track Order
- Parts Availability
- RMA
- Help Center
- Contact Us
- Shop for
- Toyota Parts
- Scion Parts
My Garage
My Account
Cart
OEM Toyota Sequoia Air Bag
Air Bag Module- Select Vehicle by Model
- Select Vehicle by VIN
Select Vehicle by Model
orMake
Model
Year
Select Vehicle by VIN
For the most accurate results, select vehicle by your VIN (Vehicle Identification Number).
34 Air Bags found

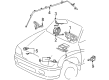
Toyota Sequoia Inflator Curtain, Driver Side
Part Number: 62180-0C020$1325.10 MSRP: $1941.95You Save: $616.85 (32%)Ships in 1-3 Business Days
Toyota Sequoia Inflator Curtain, Driver Side
Part Number: 62180-0C170$1087.21 MSRP: $1593.31You Save: $506.10 (32%)Ships in 1-3 Business Days
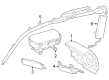
Toyota Sequoia Side Impact Inflator Module, Driver Side
Part Number: 73920-0C070$378.17 MSRP: $554.22You Save: $176.05 (32%)Ships in 1-3 Business DaysToyota Sequoia Inflator Curtain, Passenger Side
Part Number: 62170-0C010$756.70 MSRP: $1108.95You Save: $352.25 (32%)Ships in 1-3 Business Days
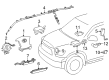
Toyota Sequoia Knee Air Bag, Brown, Lower Passenger Side
Part Number: 73990-0C010-E4$912.99 MSRP: $1338.01You Save: $425.02 (32%)Ships in 1-3 Business DaysToyota Sequoia Side Impact Inflator Module, Passenger Side
Part Number: 73910-0C120$359.73 MSRP: $527.18You Save: $167.45 (32%)Ships in 1-3 Business Days
Toyota Sequoia Passenger Air Bag, Upper
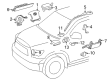
Part Number: 73970-0C070-B0$736.94 MSRP: $1080.01You Save: $343.07 (32%)Ships in 1-3 Business Days
Toyota Sequoia Passenger Air Bag, Upper
Part Number: 73970-0C060-B0$737.85 MSRP: $1081.33You Save: $343.48 (32%)Ships in 1-3 Business Days
Toyota Sequoia Knee Air Bag, Beige, Driver Side
Part Number: 73900-0C040-E1$731.86 MSRP: $1072.54You Save: $340.68 (32%)Ships in 1-3 Business DaysToyota Sequoia Inflator Curtain, Passenger Side
Part Number: 62170-0C020$1369.08 MSRP: $2006.41You Save: $637.33 (32%)Ships in 1-3 Business Days
Toyota Sequoia Inflator Curtain, Driver Side
Part Number: 62180-0C071$1179.48 MSRP: $1728.54You Save: $549.06 (32%)Ships in 1-3 Business DaysToyota Sequoia Inflator Curtain, Driver Side
Part Number: 62180-0C140$1097.76 MSRP: $1608.78You Save: $511.02 (32%)Ships in 1-3 Business DaysToyota Sequoia Inflator Curtain, Driver Side
Part Number: 62180-0C010$755.50 MSRP: $1107.20You Save: $351.70 (32%)Ships in 1-3 Business DaysToyota Sequoia Inflator Curtain, Passenger Side
Part Number: 62170-0C170$1087.21 MSRP: $1593.31You Save: $506.10 (32%)Ships in 1-3 Business DaysToyota Sequoia Passenger Air Bag, Upper
Part Number: 73970-0C070-E0$736.94 MSRP: $1080.01You Save: $343.07 (32%)Ships in 1-3 Business Days
Toyota Sequoia Passenger Air Bag
Part Number: 73960-0C010$678.68 MSRP: $994.61You Save: $315.93 (32%)Ships in 1-3 Business DaysToyota Sequoia Knee Air Bag, Red, Driver Side
Part Number: 73900-0C040-E0$784.16 MSRP: $1149.19You Save: $365.03 (32%)Ships in 1-3 Business DaysToyota Sequoia Side Impact Inflator Module, Driver Side
Part Number: 73920-0C090$378.17 MSRP: $554.22You Save: $176.05 (32%)Ships in 1-3 Business DaysToyota Sequoia Passenger Air Bag, Upper
Part Number: 73970-0C060-E0$737.85 MSRP: $1081.33You Save: $343.48 (32%)Ships in 1-3 Business DaysToyota Sequoia Side Impact Inflator Module, Passenger Side
Part Number: 73910-0C110$378.17 MSRP: $554.22You Save: $176.05 (32%)Ships in 1-3 Business Days
| Page 1 of 2 |Next >
1-20 of 34 Results
Toyota Sequoia Air Bag
Choose genuine Air Bag that pass strict quality control tests. You can trust the top quality and lasting durability. Shopping for OEM Air Bag for your Toyota Sequoia? Our website is your one-stop destination. We stock an extensive selection of genuine Toyota Sequoia parts. The price is affordable so you can save more. It only takes minutes to browse and find the exact fit. Easily add to cart and check out fast. Our hassle-free return policy will keep you stress-free. We process orders quickly for swift delivery. Your parts will arrive faster, so you can get back on the road sooner.
Toyota Sequoia Air Bag Parts and Q&A
- Q: What precautions should be taken when deploying an Air Bag before scrapping a vehicle equipped with an SRS on Toyota Sequoia?A:It is essential to deploy Air Bags using Special Service Tool: 09082-00700 (SRS Air Bag Deployment Tool) in an open space before scrapping vehicles with SRS ordisposing of the side Air Bag assembly. This must be done in areas where noise from deployment would not disturb nearby residents at a minimum 10 m (33 ft) distance from the Air Bag assembly. Testing of the tool should be completed before deployment where staff must disconnect the side Air Bag connector using proper care to avoid wire harness damage. Lock the secondary connectors when you integrate the Special Service Tool: 09082-00700 and 09082-00750 to the Air Bag connector to prevent damage. Pull the tool at least 10 meters (33 feet) from the vehicle while closing all access points and then join the red clip to the battery positive (+) side terminal followed by the black clip to the battery negative (-) terminal. Prior to activating the switch for the Air Bag deployment ensure that there are no occupants both inside the vehicle and the 10 meter (33 feet) wide area surrounding it. The deployed side Air Bag assembly maintains high temperatures which require at least 30 minutes until you work on it. Always use gloves together with safety glasses when interacting with the assembly while you should never use water on the deployed Air Bag module and you must wash your hands with water at the end of the work procedure. It is mandatory to deploy vehicle Air Bags before conducting vehicle scrapping operations which include the side Air Bag assembly. The Air Bag activates at the same time when the LED illuminates on the Special Service Tool activation switch.
- Q: How to service the side Air Bag assembly for the manual seat with power adjuster type on Toyota Sequoia?A:The service process for the manual seat with power adjuster type side Air Bag assembly starts by uninstalling the front seat by first removing its 4 track covers then 4 bolts and disconnecting the side Air Bag connector with wire harness protection. Perform the front seat removal with attention to body integrity throughout the process. The service requires removal of the reclining adjuster release handle followed by unscrewing 2 screws to detach the front seat cushion shield and its inner shield through identical procedures. The seatback assembly can be removed after unharnessing the side Air Bag assembly wire harness and pulling out three hog rings and unattaching four bolts. To connect the armrest first tighten a 37 N.m (380 kgf.cm, 27 ft.lbf) bolt then close the fastener. The installation of the 4 bolts for the seatback assembly must occur at 43 N.m (440 kgf.cm, 32 ft.lbf) torque strength while inspecting for pinching and discarding any damaged parts. Fasten three new hog rings before you attach the wire harness to the reclining adjuster inside cover. Begin the installation by mounting the front seat cushion inner shield with its outer shield using 2 screws respectively and complete the process with reclining release lever and headrest. Attach the front seat to the vehicle while connecting its side Air Bag connector before securing the 4 seat track covers through 4 bolts tightened at 37 N.m (380 kgf.cm, 27 ft.lbf).


Related Toyota Sequoia Parts
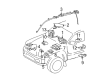
 Toyota Sequoia Antenna Mast
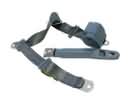 Toyota Sequoia Seat Belt
 Toyota Sequoia Air Bag Control Module
 Toyota Sequoia Air Bag Sensor
 Toyota Sequoia Clock Spring
 Toyota Sequoia Daytime Running Light Relay
 Toyota Sequoia Dimmer Switch
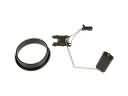 Toyota Sequoia Fuel Level Sensor
 Toyota Sequoia Horn
 Toyota Sequoia Relay
 Toyota Sequoia Relay Block
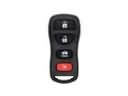 Toyota Sequoia Transmitter