×
ToyotaParts- Hello
- Login or Register
- Quick Links
- Live Chat
- Track Order
- Parts Availability
- RMA
- Help Center
- Contact Us
- Shop for
- Toyota Parts
- Scion Parts
My Garage
My Account
Cart
OEM Toyota MR2 Spyder Rack And Pinion
Steering Gear- Select Vehicle by Model
- Select Vehicle by VIN
Select Vehicle by Model
orMake
Model
Year
Select Vehicle by VIN
For the most accurate results, select vehicle by your VIN (Vehicle Identification Number).
2 Rack And Pinions found

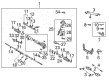
Toyota MR2 Spyder Rack Assembly, Front Part Number: 44204-17060

Toyota MR2 Spyder Steering Gear Part Number: 44250-17081
Toyota MR2 Spyder Rack And Pinion
Choose genuine Rack And Pinion that pass strict quality control tests. You can trust the top quality and lasting durability. Shopping for OEM Rack And Pinion for your Toyota MR2 Spyder? Our website is your one-stop destination. We stock an extensive selection of genuine Toyota MR2 Spyder parts. The price is affordable so you can save more. It only takes minutes to browse and find the exact fit. Easily add to cart and check out fast. Our hassle-free return policy will keep you stress-free. We process orders quickly for swift delivery. Your parts will arrive faster, so you can get back on the road sooner.
The Rack And Pinion system is engineered and synonymous with Toyota making the Toyota MR2 Spyder models manufactured between 1999 and 2007. This enhanced steering system articulates the rotational motion of the steering wheel into efficient lateral movement of the front wheels, so that drivers get to experience the prime ever control and feel. An especially notable feature of the Toyota MR2 Spyder is the power assisted rack and pinion steering system complimented by hydraulic mechanisms, ensuring the ease of steering, all in all making Toyota MR2 Spyder the choice for enthusiasts who prefer efficient and safe car. It is suitable for many models of the Toyota MR2 Spyder; it is available in B, Standard, and S trims highlighting the fact that the Rack And Pinion is customizable depending on the driver's preference. Indeed the method of engagement of helical gears provides a smooth motion but they suffered from wear and tear problems hence constant putting into condition is necessary. The Toyota MR2 Spyder is labelled as a delightful convertible sports car due to its accrued lightweighting and a virtually bulletproof rack-and-pinion steering system. Other options like the 5-speed manual and 6-speed Sequential Manual Transmission options are added features that make an even better toy in the automotive market, hence making the Toyota MR2 Spyder. In sum, the Rack And Pinion helps to make the car as it is - the vehicle with a passion and reliability that Toyota men and women love.
Toyota MR2 Spyder Rack And Pinion Parts and Q&A
- Q: How to service and repair the Rack And Pinion on Toyota MR2 Spyder?A:The beginning of rack and pinion service and repair starts with removing the 2 turn pressure tubes through the use of Special Service Tool: 09023-38200 and extracting the 4 O-rings from them. Install the Rack And Pinion assembly into a vise by using Special Service Tool: 09612-00012. Commence by applying marks on the tie rod ends along with rack ends before unstowing the lock nuts for removing LH and RH tie rod ends. You should use a screwdriver to loosen the clamps before removing clips and clamps and rack boots without damaging the boots. Use Special Service Tool: 09922-10010 on the LH rack end to remove it followed by the RH rack end after application of the tool on both ends. Use Special Service Tool: 09922-10010 to remove its lock nut and proceed to take out the rack guide spring cap and rack guide spring and rack guide subassembly using a 19 mm hexagon wrench. Use Special Service Tool: 09616-00011 to detach the rack housing cap and the self-locking nut. Mark bolt positions to remove rack and pinion control valve housing and its assembly before extracting both assembly and oil seal from the components. To remove the snap ring you need to use needle nose pliers so you can pull out the cylinder end stopper. Rephrase the rack and pinion by pressing it against the bushing through Special Service Tool: 09950-70010 (09951-07200) to remove its O-ring from the bushing. Check the rack and pinion's spots for wear as well as damage and verify that maximum runout measures less than 0.1 mm (0.004 inch). Insert the new rack housing oil seal through Special Service Tool: 09950-60010 (09951-00210, 09951-00240, 09952-06010) after applying power steering fluid to the lip of the seal before installing it into the rack housing. The control valve housing requires Special Service Tool: 09950-60010 (09951-00260) to remove its bearing and oil seal. Therefore install new components with correct orientation. Replace the No.1 and No.2 bearings of the rack housing using the correct Special Service Tools while applying grease. Use Special Service Tool: 09612-24814 (09613-22011) to remove the oil seal from the rack and pinion bushing then install a new one according to proper orientation. First uninstall the rack and pinion's teflon ring and O-ring then install a new O-ring before carefully installing the new teflon ring while expanding it. The control valve assembly requires removal of its four teflon rings together with new ring installation using Special Service Tool: 09631-20081. The process of reassembly requires power steering fluid or molybdenum disulfide lithium base grease coatings on the parts before installing the rack and pinion using Special Service Tool: 09631-10041 while attending to the bushing and cylinder end stopper installation. Use Special Service Tool: 09631-12071 (09633-00010) for an air tightness test while installing the control valve assembly without harming the teflon rings. To install the control valve assembly oil seal first use Special Service Tool: 09612-22011 before installing the control valve housing and gasket with matching mark alignment and torque bolt bolts to 21 Nm (210 kgf-cm, 15 ft. lbs.). The technicians must tighten the self-locking nut to 24.5 Nm (250 kgf-cm, 18 ft. lbs.) then use sealant on the rack housing cap before staking and tightening it to 59 Nm (600 kgf-cm, 43 ft. lbs.). The rack guide sub-assembly requires final assembly with its components and spring adjustment to 0.8 - 1.3 Nm (8 - 13 kgf-cm, 6.9 - 11.3 inch lbs.) before installing the rack guide spring cap lock nut to 28 Nm (290 kgf-cm, 21 ft. lbs.). The last phase includes installing the rack ends in the proper torque sequence of 62 Nm (630 kgf-cm, 46 ft. lbs.) then applying new O-rings to the turn pressure tubes before completing installation by torquing the tubes to 10 Nm (100 kgf-cm, 7 ft. lbs.).
- Q: How to remove and install the Rack And Pinion on Toyota MR2 Spyder?A:Begin the rack and pinion removal by properly aligning the front wheels forward while clearing away the Steering Wheel pad and wheel itself. The first step requires removal of the luggage compartment trim box cover together with the tool box. First detach the pressure feed tube together with the return hose from the power steering vane pump before removing the front luggage under cover. The Rack And Pinion assembly becomes accessible after disconnecting the No. 2 intermediate shaft assembly and both RH and LH tie rod ends by removing the 2 bolts and 2 nuts and 4 plate washers from the rack and pinion support member. The pressure feed tube assembly requires Special Service Tool: 09023-12700 to disconnect pressure feed and return tubes leading to 2 O-ring removal before extracting the bolt and pressure feed tube assembly. Begin pressure feed tube assembly installation with the bolt and torque it to 5.0 Nm (45 inch lbs.) before coating new power steering fluid on the O-rings. Finish installation by using Special Service Tool: 09023-12700 to torque the pressure feed and return tubes to 22.5 Nm (17 ft. lbs.) with a torque wrench of 345 mm (13.58 inch) length. Follow the specified steps to join the Rack And Pinion assembly with the 2 bolts and 2 nuts and 4 plate washers to the rack and pinion support member before tightening them to 57 Nm (580 kgf-cm, 42 ft. lbs.). Reinstall the front luggage under cover together with attaching pressure feed tube and return hose to the power steering vane pump before linking the No. 2 intermediate shaft assembly to the RH and LH tie rod ends. The driver must keep the front wheels aligned and straight before lifting the vehicle. The spiral cable should be centered after which the steering wheel is installed by aligning matchmarks while performing a temporary set nut torque. After bleeding the power steering system workers should check the steering wheel center point before securing the steering wheel set nut to 34 Nm (350 kgf-cm, 25 ft. lbs.). To finish the installation install the steering wheel pad together with the tool box then the luggage compartment trim box cover before inspecting the front wheel alignment.


Related Toyota MR2 Spyder Parts
 Toyota MR2 Spyder Power Steering Pump
 Toyota MR2 Spyder Steering Wheel
 Toyota MR2 Spyder Drag Link
 Toyota MR2 Spyder Ignition Switch
 Toyota MR2 Spyder Power Steering Control Valve
 Toyota MR2 Spyder Power Steering Hose
 Toyota MR2 Spyder Rack and Pinion Boot
 Toyota MR2 Spyder Steering Column Cover
 Toyota MR2 Spyder Steering Gear Box
 Toyota MR2 Spyder Steering Shaft
 Toyota MR2 Spyder Tie Rod End
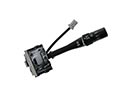 Toyota MR2 Spyder Windshield Wiper Switch