×
ToyotaParts- Hello
- Login or Register
- Quick Links
- Live Chat
- Track Order
- Parts Availability
- RMA
- Help Center
- Contact Us
- Shop for
- Toyota Parts
- Scion Parts
My Garage
My Account
Cart
OEM 2000 Toyota MR2 Spyder Rack And Pinion
Steering Rack And Pinion- Select Vehicle by Model
- Select Vehicle by VIN
Select Vehicle by Model
orMake
Model
Year
Select Vehicle by VIN
For the most accurate results, select vehicle by your VIN (Vehicle Identification Number).
2 Rack And Pinions found

 Product Specifications
- Other Name: Gear Assembly, Power Steering; Rack and Pinion Assembly; Steering Gearbox; Gear Assembly; Gear Assembly, Power Steering(For Rack & Pinion)
- Replaces: 44250-17080, 44200-17081
- Part Name Code: 44250
- Item Weight: 17.00 Pounds
- Item Dimensions: 56.0 x 11.7 x 6.8 inches
- Condition: New
- Fitment Type: Direct Replacement
- SKU: 44250-17081
- Warranty: This genuine part is guaranteed by Toyota's factory warranty.
 Product Specifications
- Other Name: Rack Sub-Assembly, Power; Rack And Pinion Rack Gear, Front; Steering Gearbox; Steering Rack; Rack; Rack Sub-Assembly, Power Steering
- Position: Front
- Part Name Code: 44204
- Item Weight: 5.40 Pounds
- Item Dimensions: 32.4 x 3.1 x 2.8 inches
- Condition: New
- Fitment Type: Direct Replacement
- SKU: 44204-17060
- Warranty: This genuine part is guaranteed by Toyota's factory warranty.
2000 Toyota MR2 Spyder Rack And Pinion
Looking for affordable OEM 2000 Toyota MR2 Spyder Rack And Pinion? Explore our comprehensive catalogue of genuine 2000 Toyota MR2 Spyder Rack And Pinion. All our parts are covered by the manufacturer's warranty. Plus, our straightforward return policy and speedy delivery service ensure an unparalleled shopping experience. We look forward to your visit!
2000 Toyota MR2 Spyder Rack And Pinion Parts Q&A
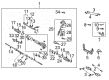
- Q: How to remove and install the Rack And Pinion on 2000 Toyota MR2 Spyder?A: Start by positioning the front wheels parallel to the vehicle direction before removing the steering wheel pad along with the steering wheel. The first step is removal of the luggage compartment trim box cover and the tool box. The first step involves disconnecting power steering hardware from the pressure feed tube and return hose of the vane pump after removing the front luggage under cover. You must first disconnect the tie rod ends and No. 2 intermediate shaft assembly before you can remove the PS rack and pinion assembly through the disassembly of the 2 bolts, 2 nuts, and 4 plate washers from the rack and pinion support member. Special Service Tool: 09023-12700 will help disconnect the pressure feed tubes on the pressure feed tube assembly. Then remove the two O-rings before taking out the bolt which holds the pressure feed tube assembly together. To begin installation start by fitting the pressure feed tube assembly with the bolt then tighten it to 5.0 Nm (50 kgf-cm, 45 inch lbs.) ensuring the 2 new O-rings receive power steering fluid application before connecting the tubes using a torque wrench with a fulcrum length of 345 mm (13.58 inch) and twisted to 22.5 Nm (230 kgf-cm, 17 ft. lbs.). The PS rack and pinion assembly requires installation onto the rack and pinion support member with 2 bolts, 2 nuts and 4 plate washers under a torque limit of 57 Nm (580 kgf-cm, 42 ftlbs). Install the front luggage under cover before you reconnect the pressure feed tube and return hose to the power steering vane pump. The technician should position the spiral cable at the center mark while installing the steering wheel to face straight ahead with wheels elevated. Both matchmarks should be aligned before tightening the steering wheel set nut temporarily. A power steering bleed must occur before checking the steering wheel center point while you torque the steering wheel set nut to 34 Nm (350 kgf-cm, 25 ft. lbs.). As the final step install both the steering wheel pad together with tool box while covering the luggage compartment trim box and examine the front wheel alignment.
Related 2000 Toyota MR2 Spyder Parts
 2000 Toyota MR2 Spyder Power Steering Pump
 2000 Toyota MR2 Spyder Steering Wheel
 2000 Toyota MR2 Spyder Drag Link
 2000 Toyota MR2 Spyder Ignition Switch
 2000 Toyota MR2 Spyder Power Steering Control Valve
 2000 Toyota MR2 Spyder Power Steering Hose
 2000 Toyota MR2 Spyder Rack and Pinion Boot
 2000 Toyota MR2 Spyder Steering Column Cover
 2000 Toyota MR2 Spyder Steering Gear Box
 2000 Toyota MR2 Spyder Steering Shaft
 2000 Toyota MR2 Spyder Tie Rod End
 2000 Toyota MR2 Spyder Wiper Switch