×
ToyotaParts- Hello
- Login or Register
- Quick Links
- Live Chat
- Track Order
- Parts Availability
- RMA
- Help Center
- Contact Us
- Shop for
- Toyota Parts
- Scion Parts
My Garage
My Account
Cart
OEM Toyota Matrix Wheel Stud
Rim Wheel Stud- Select Vehicle by Model
- Select Vehicle by VIN
Select Vehicle by Model
orMake
Model
Year
Select Vehicle by VIN
For the most accurate results, select vehicle by your VIN (Vehicle Identification Number).
2 Wheel Studs found


Toyota Matrix Wheel Stud Part Number: 90942-02082
$4.29 MSRP: $5.97You Save: $1.68 (29%)Ships in 1-3 Business Days

Toyota Matrix Hub & Bearing Bolt, Rear Part Number: 90942-02078
$7.99 MSRP: $11.13You Save: $3.14 (29%)Ships in 1-3 Business Days
Toyota Matrix Wheel Stud
Choose genuine Wheel Stud that pass strict quality control tests. You can trust the top quality and lasting durability. Shopping for OEM Wheel Stud for your Toyota Matrix? Our website is your one-stop destination. We stock an extensive selection of genuine Toyota Matrix parts. The price is affordable so you can save more. It only takes minutes to browse and find the exact fit. Easily add to cart and check out fast. Our hassle-free return policy will keep you stress-free. We process orders quickly for swift delivery. Your parts will arrive faster, so you can get back on the road sooner.
Toyota Matrix Wheel Stud Parts and Q&A
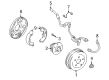
- Q: How to replace a Wheel Stud on the rear axle LH hub on Toyota Matrix?A:Begin the replacement of rear axle LH wheel stud by taking off the rear wheel followed by disconnecting the rear disc brake caliper assembly (LH) with removal of the rear disc. Users need to separate rear stabilizer link assembly LH first then remove the rear Axle Shaft LH nut which requires Special Service Tool: 09930-00010 to finish removing the rear brake drum sub-assembly. The speed sensor rear LH should be separated followed by removal of the parking brake shoe strut set LH using Special Service Tools: 09718-00010 and 09703-30010 before taking out the front brake shoe. The next step requires removal of the rear brake automatic adjust lever LH followed by the rear brake shoe before proceeding to separate the Parking Brake Cable assembly No. 3 and the rear brake tube No. 4 using Special Service Tool: 09023-00100. Work by separating the rear suspension arm assembly No. 1 LH then follow this with the upper Control Arm assembly along with the removal of the axle assembly RR LH and the rear wheel bearing dust deflector No. 1 LH and the rear axle hub & bearing assembly LH. Separate the 2WD drive types by removing the rear axle LH wheel stud through the utilization of Special Service Tool: 09628-10011 along with a hammer handle or equivalent. 4WD drive types need a press tool to extract the LH wheel stud. Installation of the rear axle LH wheel stud for 2WD requires a washer and nut on a new LH wheel stud before using a hammer handle or equivalent to stabilize the hub & bearing assembly for nut tightening. A press fixture with an extension bar helps properly install the new LH wheel stud for 4WD drive systems. Reinstall the rear axle hub & bearing assembly LH together with the rear wheel bearing dust deflector No. 1 LH through the use of Special Service Tools: 09608-10010, 09950-60020 (09951-00680), and 09950-70010 (09951-07100) while maintaining temporary tightness on the upper control arm assembly before installing the axle assembly RR LH. Connect the parking brake cable assembly No. 3 at this time while also installing the rear brake tube No. 4 and briefly tightening the rear suspension arm assembly No. 1 LH. The maintenance worker must first apply high-temperature grease before installing the rear brake shoe and the rear brake automatic adjust lever LH, the front brake shoe along with the parking brake shoe strut set LH. Examine the speed sensor rear left-hand side and confirm rear brake drum assembly correctness before attaching the rear brake drum assembly. The rear drum brake shoe clearance requires adjustment after installing the rear axle shaft LH nut and removing the rear brake drum sub-assembly. Inspecting bearing backlash and axle hub deviation is necessary before reinstallation of the rear brake drum sub-assembly. The service technician must install the rear axle shaft LH nut along with the rear stabilizer link assembly LH while also bleaching the brake line and installing the rear disc and rear disc brake caliper assembly (LH). To complete the installation sequence place the rear wheel with a prescribed torque of 103 Nm (1,050 kgf-cm, 76 ft. lbs.). After stabilization check the fluid level in the reservoir before inspecting and adjusting the rear wheel alignment while verifying the ABS speed sensor signal. Fully tighten the upper control arm assembly and the rear suspension arm assembly No. 1 LH.
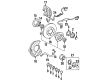
- Q: How to service the front Wheel Stud on Toyota Matrix?A:Begin the front wheel stud service by taking out the front wheel and separating the front disc brake caliper assembly LH before removing the front disc. A combination of Special Service Tool 09628-10011 and a hammer handle equivalent will allow you to successfully remove the front wheel stud LH. Start by installing a washer and nut on a new LH wheel stud according to the given figure then secure the hub sub-assembly LH with the hammer handle or an equivalent tool while tightening the nut to install the LH wheel stud. Reinstall the front disc before installing the front disc brake caliper assembly LH and completing with the front wheel. The specified torque value for installing this component stands at 103 Nm (1,050 kgf/cm, 76 ft. lbs.).


Related Toyota Matrix Parts
 Toyota Matrix Brake Caliper
 Toyota Matrix Wheel Bearing
 Toyota Matrix ABS Pump And Motor Assembly
 Toyota Matrix Brake Caliper Bracket
 Toyota Matrix Brake Drum
 Toyota Matrix Brake Line
 Toyota Matrix Hydraulic Hose
 Toyota Matrix Parking Brake Shoes
 Toyota Matrix Spindle Nut
 Toyota Matrix Wheel Cylinder Repair Kit
 Toyota Matrix Wheel Hub
 Toyota Matrix Yaw Sensor