×
ToyotaParts- Hello
- Login or Register
- Quick Links
- Live Chat
- Track Order
- Parts Availability
- RMA
- Help Center
- Contact Us
- Shop for
- Toyota Parts
- Scion Parts
My Garage
My Account
Cart
OEM Toyota Matrix Control Arm
Suspension Arm- Select Vehicle by Model
- Select Vehicle by VIN
Select Vehicle by Model
orMake
Model
Year
Select Vehicle by VIN
For the most accurate results, select vehicle by your VIN (Vehicle Identification Number).
4 Control Arms found


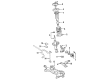
Toyota Matrix Control Arm, Lower Driver Side Part Number: 48069-02190
$173.54 MSRP: $245.66You Save: $72.12 (30%)Ships in 1 Business Day
Toyota Matrix Control Arm, Passenger Side Part Number: 48068-02190
$173.54 MSRP: $245.66You Save: $72.12 (30%)Ships in 1-3 Business Days


Toyota Matrix Control Arm, Passenger Side Part Number: 48068-02021
$192.10 MSRP: $274.27You Save: $82.17 (30%)Ships in 1-3 Business Days

Toyota Matrix Control Arm, Lower Driver Side Part Number: 48069-02021
$192.10 MSRP: $274.27You Save: $82.17 (30%)Ships in 1-3 Business Days
Toyota Matrix Control Arm
Choose genuine Control Arm that pass strict quality control tests. You can trust the top quality and lasting durability. Shopping for OEM Control Arm for your Toyota Matrix? Our website is your one-stop destination. We stock an extensive selection of genuine Toyota Matrix parts. The price is affordable so you can save more. It only takes minutes to browse and find the exact fit. Easily add to cart and check out fast. Our hassle-free return policy will keep you stress-free. We process orders quickly for swift delivery. Your parts will arrive faster, so you can get back on the road sooner.
Toyota Matrix Control Arm Parts and Q&A
- Q: How to install the front lower Control Arm on Toyota Matrix?A:The installation of 4WD front lower suspension arm requires temporary attachment of front lower suspension arm LH to the front suspension crossmember sub-assembly using two bolts and a nut without turning the nut because it has built-in stopper features. Secure the bolt with the nut in place then fully tighten all bolts after suspension stabilization. Proceed by attaching the front suspension crossmember sub-assembly temporarily before linking the steering assembly and mounting both the No. 1 front stabilizer bracket LH and RH according to LH installation. The complete tightening process of the front suspension crossmember sub-assembly must begin before connecting the front lower suspension arm LH and RH following the same sequence for the RH side. The next step requires fitting of the No. 1 steering column hole cover sub-assembly and the No. 2 steering intermediate shaft assembly followed by attaching the column hole cover silencer sheet. Before installation of the front wheels begin by positioning them directly forward. Proceed to install the engine under cover LH and RH followed by torquing the front wheels to 103 Nm (1050 kgf-cm, 76 ft-lbf). When the vehicle stands at standard height stabilize the suspension before tightening bolt A of the front lower suspension arm LH with 137 Nm (1397 kgf-cm, 101 ft-lbf). Follow by using equal torque on bolt B without turning the nut. The process of front wheel alignment inspection and adjustment should be performed as the final step.
- Q: How to Remove the Control Arm in Rear Suspension on Toyota Matrix?A:The first step to taking out the rear lower arm is to disconnect the rear wheel to proceed. The rear floor side member brace on the LH side requires removal by uninstalling its two bolts. Removing the 2 bolts allows separating the No. 3 Parking Brake Cable assembly. Next in the repair sequence is the disconnection of the rear stabilizer link components. Loosen the rear Shock Absorber with coil spring by turning the bolt clockwise until the proper tension is reached. You need to loosen the nut which fastens the rear suspension arm bracket assembly. The technician should disconnect the rear No. 1 suspension arm assembly through bolt removal, followed by secure upper control arm support, and preceding all operations with basic component markings. Free the nut to allow removal of the rear No. 2 suspension toe adjust plate then the rear suspension toe adjust cam sub-assembly before disconnecting the rear shock absorber with coil spring through bolt and nut removal. Remove the bolt from the rear section of the rear No. 1 suspension arm assembly after removing its nut but keep the nut from turning. Repeat the following sequence: begin by removing 3 bolts from the front part before removing the rear suspension arm bracket assembly by taking out the nut, the rear suspension support stopper, and using Special Service Tool: 09632-36010 09950-40011 to remove the lower control arm bushing.


Related Toyota Matrix Parts
 Toyota Matrix Ball Joint
 Toyota Matrix Sway Bar Link
 Toyota Matrix Bump Stop
 Toyota Matrix Coil Spring Insulator
 Toyota Matrix Coil Springs
 Toyota Matrix Control Arm Bolt
 Toyota Matrix Front Cross-Member
 Toyota Matrix Shock Absorber
 Toyota Matrix Shock and Strut Boot
 Toyota Matrix Steering Knuckle
 Toyota Matrix Strut Mounts
 Toyota Matrix Sway Bar Bracket
Browse Toyota Matrix Control Arm by Years
2013
2012
2011
2010
2009
2008
2007
2006
2005
2004
2003