×
ToyotaParts- Hello
- Login or Register
- Quick Links
- Live Chat
- Track Order
- Parts Availability
- RMA
- Help Center
- Contact Us
- Shop for
- Toyota Parts
- Scion Parts
My Garage
My Account
Cart
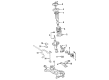
OEM 2009 Toyota Matrix Control Arm
Suspension Arm- Select Vehicle by Model
- Select Vehicle by VIN
Select Vehicle by Model
orMake
Model
Year
Select Vehicle by VIN
For the most accurate results, select vehicle by your VIN (Vehicle Identification Number).
2 Control Arms found


2009 Toyota Matrix Control Arm, Lower Driver Side
Part Number: 48069-02190$168.48 MSRP: $238.50You Save: $70.02 (30%)Ships in 1 Business DayProduct Specifications- Other Name: Arm Sub-Assembly, Suspension; Suspension Control Arm, Front Left; Control Arm Assembly; Lower Control Arm; Arm Sub-Assembly, Front Suspension, Lower Driver Side; Suspension Control Arm
- Position: Lower Driver Side
- Part Name Code: 48069
- Item Weight: 9.20 Pounds
- Item Dimensions: 18.4 x 4.2 x 16.8 inches
- Condition: New
- Fitment Type: Direct Replacement
- SKU: 48069-02190
- Warranty: This genuine part is guaranteed by Toyota's factory warranty.

2009 Toyota Matrix Control Arm, Passenger Side
Part Number: 48068-02190$168.48 MSRP: $238.50You Save: $70.02 (30%)Ships in 1-3 Business DaysProduct Specifications- Other Name: Arm Sub-Assembly, Suspension; Suspension Control Arm, Front Right; Control Arm Assembly; Lower Control Arm; Arm Sub-Assembly, Front Suspension, Lower Passenger Side; Suspension Control Arm
- Position: Passenger Side
- Part Name Code: 48068
- Item Weight: 9.20 Pounds
- Item Dimensions: 18.5 x 4.1 x 17.0 inches
- Condition: New
- Fitment Type: Direct Replacement
- SKU: 48068-02190
- Warranty: This genuine part is guaranteed by Toyota's factory warranty.
2009 Toyota Matrix Control Arm
Looking for affordable OEM 2009 Toyota Matrix Control Arm? Explore our comprehensive catalogue of genuine 2009 Toyota Matrix Control Arm. All our parts are covered by the manufacturer's warranty. Plus, our straightforward return policy and speedy delivery service ensure an unparalleled shopping experience. We look forward to your visit!
2009 Toyota Matrix Control Arm Parts Q&A
- Q: How to install the rear lower control arm on 2009 Toyota Matrix?A: Begin installation of the rear lower control arm by using Special Service Tool: 09632-36010 09950-40011 to properly position a new lower control arm bushing which needs to be installed in the correct direction with a specific dimension of 15 +/- 0.5 mm (0.591 +/- 0.0196 in.). Proper orientation of the rear suspension support stopper requires your attention before installation. The process begins by tightening the rear suspension arm bracket assembly nut before moving on to tighten the rear shock absorber along with coil spring using both the nut and bolt. Apply temporary torque to the rear No. 1 suspension arm assembly that connects to the rear suspension member using bolt and nut. At this stage the nut must not spin while the bolt receives torque. Proper torque values for the three bolts is 65 Nm (663 kgf-cm, 48 ft-lbf) starting with Bolt Number 1 through 3. To install the rear suspension toe adjust cam sub-assembly from the front side of the vehicle you must first briefly tighten the rear axle assembly to the rear No. 1 suspension arm assembly then apply temporary torque to the nut in the rear No. 2 suspension toe adjust plate. The rear stabilizer link assembly installation should be followed by the No. 3 parking brake cable assembly with two bolts tightening to 6.0 Nm (61 kgf-cm, 53 in-lbf). Burton the rear floor side member brace to the LH side through two bolts which require a torque of 30 Nm (306 kgf-cm, 22 ft-lbf). The technician applies torque to the rear No. 1 suspension arm assembly using Special Service Tool: 09961-00950 tools to attain 64 Nm (656 kgf-cm, 47 ft-lbf) torques with the tool or 87 Nm (887 kgf-cm, 64 ft-lbf) without it while the tool must have 425 mm (16.73 in.) fulcrum length and standard vehicle height conditions. The installation process requires applying 140 Nm (1428 kgf-cm, 103 ft-lbf) torque to the bolt and it should be followed by aligning matchmarks on the rear No. 2 suspension toe adjust plate which needs to be tightened with a 74 Nm (755 kgf-cm, 55 ft-lbf) torque under standard vehicle height conditions. The complete tightening process of the rear suspension arm bracket assembly requires Special Service Tool: 09961-00950 to achieve a torque value of 81 Nm (829 kgf-cm, 60 ft-lbf) or 110 Nm (1122 kgf-cm, 81 ft-lbf) unless using the tool, then ending with the rear shock absorber coil spring tightening. The technician must inspect and perform adjustments on the rear wheel alignment.
Related 2009 Toyota Matrix Parts
 2009 Toyota Matrix Ball Joint
 2009 Toyota Matrix Sway Bar Link
 2009 Toyota Matrix Bump Stop
 2009 Toyota Matrix Coil Spring Insulator
 2009 Toyota Matrix Control Arm Bolt
 2009 Toyota Matrix Front Cross-Member
 2009 Toyota Matrix Shock Absorber
 2009 Toyota Matrix Shock And Strut Mount
 2009 Toyota Matrix Shock and Strut Boot
 2009 Toyota Matrix Steering Knuckle
 2009 Toyota Matrix Strut Housing
 2009 Toyota Matrix Sway Bar Bracket