×
ToyotaParts- Hello
- Login or Register
- Quick Links
- Live Chat
- Track Order
- Parts Availability
- RMA
- Help Center
- Contact Us
- Shop for
- Toyota Parts
- Scion Parts
My Garage
My Account
Cart
OEM Toyota Matrix Brake Line
Brake Hose- Select Vehicle by Model
- Select Vehicle by VIN
Select Vehicle by Model
orMake
Model
Year
Select Vehicle by VIN
For the most accurate results, select vehicle by your VIN (Vehicle Identification Number).
13 Brake Lines found

Toyota Matrix Brake Line, Rear Driver Side Part Number: 47324-01040
$4.29 MSRP: $5.97You Save: $1.68 (29%)Ships in 1-3 Business Days
Toyota Matrix Brake Line, Rear Driver Side Part Number: 47324-01030
$10.03 MSRP: $13.96You Save: $3.93 (29%)Ships in 1-3 Business Days
Toyota Matrix Flex Hose, Passenger Side Part Number: 90947-A2019
$44.92 MSRP: $62.53You Save: $17.61 (29%)Ships in 1-3 Business DaysToyota Matrix Flex Hose, Rear Driver Side Part Number: 90947-A2020
$48.15 MSRP: $67.02You Save: $18.87 (29%)Ships in 1-3 Business Days
Toyota Matrix Flex Hose, Rear Part Number: 90080-94139
$54.72 MSRP: $76.17You Save: $21.45 (29%)Ships in 1-3 Business Days
Toyota Matrix Flex Hose, Rear Part Number: 90947-02C25
$58.90 MSRP: $81.99You Save: $23.09 (29%)Ships in 1-3 Business Days
Toyota Matrix Flex Hose, Rear Driver Side Part Number: 90947-A2024
$68.84 MSRP: $96.62You Save: $27.78 (29%)Ships in 1-3 Business Days
Toyota Matrix Flex Hose, Passenger Side Part Number: 90947-A2023
$73.81 MSRP: $103.61You Save: $29.80 (29%)Ships in 1-3 Business Days
Toyota Matrix Flex Hose, Front Driver Side Part Number: 90947-A2078
$89.46 MSRP: $125.57You Save: $36.11 (29%)Ships in 1-3 Business DaysToyota Matrix Flex Hose, Front Passenger Side Part Number: 90947-A2077
$89.46 MSRP: $125.57You Save: $36.11 (29%)Ships in 1-3 Business Days
Toyota Matrix Flex Hose, Driver Side Part Number: 90080-94137
$89.46 MSRP: $125.57You Save: $36.11 (29%)Ships in 1-3 Business DaysToyota Matrix Flex Hose, Passenger Side Part Number: 90080-94136
$89.46 MSRP: $125.57You Save: $36.11 (29%)Ships in 1-3 Business Days
Toyota Matrix Flex Hose, Rear Part Number: 90080-94138
$49.50 MSRP: $68.90You Save: $19.40 (29%)Ships in 1-3 Business Days
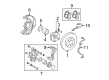
Toyota Matrix Brake Line
Choose genuine Brake Line that pass strict quality control tests. You can trust the top quality and lasting durability. Shopping for OEM Brake Line for your Toyota Matrix? Our website is your one-stop destination. We stock an extensive selection of genuine Toyota Matrix parts. The price is affordable so you can save more. It only takes minutes to browse and find the exact fit. Easily add to cart and check out fast. Our hassle-free return policy will keep you stress-free. We process orders quickly for swift delivery. Your parts will arrive faster, so you can get back on the road sooner.
Toyota Matrix Brake Line Parts and Q&A
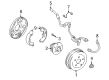
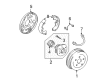
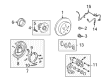
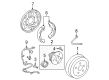
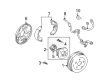
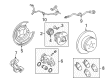
- Q: How to remove the rear Brake Line on Toyota Matrix?A:It is necessary to mark both the RH and LH rear brake flexible hoses when disconnecting them altogether. Start the procedure by removing the rear wheel then draining the brake fluid before cleaning off leaking fluid from painted components. The removal of a rear flexible hose on Torsion Beam Type Suspension requires firstly the bolt removal connecting it to the rear axle beam and afterward removing the union bolt and gasket to detach the hose from the rear disc brake cylinder assembly. The brake line requires a 10 mm union nut wrench for disconnection but the rear flexible hose should be gripped by another wrench to avoid line kinking or damage and stop outside objects from moving into the brake line. Finish the process by taking away the clip along with the rear flexible hose. The Double Wishbone Type Suspension repair process begins by disassembling the rear flexible hose from the rear disc brake cylinder assembly through removal of the union bolt and gasket. Next, use the union nut wrench (10 mm) to detach the brake line while maintaining a secure hold on the rear flexible hose with a wrench. Additionally, avoid flexing or damaging the brake line and stop any foreign material from entering its path before removing the clip and the rear flexible hose.
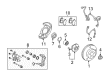
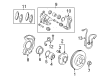
- Q: How to install the front Brake Line on Toyota Matrix?A:The installation of front brake flexible hose begins with checking the part number since it determines if left and right hoses can be used interchangeably. It is crucial to verify identification marks from disconnection before reusing hoses before their connection. The front flexible hose installation begins with attaching it to the front disc brake cylinder assembly through the union bolt using a fresh gasket while torquing at 29 Nm (296 kgf-cm, 21 ft-lbf). Then install the front flexible hose clip with quality maintenance by advancing it to its farthest point. Use a 10 mm union nut wrench to connect the brake line with the front flexible hose by holding the hose still with another wrench while you apply a torque of 15 Nm for independent wrench use and 14 Nm with a union nut wrench. The brake line must be protected from kinking as well as from any foreign matter infiltrating the tube. A torque wrench with 250 mm (9.84 in.) fulcrum should apply torque with the union nut wrench parallel to the wrench for precise torque delivery. The first step in installation involves attaching the front flexible hose to the absorber bracket through a bolt that needs 29 Nm (296 kgf-cm, 21 ft-lbf) torque. It is beneficial to install the speed sensor harness bracket simultaneously. First set the front wheel then torque it to 103 Nm (1050 kgf-cm, 76 ft-lbf). Finally inspect for fluid leaks and check the level while bleeding the brake line after filling the reservoir with brake fluid.


Related Toyota Matrix Parts
 Toyota Matrix Wheel Bearing
 Toyota Matrix ABS Pump And Motor Assembly
 Toyota Matrix Backing Plate
 Toyota Matrix Brake Caliper Bracket
 Toyota Matrix Brake Caliper Piston
 Toyota Matrix Brake Drum
 Toyota Matrix Brake Proportioning Valve
 Toyota Matrix Hydraulic Hose
 Toyota Matrix Parking Brake Cable
 Toyota Matrix Spindle Nut
 Toyota Matrix Wheel Cylinder Repair Kit
 Toyota Matrix Yaw Sensor