×
ToyotaParts- Hello
- Login or Register
- Quick Links
- Live Chat
- Track Order
- Parts Availability
- RMA
- Help Center
- Contact Us
- Shop for
- Toyota Parts
- Scion Parts
My Garage
My Account
Cart
OEM Toyota FJ Cruiser Window Motor
Window Lift Motor- Select Vehicle by Model
- Select Vehicle by VIN
Select Vehicle by Model
orMake
Model
Year
Select Vehicle by VIN
For the most accurate results, select vehicle by your VIN (Vehicle Identification Number).
2 Window Motors found


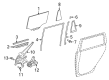
Toyota FJ Cruiser Window Motor Part Number: 85720-AE010
$316.64 MSRP: $452.09You Save: $135.45 (30%)Ships in 1-2 Business Days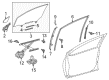
Toyota FJ Cruiser Window Motor Part Number: 85710-AE010
$316.64 MSRP: $452.09You Save: $135.45 (30%)Ships in 1-2 Business Days
Toyota FJ Cruiser Window Motor
Choose genuine Window Motor that pass strict quality control tests. You can trust the top quality and lasting durability. Shopping for OEM Window Motor for your Toyota FJ Cruiser? Our website is your one-stop destination. We stock an extensive selection of genuine Toyota FJ Cruiser parts. The price is affordable so you can save more. It only takes minutes to browse and find the exact fit. Easily add to cart and check out fast. Our hassle-free return policy will keep you stress-free. We process orders quickly for swift delivery. Your parts will arrive faster, so you can get back on the road sooner.
The Window Motor is an important part of Toyota FJ Cruiser that represents the quality of the vehicle production. This window motor is specifically manufactured and developed for the Toyota FJ Cruiser which allows efficient control of the windows thus providing comfort of fresh air and shield from weather. It interoperates with different models of FJ Cruiser making it possible for the user to enhance on the efficiency and safety aspect of the car. The Toyota FJ Cruiser Window Motor rotates the window regulator by providing an electric current for the effective and fast window control as it plays an important role to regulate the comfort level of the interior of the car. The window motor may give in to mechanical friction and may experience slow operation or even poor operation at all after some time hence the need to have a check on the same. The Toyota FJ Cruiser is a model which is understood to be extremely sound and suitable for intense, off-road use, which means that the window motor is a very important component of one which is expected to work well in almost any environment. When it comes to the differentiation of Toyota FJ Cruiser Window Motor in the automotive market, one can identify its rather robust construction and rather simple installation process. Through its dependability, the Toyota FJ Cruiser Window Motor improves the firm's performance while at the same time improving the safety and comfort of all occupants which makes it an important component of the FJ Cruiser.
Toyota FJ Cruiser Window Motor Parts and Q&A
- Q: How to install the Window Motor assembly on Toyota FJ Cruiser?A:Before assembly start by applying MP grease to moving and rotating points of the regulator motor assembly. A "Torx" T25 socket wrench enables mounting the power window regulator motor by three screws; make sure to tighten these screws to 5.4 Nm (55 kgf-cm, 48 in-lbf). This procedure demands the front door window regulator sub-assemblies alongside front door glass sub-assemblies and finally front door window frame rear lower components and front door lower frame bracket garnishes. The following step involves the installation of the front door frame sub-assembly front lower before adding the front door glass run and front door Weather Strip. The next procedure involves the installation of the front door check assembly while also installing the front door inside panel plate and the front door service hole cover. You must first secure both the front No. 1 speaker and front door glass outer Weather Strip assembly until you finish with the outer rear view mirror. Complementallly install the front No. 2 door service hole cover alongside the front door trim board sub-assembly and the front armrest base upper panel. The installment ends when attaching the cable to the negative terminal of the battery using a torque force of 3.9 Nm (40 kgf-cm, 35 in-lbf).
- Q: How to remove the Window Motor from the RH side on Toyota FJ Cruiser?A:Before starting the removal process of the RH power window regulator motor it is necessary to first separate the battery cable from the negative terminal. Next, remove the front armrest base upper panel, front door trim board sub-assembly, front No. 2 door service hole cover, outer rear view mirror, front door glass outer Weather Strip assembly, front No. 1 speaker, front door service hole cover, front door inside panel plate, front door check assembly, front door Weather Strip, front door glass run, front door frame sub-assembly front lower, front door lower frame bracket garnish, front door window frame rear lower, and front door glass sub-assembly. The front door window regulator sub-assembly should be removed next before attention is turned to separate the power window regulator motor assembly through the removal of its 3 "Torx" socket wrench T25 secured screws.


Related Toyota FJ Cruiser Parts
 Toyota FJ Cruiser Armrest
 Toyota FJ Cruiser Door Check
 Toyota FJ Cruiser Door Hinge
 Toyota FJ Cruiser Door Latch Cable
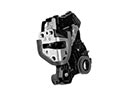 Toyota FJ Cruiser Door Lock
 Toyota FJ Cruiser Door Lock Actuator
 Toyota FJ Cruiser Door Lock Cylinder
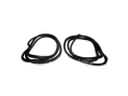 Toyota FJ Cruiser Door Seal
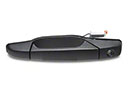 Toyota FJ Cruiser Exterior Door Handle
 Toyota FJ Cruiser Interior Door Handle
 Toyota FJ Cruiser Weather Strip
 Toyota FJ Cruiser Window Run