×
ToyotaParts- Hello
- Login or Register
- Quick Links
- Live Chat
- Track Order
- Parts Availability
- RMA
- Help Center
- Contact Us
- Shop for
- Toyota Parts
- Scion Parts
My Garage
My Account
Cart
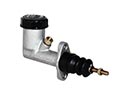
OEM Toyota Celica Clutch Slave Cylinder
- Select Vehicle by Model
- Select Vehicle by VIN
Select Vehicle by Model
orMake
Model
Year
Select Vehicle by VIN
For the most accurate results, select vehicle by your VIN (Vehicle Identification Number).
6 Clutch Slave Cylinders found


Toyota Celica Slave Cylinder Part Number: 31470-30222
$66.82 MSRP: $93.80You Save: $26.98 (29%)Ships in 1-3 Business Days


Toyota Celica Slave Cylinder Part Number: 31470-20231
$91.00 MSRP: $127.73You Save: $36.73 (29%)Ships in 1-3 Business Days


Toyota Celica Cylinder Assembly, Clutch Release Part Number: 31470-32032
$82.23 MSRP: $115.42You Save: $33.19 (29%)

Toyota Celica Slave Cylinder Part Number: 31470-12093
$82.23 MSRP: $115.42You Save: $33.19 (29%)Toyota Celica Slave Cylinder Part Number: 31470-32023
$73.58 MSRP: $103.28You Save: $29.70 (29%)Toyota Celica Slave Cylinder Part Number: 31470-20210
$97.16 MSRP: $136.37You Save: $39.21 (29%)
Toyota Celica Clutch Slave Cylinder
Choose genuine Clutch Slave Cylinder that pass strict quality control tests. You can trust the top quality and lasting durability. Shopping for OEM Clutch Slave Cylinder for your Toyota Celica? Our website is your one-stop destination. We stock an extensive selection of genuine Toyota Celica parts. The price is affordable so you can save more. It only takes minutes to browse and find the exact fit. Easily add to cart and check out fast. Our hassle-free return policy will keep you stress-free. We process orders quickly for swift delivery. Your parts will arrive faster, so you can get back on the road sooner.
Toyota Celica Clutch Slave Cylinder Parts and Q&A
- Q: How to service and repair the Clutch Slave Cylinder on Toyota Celica?A:The Clutch Slave Cylinder repair process starts with disconnecting the clutch line after properly lifting the vehicle while removing the LH and RH engine under covers. Special Service Tool 09023-00100 enables users to disconnect the clutch line while a storage container catches fluid before lowering the vehicle. You must start by disassembling the air cleaner case assembly with the air hose then detach the clutch line clamp set bolt before finally removing the two bolts for clutch line bracket and release cylinder. To perform disassembly simply pull out the boot containing the push rod before removing it off the push rod. Keep the spring and piston submerged in waste cloth while using compressed air to extract them from the cylinder pipe because abrupt motion may lead to fluid splatter. When assembling install the bleeder plug with 8.4 Nm (85 kgf-cm, 74 inch lbs.) torque while applying lithium soap base glycol grease to the piston before inserting it with the spring into the cylinder. To assemble the components begin by cutting the push rod inside the boot until it reaches a suitable length after which attach the push rod to the boot and then to the cylinder. The installation process requires two bolts on the release cylinder and clutch line bracket to be tightened at 12 Nm (120 kgf-cm, 9 ft. lbs.) torque and a 4.9 Nm (50 kgf-cm, 43 inch lbs.) torque fastening of the clutch line clamp to the clutch line bracket followed by the correct installation of the air cleaner case assembly with its air hose. After raising the vehicle Special Service Tool: 09023-00100 must be used to connect the clutch line at 15 Nm (155 kgf-cm, 11 ft. lbs.) torque. The process includes filling the brake reservoir with fluid, bleeding the clutch system, leak inspection, and reinstallation of LH and RH engine under covers before lowering the vehicle.

Related Toyota Celica Parts
 Toyota Celica Clutch Master Cylinder
 Toyota Celica Flywheel
 Toyota Celica Automatic Transmission Shift Levers
 Toyota Celica Clutch Disc
 Toyota Celica Clutch Fork
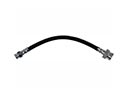 Toyota Celica Clutch Hose
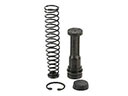 Toyota Celica Clutch Master Repair Kit
 Toyota Celica Clutch Release Bearing
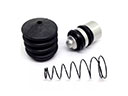 Toyota Celica Clutch Slave Repair Kit
 Toyota Celica Pilot Bearing
 Toyota Celica Pressure Plate
 Toyota Celica Transfer Case