×
ToyotaParts- Hello
- Login or Register
- Quick Links
- Live Chat
- Track Order
- Parts Availability
- RMA
- Help Center
- Contact Us
- Shop for
- Toyota Parts
- Scion Parts
My Garage
My Account
Cart
OEM Toyota Celica Air Bag Sensor
Air Bag Impact Sensor- Select Vehicle by Model
- Select Vehicle by VIN
Select Vehicle by Model
orMake
Model
Year
Select Vehicle by VIN
For the most accurate results, select vehicle by your VIN (Vehicle Identification Number).
11 Air Bag Sensors found

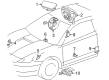
Toyota Celica SDM Module Part Number: 89170-20180
$668.67 MSRP: $841.73You Save: $173.06 (21%)Ships in 1-3 Business Days
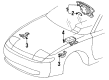
Toyota Celica Side Impact Sensor, Driver Side Part Number: 89835-20010
$220.06 MSRP: $269.88You Save: $49.82 (19%)Ships in 1-3 Business Days
Toyota Celica Side Impact Sensor, Passenger Side Part Number: 89860-20030
$225.61 MSRP: $276.69You Save: $51.08 (19%)Ships in 1-3 Business Days
Toyota Celica Side Impact Sensor, Driver Side Part Number: 89830-20030
$225.61 MSRP: $276.69You Save: $51.08 (19%)Ships in 1-3 Business Days
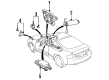
Toyota Celica Front Impact Sensor, Passenger Side Part Number: 89173-29165
$127.02 MSRP: $154.45You Save: $27.43 (18%)Ships in 1-3 Business Days

Toyota Celica SDM Module Part Number: 89170-20190
Toyota Celica Air Bag Sensor
Choose genuine Air Bag Sensor that pass strict quality control tests. You can trust the top quality and lasting durability. Shopping for OEM Air Bag Sensor for your Toyota Celica? Our website is your one-stop destination. We stock an extensive selection of genuine Toyota Celica parts. The price is affordable so you can save more. It only takes minutes to browse and find the exact fit. Easily add to cart and check out fast. Our hassle-free return policy will keep you stress-free. We process orders quickly for swift delivery. Your parts will arrive faster, so you can get back on the road sooner.
Toyota Celica Air Bag Sensor is an essential component in the safety schema of Toyota Celica automobiles that are reputed for their efficiency and durability. This basic Air Bag Sensor identifies impacts during an accident and immediately alerts the control unit to inflate the air bags hence improving customer's safety. Different models of Celica have the Air Bag Sensor embedded in different features over the years with the primary objective of enhancing the optimum deployment of the air bags as intended. The model Toyota Celica with manufacturing records from 1970 and up to 2006 has a good record of technological advancement and the important safety device- the Air Bag Sensor. This is because compatibility between multiple generations of Celicia guarantees that motorists have access to contemporary generative sensor capability, that enhances reaction aptitude and collision identification frequency. This readiness to ensure that the cars are safe is an aspect of Toyota engineering culture, and the Celica stands out in the market. Moreover, Air Bag Sensor has a small size and reliable performance; thus, it positively influences the car's efficiency and confirms Toyota's reliability. Being a great model of automobile, especially in its sporty range and powerful performance, Toyota Celica continues to be a car worth considering; the Air Bag Sensor is, undeniably, a significant part of the car's safety and reliability aspects. To sum it all up, the Toyota Celica Air Bag Sensor improves security and exemplifies the distinctive Toyota concept; therefore, it should be considered as a feature that every owner of a Celica automobile should invest in.
Toyota Celica Air Bag Sensor Parts and Q&A
- Q: How to service and repair the Air Bag Sensor on Toyota Celica?A:A repair or service process on the impact sensor requires uninstalling the No.2 Door Inside Handle Bezel together with the Outer Mirror Switch Assembly along with Front Door Lower Frame Bracket Garnish and Door Trim. After disconnecting the door side Air Bag sensor connector you must keep the sensor assembly installed before removing the two bolts which secure the door side Air Bag sensor. Installation requires torquing the two bolts of the door side Air Bag sensor to 82 kg.cm or 71 in.lb (8.0 Nm). Securely connect the sensor connector once installation is complete while making sure the arrow on the sensor faces the vehicle's front aspect because this action prevents diagnostic system detection of any malfunction codes. Reassemble the installation by placing in order the Door Trim followed by the Front Door Lower Frame Bracket Garnish then the Outer Mirror Switch Assembly and conclude with the No.2 Door Inside Handle Bezel. The technicians must replace sensors with new parts instead of using damaged sensors from accident sites and refrain from repairing sensors for reinstallation. Replace the sensor immediately when it drops or exhibits sign of damage with an authentic new unit.
- Q: When should the front Air Bag sensor be replaced in relation to the door side Air Bag sensor on Toyota Celica?A:The front Air Bag sensor must be replaced when the side Air Bag assembly detects a collision or when door side Air Bag sensor displays malfunction during testing procedures or after detecting an accidental sensor drop. The correct method for uninstalled then reinstalling the door side Air Bag sensor remains essential to follow.


Related Toyota Celica Parts
 Toyota Celica Speedometer
 Toyota Celica Coolant Temperature Sensor
 Toyota Celica Power Window Switch
 Toyota Celica Dimmer Switch
 Toyota Celica Distributor Cap
 Toyota Celica Door Jamb Switch
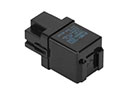 Toyota Celica Flasher Relay
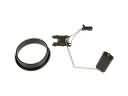 Toyota Celica Fuel Level Sensor
 Toyota Celica Neutral Safety Switch
 Toyota Celica Radiator Fan Relay
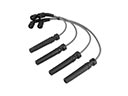 Toyota Celica Spark Plug Wire
 Toyota Celica Turn Signal Flasher