×
ToyotaParts- Hello
- Login or Register
- Quick Links
- Live Chat
- Track Order
- Parts Availability
- RMA
- Help Center
- Contact Us
- Shop for
- Toyota Parts
- Scion Parts
My Garage
My Account
Cart
OEM Toyota Avalon Crankshaft Seal
- Select Vehicle by Model
- Select Vehicle by VIN
Select Vehicle by Model
orMake
Model
Year
Select Vehicle by VIN
For the most accurate results, select vehicle by your VIN (Vehicle Identification Number).
7 Crankshaft Seals found


Toyota Avalon Oil Seal, Front Part Number: 90311-A0005
$19.11 MSRP: $26.60You Save: $7.49 (29%)Ships in 1-3 Business Days

Toyota Avalon Rear Main Seal Part Number: 90311-A0027
$44.08 MSRP: $61.37You Save: $17.29 (29%)Ships in 1-3 Business Days

Toyota Avalon Crankshaft Seal, Front Part Number: 90311-A0015
$8.11 MSRP: $11.29You Save: $3.18 (29%)Ships in 1-3 Business Days

Toyota Avalon Rear Main Seal Part Number: 90311-A0020
$29.15 MSRP: $40.57You Save: $11.42 (29%)Ships in 1-2 Business Days
Toyota Avalon Seal, Oil(For Timing Gear Case Or Timing Chain Case), Front Part Number: 90311-A0028
$9.43 MSRP: $13.12You Save: $3.69 (29%)Ships in 1-3 Business Days
Toyota Avalon Crankshaft Seal, Front Part Number: 90311-A0033
$14.09 MSRP: $19.61You Save: $5.52 (29%)Ships in 1-3 Business Days
Toyota Avalon Rear Main Seal Part Number: 90311-A0035
$41.57 MSRP: $57.87You Save: $16.30 (29%)Ships in 1-3 Business Days
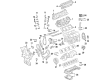
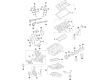
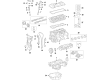
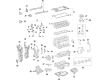
Toyota Avalon Crankshaft Seal
Choose genuine Crankshaft Seal that pass strict quality control tests. You can trust the top quality and lasting durability. Shopping for OEM Crankshaft Seal for your Toyota Avalon? Our website is your one-stop destination. We stock an extensive selection of genuine Toyota Avalon parts. The price is affordable so you can save more. It only takes minutes to browse and find the exact fit. Easily add to cart and check out fast. Our hassle-free return policy will keep you stress-free. We process orders quickly for swift delivery. Your parts will arrive faster, so you can get back on the road sooner.
The Crankshaft Seal is an important part of Toyota Avalon automobile placed at the frontal area of it that offers protection. This is usually made up of round metal and rubber; the main function of this item is to stop oil leaks from happening in the crankcase. Because the Crankshaft Seal does not allow debris and oil leak in and out of the engine, it plays a vital role in ensuring that the engine wears less and has reduced friction. There might be signs that warn the driver of the need for a crankshaft seal replacement, for instance, greater mileage, or signs of oil leak, then it is advisable to opt for the replacement to enhance the efficiency of the car's engine.
Toyota Avalon Crankshaft Seal Parts and Q&A
- Q: How to remove the front crankshaft seal on Toyota Avalon?A:The removal process for the 2GR-FE engine crankshaft seal begins with disassembly of the front wheel at the right-hand side and continuing with the front fender apron seal removal on the right. The next step is to uninstall both the V-bank cover sub-assembly together with the fan and generator V belt. Remove the crankshaft pulley as the subsequent step. The removal of the timing chain cover oil seal requires a screwdriver with taped tip which you should utilize to pry it out without damaging the crankshaft.
- Q: How to install the Crankshaft Seal on Toyota Avalon?A:The installation of a new 2GR-FE engine rear oil seal requires applying MP grease onto its lip. Install the oil seal with Special Service Tool: 09223-15030, 09950-70010 along with a hammer until its depth reaches -0.5 to 0.5 mm (-0.020 to 0.020 in.). Special Service Tools 09213-70011 and 09213-70020 should be applied to hold the crankshaft in place. You should apply Toyota Genuine Adhesive 1324, Three Bond 1324 or an equivalent product to 2 or 3 threads from the mounting bolt end. The front spacer and drive plate and rear spacer should be installed onto the crankshaft before securing the 8 mounting bolts in multiple steps until their torque reaches 83 Nm (850 kgf-cm, 61 ft-lbf). The automatic transaxle assembly installation should be the final step of this process.


Related Toyota Avalon Parts
 Toyota Avalon Camshaft
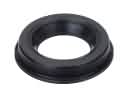 Toyota Avalon Camshaft Seal
 Toyota Avalon Crankshaft Pulley
 Toyota Avalon Dipstick Tube
 Toyota Avalon Engine Mount
 Toyota Avalon Harmonic Balancer
 Toyota Avalon Intake Valve
 Toyota Avalon Oil Drain Plug Gasket
 Toyota Avalon Oil Filler Cap
 Toyota Avalon Rod Bearing
 Toyota Avalon Spool Valve
 Toyota Avalon Timing Chain