×
ToyotaParts- Hello
- Login or Register
- Quick Links
- Live Chat
- Track Order
- Parts Availability
- RMA
- Help Center
- Contact Us
- Shop for
- Toyota Parts
- Scion Parts
My Garage
My Account
Cart
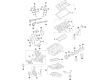
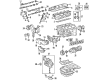
OEM Toyota Avalon Camshaft
Cam- Select Vehicle by Model
- Select Vehicle by VIN
Select Vehicle by Model
orMake
Model
Year
Select Vehicle by VIN
For the most accurate results, select vehicle by your VIN (Vehicle Identification Number).
23 Camshafts found


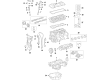
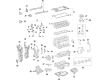
Toyota Avalon Camshaft Part Number: 13501-36030
$341.17 MSRP: $499.98You Save: $158.81 (32%)Ships in 1-3 Business Days


Toyota Avalon Camshaft Sub-Assembly Part Number: 13053-20010
$335.39 MSRP: $478.86You Save: $143.47 (30%)Ships in 1-3 Business Days
Toyota Avalon Camshaft Part Number: 13502-36020
$341.17 MSRP: $499.98You Save: $158.81 (32%)Ships in 1-3 Business Days
Toyota Avalon Camshaft Part Number: 13502-F0020
$362.05 MSRP: $530.60You Save: $168.55 (32%)Ships in 1-3 Business Days
Toyota Avalon Camshaft Part Number: 13501-F0030
$362.05 MSRP: $530.60You Save: $168.55 (32%)Ships in 1-3 Business Days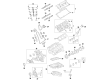
Toyota Avalon Camshaft Sub-Assembly Part Number: 13053-31031
$458.52 MSRP: $671.96You Save: $213.44 (32%)Ships in 1-3 Business Days
Toyota Avalon Camshaft Part Number: 13502-20903
$503.02 MSRP: $737.18You Save: $234.16 (32%)Ships in 1-3 Business Days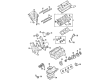
Toyota Avalon Camshaft Part Number: 13502-31061
$541.61 MSRP: $793.74You Save: $252.13 (32%)Ships in 1-3 Business DaysToyota Avalon Camshaft Part Number: 13501-31091
$537.30 MSRP: $787.41You Save: $250.11 (32%)Ships in 1-3 Business Days
Toyota Avalon Camshaft Sub-Assembly Part Number: 13054-31061
$533.55 MSRP: $781.93You Save: $248.38 (32%)Ships in 1-3 Business Days
Toyota Avalon Camshaft Part Number: 13053-31061
$541.61 MSRP: $793.74You Save: $252.13 (32%)Ships in 1-3 Business Days
Toyota Avalon Camshaft Sub-Assembly Part Number: 13502-31110
$548.42 MSRP: $803.72You Save: $255.30 (32%)Ships in 1-3 Business Days
Toyota Avalon Camshaft Sub-Assembly Part Number: 13501-31140
$548.42 MSRP: $803.72You Save: $255.30 (32%)Ships in 1-3 Business Days
Toyota Avalon Camshaft Sub-Assembly Part Number: 13054-31110
$548.42 MSRP: $803.72You Save: $255.30 (32%)Ships in 1-3 Business Days
Toyota Avalon Camshaft Sub-Assembly, No Part Number: 13502-20902
$549.67 MSRP: $805.55You Save: $255.88 (32%)Ships in 1-3 Business Days
Toyota Avalon Camshaft Sub-Assembly, No Part Number: 13054-20902
$557.95 MSRP: $817.69You Save: $259.74 (32%)Ships in 1-3 Business Days
Toyota Avalon Camshaft Sub-Assembly Part Number: 13053-31110
$582.36 MSRP: $853.46You Save: $271.10 (32%)Ships in 1-3 Business Days
Toyota Avalon Camshaft Part Number: 13501-20020
$305.92 MSRP: $436.78You Save: $130.86 (30%)Ships in 1-3 Business Days
Toyota Avalon Camshaft Part Number: 13501-20040
$320.36 MSRP: $457.41You Save: $137.05 (30%)Ships in 1-3 Business Days


Toyota Avalon Camshaft Part Number: 13054-20010
$335.62 MSRP: $479.20You Save: $143.58 (30%)
| Page 1 of 2 |Next >
1-20 of 23 Results
Toyota Avalon Camshaft
Choose genuine Camshaft that pass strict quality control tests. You can trust the top quality and lasting durability. Shopping for OEM Camshaft for your Toyota Avalon? Our website is your one-stop destination. We stock an extensive selection of genuine Toyota Avalon parts. The price is affordable so you can save more. It only takes minutes to browse and find the exact fit. Easily add to cart and check out fast. Our hassle-free return policy will keep you stress-free. We process orders quickly for swift delivery. Your parts will arrive faster, so you can get back on the road sooner.
Camshaft in car is used to govern the intake and also the exhaust valves, thereby controlling the air fuel mixture for combustion in Toyota Avalon cars. The camshafts of Avalon models can vary with different types like Over Head Valve (OHV), Single Over Head Cam (SOHC), or Double Over Head Cam (DOHC) where each of them has valve actuation system. The control of the valve is made in concordance with the crankshaft to set the right timing for the movement of the cams. However, for better performance, some performance camshafts are available to suit output modifications depending on the intended objectives. These performance camshafts normally have marginally higher lift and longer duration thereby enhancing the airflow and power at higher speeds. Other factors such as compression ratio, transmission type, and weight of the car among others must be fully put into consideration in order to realize set goals when choosing a camshaft. Also, the degree of separation of the camshaft's lobes, LSA, can also affect torque, RPM range, and idle refinement, giving the Avalon's buyer yet more opportunities to choose the car's optimal response.
Toyota Avalon Camshaft Parts and Q&A
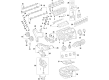
- Q: How to service and repair the RH bank camshaft on Toyota Avalon?A:Begin service and repair of RH bank camshaft (2GR-FE) by detaching these components: engine assembly with transaxle, engine wire, front frame assembly, Starter assembly, automatic transaxle assembly, oil level gauge guide sub-assembly, exhaust manifold sub-assemblies (RH and LH), drive plate & ring gear sub-assembly, and fix the engine assembly. Advance by removing idler pulley sub-assembly No.2 together with engine mounting bracket RH, water pump pulley and V-ribbed belt tensioner assembly, timing gear cover No.2, engine mounting stay No.2 RH and engine mounting bracket front No.1 LH, water inlet housing, crankshaft pulley, oil pan sub-assembly No.2, oil strainer sub-assembly, and oil pan sub-assembly, intake air surge tank, Ignition Coil assembly and oil pipe No.1 and No.2 while taking out all the associated unions and filters. The maintenance process continues by removing sequence the Timing Chain cover sub-assemblies together with the cylinder head cover sub-assemblies (both RH and LH) and timing chain cover oil seal. Next position cylinder No.1 at TDC/compression and remove all components containing chain tensioner assembly No.1 as well as sub-assembly and camshaft timing gears with the No.2 chain from the RH bank before leveling the camshaft to avoid damage. Detach chain tensioner assembly No.2 and remove the camshafts by using a uniform sequence of bolt removal on the specified bearing caps. Put the camshaft timing gear into position while matching the key groove with the straight pin then secure the fringe bolt at 100 Nm (1,020 kgf-cm, 74 ft. lbs.). Examine the camshaft timing gear assembly for correct locking and evaluate its free rotation before removing the gear. You should install the camshafts at level position and apply engine oil to both the cam portion and cylinder head journals and briefly tighten the bearing cap bolts. Fitting the camshaft housing sub-assembly RH with Part No. 08826-00080 seal packing requires proper bolt torque of 25 Nm (255 kgf-cm, 18 ft. lbs.) while validating the knock pin placement. Safely position the Installation of No.2 chain tensioner assembly before fitting both camshaft timing gears and No.2 chain (RH bank while maintaining proper alignment and torque specifications. The service requires installation of the timing chain cover oil seal (SST 09316-60011) followed by adding the timing chain cover sub-assembly and water inlet housing with engine mounting bracket front No.1 LH and cylinder head cover sub-assemblies (both RH and LH) to which seal packing (Part No.08826-00080) is applied and then bolts are tightened to specified torques. The last step includes fitting oil pipes No.1 and No.2 followed by installing the ignition coil assembly and intake air surge tank and then joining the oil pan sub-assemblies to the crankshaft pulley and engine mounting stay No.2 RH and timing gear cover No.2 and water pump pulley and V-ribbed belt tensioner assembly and engine mounting bracket RH and idler pulley sub-assembly No.2 before reuniting all components with the transaxle while ensuring proper torque on everything.
- Q: How to service the camshaft on the LH bank on Toyota Avalon?A:The procedure for servicing the LH bank camshaft on a 2GR-FE engine starts by removing the engine assembly combined with transaxle and engine wire while also taking out front frame assembly and Starter assembly as well as automatic transaxle assembly and oil level gauge guide sub-assembly and both exhaust manifold sub-assemblies (RH and LH). First choose Special Service Tools: 09213-70011 (09213-70020), 09330-00021 to remove the drive plate & ring gear sub-assembly, fix the engine assembly and then continue removing idler pulley sub-assembly No.2, engine mounting bracket RH, V-ribbed belt tensioner assembly, water pump pulley, timing gear cover No.2. Remove the engine mounting stay No.2 RH, engine mounting bracket front No.1 LH, water inlet housing, crankshaft pulley using Special Service Tools: 09032-00100, 09213-70011 (09213-70020), 09330-00021, 09950-50013 (09951-05010, 09952-05010, 09953-05020, 09954-05021), oil pan sub-assembly No.2, oil strainer sub-assembly, oil pan sub-assembly, intake air surge tank, Ignition Coil assembly, oil pipe No.1, oil pipe No.2, cylinder head cover sub-assemblies (RH and LH), timing chain cover sub-assembly, and timing chain cover oil seal. Keep the camshaft horizontal so no damage happens during removal of the LH bank No.2 chain that includes chain sub-assembly and camshaft timing gears followed by chain tensioner assembly No.1 from TDC/compression position. The camshaft housing sub-assembly LH requires careful removal since contact surfaces should not get damaged. The timing gear installation sequence begins with this step while the technicians should ensure that each camshaft stays level during installation and also apply engine oil to both the camshaft journal and bearing cap. Install the camshaft housing sub-assembly LH by first applying seal packing (approx. 10 inches long) material (Part No. 08826-00080 or equivalent) to form a continuous bead before installation. The assembly requires new gaskets and proper bolt tightening according to specifications before installing chain tensioner assembly No.3. Place the camshaft timing gears along with the No.2 chain (LH bank) properly aligned before following the torque specifications. Retrain the service steps in reverse sequence by following the checklist for time chain cover oil seal along with the timing chain cover sub-assembly and water inlet housing, engine mounting bracket front No.1 LH, cylinder head cover sub-assemblies, oil pipes, ignition coil assembly, intake air surge tank, oil pan sub-assemblies, crankshaft pulley and engine mounting stay No.2 RH. The installation process ends with rejoining the drive plate & ring gear sub-assembly, exhaust manifold sub-assemblies, oil level gauge guide sub-assembly, automatic transaxle assembly, starter assembly, front frame assembly, engine wire, and the engine assembly with transaxle.


Related Toyota Avalon Parts
 Toyota Avalon Timing Belt
 Toyota Avalon Cam Gear
 Toyota Avalon Crankshaft Thrust Washer
 Toyota Avalon Dipstick Tube
 Toyota Avalon Engine Mount Torque Strut
 Toyota Avalon Exhaust Valve
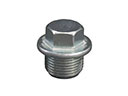 Toyota Avalon Oil Drain Plug
 Toyota Avalon Oil Pump
 Toyota Avalon Piston
 Toyota Avalon Timing Chain
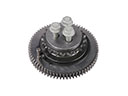 Toyota Avalon Timing Idler Gear
 Toyota Avalon Variable Timing Sprocket