×
ToyotaParts- Hello
- Login or Register
- Quick Links
- Live Chat
- Track Order
- Parts Availability
- RMA
- Help Center
- Contact Us
- Shop for
- Toyota Parts
- Scion Parts
My Garage
My Account
Cart
OEM Scion xD Control Arm
Suspension Arm- Select Vehicle by Model
- Select Vehicle by VIN
Select Vehicle by Model
orMake
Model
Year
Select Vehicle by VIN
For the most accurate results, select vehicle by your VIN (Vehicle Identification Number).
2 Control Arms found


Scion xD Lower Control Arm, Passenger Side Part Number: 48068-59145
$217.77 MSRP: $310.93You Save: $93.16 (30%)Ships in 1-3 Business DaysScion xD Lower Control Arm, Driver Side Part Number: 48069-59135
$213.04 MSRP: $304.18You Save: $91.14 (30%)Ships in 1-3 Business Days
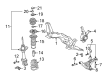
Scion xD Control Arm
Choose genuine Control Arm that pass strict quality control tests. You can trust the top quality and lasting durability. Shopping for OEM Control Arm for your Scion xD? Our website is your one-stop destination. We stock an extensive selection of genuine Scion xD parts. The price is affordable so you can save more. It only takes minutes to browse and find the exact fit. Easily add to cart and check out fast. Our hassle-free return policy will keep you stress-free. We process orders quickly for swift delivery. Your parts will arrive faster, so you can get back on the road sooner.
Scion xD Control Arm is one of the most critical parts that give a huge boost to the overall reliability of the Scion xD series. Control arm plays a vital role in connecting the frame of the vehicle to the wheels; this makes the suspension of the car to be able to operate smoothly with regard to the wheels performing the feasible movement to allow the wheels to adapt to the irregularities of the roads. This functionality is important for achieving the correct position of Scion wheels and also the handling of Scion xD. The control arms used in Scion xD vary in types; there are stamped steel control arms, and cast iron or aluminum ones that are stronger and lighter than the former kind. Among these trims, it is necessary to pay attention to the Control Arms, which are focused on performance and made of DOM tubular steel or aluminum to be able to handle higher stresses and enhance the handling characteristics of the car during performance driving. Also, the Control Arms may come with superior bushings and ball joints improving the suspension efficiency and geometry. The Scion xD features include; Anti-lock brake system, Tire Pressure Monitor System, Control Arm amongst which are features that make the drive experience safe and comfortable. Being among the reliable spare auto parts, Scion xD Control Arm can be considered as one of the significant purchases for every owner of the Scion xD automobile to upgrade its functioning and safety level on the modern car market.
Scion xD Control Arm Parts and Q&A
- Q: How to install the front lower Control Arm on Scion xD?A:The front lower suspension arm installation begins with a provisional tightness of the front lower suspension arm sub-assembly LH bolt after setting it on the crossmember. Installation should be conducted on both sides using the identical process for the front lower suspension arm sub-assembly RH. Begin by setting the front suspension crossmember sub-assembly then insert the front stabilizer link assemblies LH and RH by following the same installation sequence for both units. The installation of front lower suspension arm sub-assembly LH and RH requires the same procedure for both sides. The same installation process applies to both sides when installing the tie rod end sub-assembly LH and RH. Secure the No. 1 steering column hole cover sub-assembly together with the steering sliding yoke sub-assembly and column hole cover silencer sheet. The manual transaxle requires the first front lower suspension arm sub-assembly LH bolt tightening for installation before setting the lower arm onto the steering knuckle with a new castle nut that reaches torque specifications of 98 Nm (999 kgf-cm, 72 ft-lbf). Following this, the clip holes should be checked for alignment before putting in a new clip. Install the front wheel while torquing it to 103 Nm (1050 kgf-cm, 76 ft-lbf) and set wheels straight before stabilizing suspension by lowering the vehicle from the jack. Then bounce the vehicle several times. Proceed with full tightening of the front lower suspension arm sub-assembly LH through proper torque behavior on two bolts as Bolt A attains 137 Nm (1397 kgf-cm, 101 ft-lbf) and Bolt B reaches 160 Nm (1631 kgf-cm, 118 ft-lbf). Installation of these components concludes the service procedure: outer cowl top panel followed by front air shutter seal RH and front Wiper Motor and link while finishing with cowl top ventilator louver LH and RH and the sequence of front wiper arm and blade assembly LH and RH with front wiper arm head cap. Lastly, inspect and adjust the hood sub-assembly then check front wheel alignment.
- Q: How to remove the front lower Control Arm on Scion xD?A:The front wheel needs removal before proceeding with front lower suspension arm disposal. Use Special Service Tool: 09960-20010 (spacer B) to insert on the lower ball joint threaded section with its ends facing the upper section but keep the ends level. When doing the left-hand side of the manual transaxle remove both the clip and castle nut. The lower arm separation using Service Tools 09960-20010 09961-02010 requires the string rope to be tied to the vehicle to stop the tool from falling while maintaining A and B parallel orientation and placing the wrench correctly to avoid damaging the lower ball joint dust cover drive shaft outboard joint boots and front disc brake dust cover. When separating the lower arm users should first remove the two bolts. The technician should disassemble the hood sub-assembly together with front wiper arm head caps and front wiper arm and blade assemblies from both sides and the hood to cowl top seal and cowl top ventilator louver for both right and left sides before moving on to removing the front Wiper Motor and link assembly next to the front air shutter seal on the right-hand side and the outer cowl top panel. Direct the wheels toward front and discern the column hole cover silencer sheet along with the steering sliding yoke sub-assembly and the No. 1 steering column hole cover sub-assembly. The task requires the split of tie rod end sub-assemblies from left and right sides, followed by front lower suspension arm sub-assemblies from both sides and front stabilizer link assemblies from both sides. After suspending the engine assembly complete removal of the front suspension crossmember sub-assembly results in extraction of the front lower suspension arm sub-assembly from the left-hand side while performing the same operations on the right-hand side.


Related Scion xD Parts
 Scion xD Bump Stop
 Scion xD Coil Spring Insulator
 Scion xD Coil Springs
 Scion xD Control Arm Bolt
 Scion xD Steering Knuckle
 Scion xD Strut Bearing
 Scion xD Strut Housing
 Scion xD Sway Bar Bracket
 Scion xD Sway Bar Bushing
 Scion xD Sway Bar Link
 Scion xD Sway Bars
 Scion xD Transfer Case Bearing
Browse Scion xD Control Arm by Years
2014
2013
2012
2011
2010
2009
2008