×
ToyotaParts- Hello
- Login or Register
- Quick Links
- Live Chat
- Track Order
- Parts Availability
- RMA
- Help Center
- Contact Us
- Shop for
- Toyota Parts
- Scion Parts
My Garage
My Account
Cart
OEM 2008 Scion xD Control Arm
Suspension Arm- Select Vehicle by Model
- Select Vehicle by VIN
Select Vehicle by Model
orMake
Model
Year
Select Vehicle by VIN
For the most accurate results, select vehicle by your VIN (Vehicle Identification Number).
2 Control Arms found


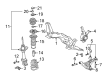
2008 Scion xD Lower Control Arm, Passenger Side
Part Number: 48068-59145$217.77 MSRP: $310.93You Save: $93.16 (30%)Ships in 1-3 Business DaysProduct Specifications- Other Name: Arm Sub-Assembly, Suspension; Suspension Control Arm, Front Right, Front Right Lower; Control Arm Assembly; Arm Sub-Assembly, Front Suspension, Lower Passenger Side; Suspension Control Arm; Control Arm
- Position: Passenger Side
- Replaces: 48068-59095, 48068-59135
- Part Name Code: 48068
- Item Weight: 1.40 Pounds
- Item Dimensions: 21.1 x 3.9 x 17.8 inches
- Condition: New
- Fitment Type: Direct Replacement
- SKU: 48068-59145
- Warranty: This genuine part is guaranteed by Toyota's factory warranty.
2008 Scion xD Lower Control Arm, Driver Side
Part Number: 48069-59135$213.04 MSRP: $304.18You Save: $91.14 (30%)Ships in 1-3 Business DaysProduct Specifications- Other Name: Arm Sub-Assembly, Suspension; Suspension Control Arm, Front Left, Front Left Lower; Control Arm Assembly; Arm Sub-Assembly, Front Suspension, Lower Driver Side; Suspension Control Arm; Control Arm
- Position: Lower Driver Side
- Replaces: 48069-59095, 48069-59125
- Part Name Code: 48069
- Item Weight: 5.30 Pounds
- Item Dimensions: 20.7 x 3.9 x 17.8 inches
- Condition: New
- Fitment Type: Direct Replacement
- SKU: 48069-59135
- Warranty: This genuine part is guaranteed by Toyota's factory warranty.
2008 Scion xD Control Arm
Looking for affordable OEM 2008 Scion xD Control Arm? Explore our comprehensive catalogue of genuine 2008 Scion xD Control Arm. All our parts are covered by the manufacturer's warranty. Plus, our straightforward return policy and speedy delivery service ensure an unparalleled shopping experience. We look forward to your visit!
2008 Scion xD Control Arm Parts Q&A
- Q: How to install the front lower Control Arm on 2008 Scion xD?A: Begin the front lower suspension arm installation through temporary bolt tightening of the front lower suspension arm sub-assembly LH which involves fastening the lower arm onto the crossmember before securing the bolt loosely. Once again follow the procedure with the front lower suspension arm sub-assembly on the right-hand side. The second step involves installing the front suspension crossmember sub-assembly and after that you must add the front stabilizer link assembly LH and RH through a standard installation process repeated for both front sides. Both front lower suspension arm sub-assemblies need to be installed by repeating the previous installation process. Install the tie rod ends sub-assembly LH and RH according to the same installation process for each side. Install the steering column hole cover sub-assembly, steering sliding yoke sub-assembly and column hole cover silencer sheet one after another. The manual transaxle procedure requires temporary bolt tightening of front lower suspension arm sub-assembly LH but proper installation of the lower arm to steering knuckle requires a new castle nut installed at 98 Nm (999 kgf-cm, 72 ft-lbf) then possibly additional turns up to 60 degrees when the holes for the clip are misaligned. Use a new clip before installing the front wheel which should be tightened to 76 ft-lbf (1050 kgf-cm, 103 Nm). Challenge the wheels to face forward straight before stabilizing the suspension by reducing the vehicle height from the jack while performing at least three suspension bouncing movements. The front lower suspension arm sub-assemblies require complete tightening through the respective bolt torques of 137 Nm (1397 kgf-cm, 101 ft-lbf) for Bolt A and 160 Nm (1631 kgf-cm, 118 ft-lbf) for Bolt B simultaneously for both the LH and RH assemblies. To complete the installation you should begin by putting on the outer cowl top panel and then the front air shutter seal RH followed by the front wiper motor and link after which you should install the cowl top ventilator louver LH and RH and finally the hood to cowl top seal before you proceed to add the front wiper arm and blade assembly LH and RH and front wiper arm head cap. Then check and adjust the hood sub-assembly and perform an inspection and adjustment on the front wheel alignment.
Related 2008 Scion xD Parts
 2008 Scion xD Alignment Bolt
 2008 Scion xD Coil Spring Insulator
 2008 Scion xD Coil Springs
 2008 Scion xD Control Arm Bolt
 2008 Scion xD Front Cross-Member
 2008 Scion xD Shock and Strut Boot
 2008 Scion xD Steering Knuckle
 2008 Scion xD Strut Housing
 2008 Scion xD Sway Bar Kit
 2008 Scion xD Sway Bar Link
 2008 Scion xD Transfer Case Bearing
 2008 Scion xD Wheel Hub