×
ToyotaParts- Hello
- Login or Register
- Quick Links
- Live Chat
- Track Order
- Parts Availability
- RMA
- Help Center
- Contact Us
- Shop for
- Toyota Parts
- Scion Parts
My Garage
My Account
Cart
OEM 2008 Scion xD Front Cross-Member
Front Engine Cross Member- Select Vehicle by Model
- Select Vehicle by VIN
Select Vehicle by Model
orMake
Model
Year
Select Vehicle by VIN
For the most accurate results, select vehicle by your VIN (Vehicle Identification Number).
3 Front Cross-Members found

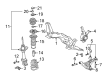
2008 Scion xD Suspension Crossmember, Front
Part Number: 51201-52097$923.54 MSRP: $1353.45You Save: $429.91 (32%)Ships in 1-3 Business DaysProduct Specifications- Other Name: Crossmember Sub-Assembly; Suspension Subframe Crossmember, Front; Crossmember Sub-Assembly, Front Suspension
- Position: Front
- Replaces: 51201-52094, 51201-52090, 51201-52092, 51201-52095, 51201-52093, 51201-52096
- Part Name Code: 51201
- Item Weight: 26.90 Pounds
- Condition: New
- Fitment Type: Direct Replacement
- SKU: 51201-52097
- Warranty: This genuine part is guaranteed by Toyota's factory warranty.

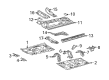
2008 Scion xD Floor Crossmember, Driver Side
Part Number: 57454-52010$69.39 MSRP: $97.40You Save: $28.01 (29%)Ships in 1-3 Business DaysProduct Specifications- Other Name: Floor Pan Crossmember, Left; Member, Front Floor Cross Side, Driver Side
- Position: Driver Side
- Part Name Code: 57454B
- Condition: New
- Fitment Type: Direct Replacement
- SKU: 57454-52010
- Warranty: This genuine part is guaranteed by Toyota's factory warranty.
2008 Scion xD Floor Crossmember, Passenger Side
Part Number: 57453-52020$68.67 MSRP: $96.40You Save: $27.73 (29%)Ships in 1-3 Business DaysProduct Specifications- Other Name: Floor Pan Crossmember, Right; Member, Front Floor Cross Side, Passenger Side
- Position: Passenger Side
- Part Name Code: 57453C
- Item Weight: 5.30 Pounds
- Condition: New
- Fitment Type: Direct Replacement
- SKU: 57453-52020
- Warranty: This genuine part is guaranteed by Toyota's factory warranty.
2008 Scion xD Front Cross-Member
Looking for affordable OEM 2008 Scion xD Front Cross-Member? Explore our comprehensive catalogue of genuine 2008 Scion xD Front Cross-Member. All our parts are covered by the manufacturer's warranty. Plus, our straightforward return policy and speedy delivery service ensure an unparalleled shopping experience. We look forward to your visit!
2008 Scion xD Front Cross-Member Parts Q&A
- Q: How to remove the front cross-member on 2008 Scion xD?A: The first step to remove the front cross-member requires positioning front wheels facing forward and removing the hood through its 4 bolts. Begin by taking out the front wiper arm head caps and proceeding to remove the assemblies including wiper arm and blade from both left and right sides. Next, remove the front components including hood to cowl top seal, cowl top ventilator louvers on both sides and windshield wiper motor with its link. Detach both components: right-side front air shutter seal from its position and outer cowl top panel from its mounting. To access the column hole cover silencer sheet you need to remove the floor carpet and unwedge its 2 clips. The procedure for separating the steering sliding yoke sub-assembly involves fixing the steering wheel assembly using a seat belt then marking the sliding yoke while loosening bolt A followed by removing bolt B to separate the steering intermediate shaft assembly. First detach A clip from the No. 1 steering column hole cover sub-assembly then break clip B before removing the front wheel followed by separating the tie rod end sub-assemblies from both sides followed by removal of the front stabilizer link assemblies and front lower suspension arm sub-assemblies on both sides. The engine suspension requires installing two hangers (Engine Hanger No. 1: 12281-37020, Engine Hanger No. 2: 12282-37010) in proper orientation before securing the engine chain hoist since no engine support must be by any other part. You must remove the bolt that holds the engine moving control rod along with the moving rod to free the front suspension crossmember sub-assembly next support the crossmember with a transmission jack before you take out the six bolts. The power steering gear can be detached through removing 2 bolts and 2 nuts but ensure the nut stays still. Remove the front stabilizer No. 1 brackets from both sides of the vehicle before proceeding to take off the front stabilizer bar. Both front lower suspension arm sub-assemblies need removal before the engine moving control rod cover can come off with the removal of its 2 retaining clips. The engine moving control rod requires removal along with the automatic and manual transaxle bolts whereas the 2 bolts securing the front suspension member dumper weight must be removed as well.
Related 2008 Scion xD Parts
 2008 Scion xD Alignment Bolt
 2008 Scion xD Bump Stop
 2008 Scion xD Coil Spring Insulator
 2008 Scion xD Coil Springs
 2008 Scion xD Shock and Strut Boot
 2008 Scion xD Strut Bearing
 2008 Scion xD Sway Bar Bracket
 2008 Scion xD Sway Bar Bushing
 2008 Scion xD Sway Bar Kit
 2008 Scion xD Sway Bar Link
 2008 Scion xD Transfer Case Bearing
 2008 Scion xD Wheel Hub