×
ToyotaParts- Hello
- Login or Register
- Quick Links
- Live Chat
- Track Order
- Parts Availability
- RMA
- Help Center
- Contact Us
- Shop for
- Toyota Parts
- Scion Parts
My Garage
My Account
Cart
OEM Scion xD Antenna Cable
Radio Antenna Cable- Select Vehicle by Model
- Select Vehicle by VIN
Select Vehicle by Model
orMake
Model
Year
Select Vehicle by VIN
For the most accurate results, select vehicle by your VIN (Vehicle Identification Number).
2 Antenna Cables found

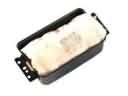
Scion xD Antenna Cable Part Number: 86101-52640
$79.55 MSRP: $111.65You Save: $32.10 (29%)Ships in 1-3 Business Days
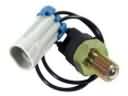
Scion xD Antenna Cable Part Number: 86101-52620
$106.99 MSRP: $150.18You Save: $43.19 (29%)Ships in 1-3 Business Days
Scion xD Antenna Cable
Choose genuine Antenna Cable that pass strict quality control tests. You can trust the top quality and lasting durability. Shopping for OEM Antenna Cable for your Scion xD? Our website is your one-stop destination. We stock an extensive selection of genuine Scion xD parts. The price is affordable so you can save more. It only takes minutes to browse and find the exact fit. Easily add to cart and check out fast. Our hassle-free return policy will keep you stress-free. We process orders quickly for swift delivery. Your parts will arrive faster, so you can get back on the road sooner.
The Scion xD Antenna Cable represents a fundamental equipment which establishes the reliability and operational performance for Scion xD vehicles. The cable enables signal enhancement between radio antennas and receivers thus enabling smooth delivery of radio and communication signals particularly beneficial in remote or difficult conditions. The Scion xD Antenna Cable serves all types of xD models while elevating vehicle performance and safety for owners who want better functionality. A broken or improperly connected antenna cable jeopardizes radio reception so owners need to replace it immediately to keep the system operational. Safer replacement of the Scion xD antenna cable permits owners to do it themselves or to involve professionals to keep their audio uninterrupted. The Scion xD Antenna Cable adapts to various antenna systems which include internal and satellite antennas because each antenna design brings special advantages. The adaptable nature of this item distinguishes it within the car market because it serves varied types of users. The reliability and advanced safety features of the car become more effective through its antenna cable because it provides communication and navigation features essential for safety. The durable Scion car Antenna Cable establishes itself as a critical component which adds performance value to the automaker model while improving both the driving experience and the vehicle functionality.
Scion xD Antenna Cable Parts and Q&A
- Q: How to remove the antenna cable on Scion xD?A:The removal process for the antenna cable begins by disconnecting the negative battery terminal but waiting 90 seconds to prevent Air Bag deployment and initializing certain systems upon cable reconnection. Next, remove the deck board assembly, followed by the No. 1 rear seat leg cover RH, No. 1 rear seat leg cover LH, No. 2 rear seat leg cover LH, rear seat assembly RH, rear seat assembly LH, front door scuff plate RH, front door scuff plate LH, No. 1 instrument panel under cover sub-assembly, No. 2 instrument panel under cover sub-assembly, cowl side trim board RH, cowl side trim board LH, front door opening trim Weather Strip RH, front door opening trim Weather Strip LH, rear door scuff plate RH, rear door scuff plate LH, rear door opening trim Weather Strip RH, rear door opening trim Weather Strip LH, rear deck trim cover, luggage hold belt striker assembly, rear seat outer belt assembly RH, rear seat outer belt assembly LH, deck trim side panel assembly RH, deck trim side panel assembly LH, roof side inner garnish assembly RH, roof side inner garnish assembly LH, Seat Belt anchor cover cap, front seat outer belt assembly RH, front seat outer belt assembly LH, center pillar lower garnish RH, center pillar lower garnish LH, center pillar upper garnish RH, center pillar upper garnish LH, front pillar garnish RH, front pillar garnish LH, assist grip, visor assembly RH, visor assembly LH, visor holder RH, visor holder LH, room light assembly, map light assembly, instrument cluster finish center panel sub-assembly, glove compartment door assembly, instrument cluster finish panel sub-assembly, combination meter assembly, upper instrument panel sub-assembly, rear center seat outer belt assembly, seat belt anchor cover, and roof headlining assembly. To extract the No. 2 antenna cord sub-assembly technicians must remove the bolt while disconnecting the connector and dislodging five clamps before they can pull out the antenna cord from the roof headlining cutout by removing six pieces of tape.
- Q: How to install the antenna cable sub-assembly and related components on Scion xD?A:To install the antenna cord sub-assembly, securely apply tape without touching the adhesive surface, clamping the sections of the antenna cord with red tape to the side rail spacer in two locations, aligning with the roof headlining marking, and fastening with tape in one location; clamp the section with pink tape to the side rail spacer in one location, aligning with the roof headlining marking, and fastening with tape in two locations; align with the roof headlining marking and fasten with tape in three locations; then insert the antenna cord through the slit in the roof headlining. Affix the No. 2 antenna cord sub-assembly through five clamps before connecting the connector and tightening the bolt to 7.0 Nm (71 kgf-cm, 62 in-lbf). Proceed to install the roof headlining assembly, rear shoulder belt anchor cover, Seat Belt anchor cover, rear center seat outer belt assembly, upper instrument panel sub-assembly, combination meter assembly, instrument cluster finish panel sub-assembly, glove compartment door assembly, instrument cluster finish center panel sub-assembly, map light assembly, room light assembly, visor holders (RH and LH), visor assemblies (RH and LH), assist grip, front pillar garnishes (RH and LH), center pillar upper garnishes (RH and LH), center pillar lower garnishes (RH and LH), front seat outer belt assemblies (RH and LH), seat belt anchor cover cap, roof side inner garnish assemblies (RH and LH), deck trim side panel assemblies (RH and LH), rear seat outer belt assemblies (RH and LH), luggage hold belt striker assembly, rear deck trim cover, rear door opening trim Weather Strips (RH and LH), rear door scuff plates (RH and LH), front door opening trim Weather Strips (RH and LH), cowl side trim boards (RH and LH), No. 1 and No. 2 instrument panel under cover sub-assemblies, front door scuff plates (RH and LH), rear seat assemblies (RH and LH), No. 1 rear seat leg covers (RH and LH), No. 2 rear seat leg cover LH, and deck board assembly. The cable needs to be connected to the negative battery terminal with proper torque application of 5.4 Nm (55 kgf-cm, 48 in-lbf) while checking the SRS warning light.