×
ToyotaParts- Hello
- Login or Register
- Quick Links
- Live Chat
- Track Order
- Parts Availability
- RMA
- Help Center
- Contact Us
- Shop for
- Toyota Parts
- Scion Parts
My Garage
My Account
Cart
OEM Scion Wiper Motor
Windshield Wiper Motor- Select Vehicle by Model
- Select Vehicle by VIN
Select Vehicle by Model
orMake
Model
Year
Select Vehicle by VIN
For the most accurate results, select vehicle by your VIN (Vehicle Identification Number).
18 Wiper Motors found


Scion Wiper Motor, Front Part Number: 85110-52510
$220.29 MSRP: $314.52You Save: $94.23 (30%)Ships in 1-3 Business DaysProduct Specifications- Other Name: Motor Assembly, Front Wiper; Windshield Wiper Motor; Front Motor; Motor Assembly, Windshield Wiper
- Position: Front
- Replaces: 85110-52310


Scion Wiper Motor, Front Part Number: 85110-47200
$176.02 MSRP: $251.32You Save: $75.30 (30%)Ships in 1-2 Business DaysProduct Specifications- Other Name: Motor Assembly, Front Wiper; Windshield Wiper Motor; Front Motor; Motor Assembly, Windshield Wiper
- Position: Front


Scion Wiper Motor, Front Part Number: 85110-60400
$176.84 MSRP: $252.48You Save: $75.64 (30%)Ships in 1-3 Business DaysProduct Specifications- Other Name: Motor Assembly, Front Wiper; Windshield Wiper Motor; Front Motor; Motor Assembly, Windshield Wiper
- Position: Front


Scion Rear Motor Part Number: 85130-21060
$165.78 MSRP: $234.68You Save: $68.90 (30%)Ships in 1-2 Business DaysProduct Specifications- Other Name: Motor Assembly, Rear Wiper; Wiper Motor; Motor And Bracket Assembly, Rear Wiper
- Position: Rear

Scion Wiper Motor, Rear Part Number: 85130-52060
$145.34 MSRP: $205.74You Save: $60.40 (30%)Ships in 1-3 Business DaysProduct Specifications- Other Name: Motor Assembly, Rear Wiper; Back Glass Wiper Motor; Rear Motor
- Position: Rear

Scion Wiper Motor, Rear Part Number: 85130-74020
$153.09 MSRP: $216.72You Save: $63.63 (30%)Ships in 1-3 Business DaysProduct Specifications- Other Name: Motor Assembly, Rear Wiper; Back Glass Wiper Motor; Rear Motor
- Position: Rear

Scion Wiper Motor, Rear Part Number: 85130-52160
$154.15 MSRP: $218.22You Save: $64.07 (30%)Ships in 1-3 Business DaysProduct Specifications- Other Name: Motor Assembly, Rear Wiper; Back Glass Wiper Motor; Rear Motor
- Position: Rear

Scion Wiper Motor, Rear Part Number: 85130-12A10
$156.26 MSRP: $221.21You Save: $64.95 (30%)Ships in 1-3 Business DaysProduct Specifications- Other Name: Motor Assembly, Rear Wiper; Back Glass Wiper Motor; Rear Motor
- Position: Rear

Scion Wiper Motor, Front Part Number: 85110-52550
$173.18 MSRP: $245.16You Save: $71.98 (30%)Ships in 1-3 Business DaysProduct Specifications- Other Name: Motor Assembly, Front Wiper; Windshield Wiper Motor; Front Motor; Motor Assembly, Windshield Wiper
- Position: Front

Scion Wiper Motor, Rear Part Number: 85130-52030
$214.81 MSRP: $306.70You Save: $91.89 (30%)Ships in 1-3 Business DaysProduct Specifications- Other Name: Motor Assembly, Rear Wiper; Back Glass Wiper Motor; Rear Motor
- Position: Rear

Scion Wiper Motor, Front Part Number: 85110-21080
$225.88 MSRP: $322.51You Save: $96.63 (30%)Ships in 1-3 Business DaysProduct Specifications- Other Name: Motor Assembly, Front Wiper; Windshield Wiper Motor; Front Motor; Motor Assembly, Windshield Wiper
- Position: Front

Scion Wiper Motor, Front Part Number: 85110-47080
$226.93 MSRP: $324.01You Save: $97.08 (30%)Ships in 1-3 Business DaysProduct Specifications- Other Name: Motor Assembly, Front Wiper; Windshield Wiper Motor; Front Motor
- Position: Front
- Replaces: 85110-35300

Scion Wiper Motor, Front Driver Side Part Number: SU003-05710
$252.51 MSRP: $335.29You Save: $82.78 (25%)Ships in 1-3 Business DaysProduct Specifications- Other Name: Wiper Assembly Front Left-Hand; Windshield Wiper Motor; Wiper Linkage; Motor & Link Assembly, Front Wiper
- Position: Front Driver Side
- Replaces: SU003-02664


Scion Wiper Motor, Rear Part Number: 85130-12A20
$135.00 MSRP: $191.11You Save: $56.11 (30%)Product Specifications- Other Name: Motor Assembly, Rear Wiper; Back Glass Wiper Motor; Rear Motor
- Position: Rear

Scion Wiper Motor, Front Part Number: 85110-12B70
$156.26 MSRP: $221.21You Save: $64.95 (30%)Product Specifications- Other Name: Motor Assembly, Front Wiper; Windshield Wiper Motor; Front Motor; Motor Assembly, Windshield Wiper
- Position: Front

Scion Wiper Motor, Front Part Number: 85010-WB002
Product Specifications- Other Name: Motor&Link Assembly, Front Wiper; Windshield Wiper Motor; Wiper Linkage; Motor & Linkage; Motor & Link Assembly, Front Wiper
- Position: Front
- Replaces: 85010-WB001

Scion Wiper Motor, Front Part Number: 85110-74050
Product Specifications- Other Name: Motor Assembly, Front Wiper; Windshield Wiper Motor; Front Motor; Motor Assembly, Windshield Wiper
- Position: Front

Scion Wiper Motor, Front Part Number: 85110-52240
Product Specifications- Other Name: Motor Assembly, Front Wiper; Windshield Wiper Motor; Front Motor; Motor Assembly, Windshield Wiper
- Position: Front
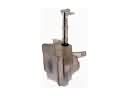
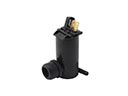
Scion Wiper Motor
OEM parts deliver unmatched quality you can rely on. They pass extensive quality control inspections. Scion produces them to the official factory specifications. This process helps prevent defects and imperfections. So you can get exceptional lifespan and a flawless fit. Need new OEM Scion Wiper Motor? You'll love our wide selection of genuine options. Shop in minutes and skip the hunt. Our prices are unbeatable, you'll save time and money. It's easy to shop and find the right piece. Our committed customer service team gives professional help from start to finish. Every part includes a manufacturer's warranty. We ship quickly, your parts will arrive fast at your door.
Scion Wiper Motor maintains the windshield clean to ensure that drivers are in full focus during rainy seasons when it becomes very hard. Scion was introduced in 2003 with colorful paint, straight prices and an offer to newcomers to play. Scion believed in limited-run Release Series vehicles and worlds to connect with a crowd of people who scorned boring advertisements. Scion was applied by Toyota as its concept lab and demonstrated that it was possible to sell a million vehicles with bold cabins and mix and match components. Scion ceased operation in 2016 but its experiment continues to shape how large makers court first drivers in need of control. The brand demonstrated that allowing consumers to imprint personality on small nimble cars is more effective in landing a customer than a rebate. The launch was designed to be more of pop culture than showroom routine through virtual showrooms, music tours, and vivid catalogs. The Wiper Motor is provided with a small electric motor that rotates links at variable speed and keeps up with drizzles or downpour without hassles. The Wiper Motor with its enclosed case can withstand moisture and grit, allowing teenage drivers to forget about the dramatic fogged glass. Since the Wiper Motor is easily mounted on standard mounts and it can accept stock wiring, an owner can easily interchange it with simple tools. When plans are stalled by storms, it is a healthy ride and the Wiper Motor will keep it going.
Scion Wiper Motor Parts and Q&A
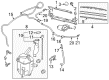
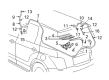
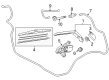
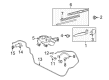
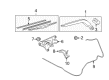
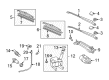
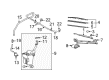
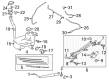
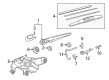
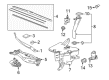
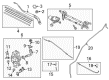
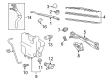
- Q: How to service and repair the wiper motor on Scion tC?A:A necessary first step for wiper motor repair includes disconnecting the battery cable from the negative terminal followed by a minimum 90-second wait before continuing to avoid air bags and seat belt pretensioner activation. The first step requires removal of front wiper arm head caps before uninstalling the front wiper arm and blade assemblies starting with the left-hand side assembly by removing the nut followed by removing the right-hand side assembly in the same way. The removal of the cowl top hood to seal demands 8 clip detachment followed by disconnection of 5 claws together with 2 clips to extract the cowl top ventilator louver LH. First remove the 4 bolts while disconnecting the connector to extract the windshield wiper motor and link assembly. The procedure includes disconnecting the wiper link rod with a taped-up screwdriver from the windshield wiper motor while rotating the motor crank arm to the required position then unfastening the 3 bolts to remove the wiper motor. Begin the installation of the windshield wiper motor by securing its 3 bolts with 5.4 N.m (55 kgf.cm, 47 in.lbf) torque then position the crank arm according to specifications before applying Denso No.50 grease to the crank arm pivot followed by attaching the rod onto the wiper link. Proceed to install the 4 bolts of the windshield wiper motor and link assembly at 5.4 N.m (55 kgf.cm, 47 in.lbf) torque level before reconnecting the connector. The windshield installation requires attachment of 5 claws, 2 clips for the cowl top ventilator louver LH and 8 clips for the hood to cowl top seal. Clean the wiper arm serrations together with the wiper pivot serration before installing the front wiper arm and blade assembly LH with its nut placed at the correct spot using a torque of 34.3 N.m (350 kgf.cm, 25 ft.lbf) while manually tightening the arm hinge to fasten the nut. Complete the second installation phase of the front wiper arm and blade assembly RH according to the technical specifications by securing the nut at 34.3 N.m (350 kgf.cm, 25 in.lbf) but also maintain manual contact with the arm hinge. After reattaching the negative battery wire complete the system initialization since it requires post-cable-disconnect procedures.
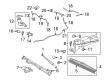
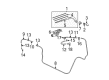
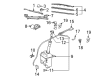
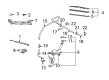
- Q: How to remove the front wiper motor on Scion xB?A:Disengage the claw to start the process by removing the two windscreen wiper arm covers with a suitable screwdriver that has protective tape on its tip. Start by setting the windshield wiper motor to automatic stop. Next remove the nut on the left and right front wiper arms before taking out the wiper arms from both sides. The process begins by taking off the hood to cowl top seal through removing its 5 clips and then continuing with the removal of the clip and disconnection of 6 claws for each right-hand and left-hand cowl top ventilator louver. The procedure requires detachments of both bolts holding the front wiper motor and link then shifting the link away from the rubber pin to split the connection before unplugging the connector to remove the front wiper motor and link assembly. You must use a screwdriver wrapped in protective tape to remove the second rod from the front wiper motor crank arm pivot. Then match this step for the first rod before unscrewing the 2 screws on the front wiper motor with a "TORX" socket T30.