×
ToyotaParts- Hello
- Login or Register
- Quick Links
- Live Chat
- Track Order
- Parts Availability
- RMA
- Help Center
- Contact Us
- Shop for
- Toyota Parts
- Scion Parts
My Garage
My Account
Cart
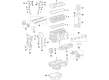
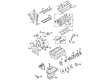
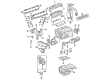
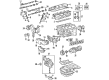
OEM 2009 Toyota Highlander Camshaft
Cam- Select Vehicle by Model
- Select Vehicle by VIN
Select Vehicle by Model
orMake
Model
Year
Select Vehicle by VIN
For the most accurate results, select vehicle by your VIN (Vehicle Identification Number).
10 Camshafts found

2009 Toyota Highlander Camshaft
Part Number: 13502-36030$367.39 MSRP: $538.41You Save: $171.02 (32%)Ships in 1-3 Business DaysProduct Specifications- Other Name: Camshaft Sub-Assembly
- Replaces: 13502-0V010, 13502-36010
- Part Name Code: 13512
- Item Weight: 4.50 Pounds
- Item Dimensions: 21.1 x 3.3 x 2.8 inches
- Condition: New
- Fitment Type: Direct Replacement
- SKU: 13502-36030
- Warranty: This genuine part is guaranteed by Toyota's factory warranty.

2009 Toyota Highlander Camshaft
Part Number: 13501-36050$377.60 MSRP: $553.38You Save: $175.78 (32%)Ships in 1-3 Business DaysProduct Specifications- Other Name: Camshaft Sub-Assembly
- Replaces: 13501-0V010, 13501-36020
- Part Name Code: 13511
- Item Weight: 5.70 Pounds
- Item Dimensions: 20.9 x 3.5 x 3.0 inches
- Condition: New
- Fitment Type: Direct Replacement
- SKU: 13501-36050
- Warranty: This genuine part is guaranteed by Toyota's factory warranty.

2009 Toyota Highlander Camshaft
Part Number: 13502-31061$533.55 MSRP: $781.93You Save: $248.38 (32%)Ships in 1-3 Business DaysProduct Specifications- Other Name: Camshaft Sub-Assembly
- Replaces: 13502-31041, 13502-0P020, 13502-31040, 13502-31060, 13502-31080, 13502-0P021
- Part Name Code: 13512
- Item Weight: 4.40 Pounds
- Item Dimensions: 20.7 x 3.3 x 2.8 inches
- Condition: New
- Fitment Type: Direct Replacement
- SKU: 13502-31061
- Warranty: This genuine part is guaranteed by Toyota's factory warranty.

2009 Toyota Highlander Camshaft
Part Number: 13501-31091$533.55 MSRP: $781.93You Save: $248.38 (32%)Ships in 1-3 Business DaysProduct Specifications- Other Name: Camshaft Sub-Assembly
- Replaces: 13501-31100, 13501-31090, 13501-0P021, 13501-0P020, 13501-31061, 13501-31060
- Part Name Code: 13511
- Item Weight: 4.60 Pounds
- Item Dimensions: 21.5 x 3.5 x 3.0 inches
- Condition: New
- Fitment Type: Direct Replacement
- SKU: 13501-31091
- Warranty: This genuine part is guaranteed by Toyota's factory warranty.

2009 Toyota Highlander Camshaft Sub-Assembly
Part Number: 13054-31061$533.55 MSRP: $781.93You Save: $248.38 (32%)Ships in 1-3 Business DaysProduct Specifications- Other Name: Camshaft
- Replaces: 13054-0P020, 13054-31030, 13054-31080, 13054-31060, 13054-0P021, 13054-31031
- Part Name Code: 13054
- Item Weight: 4.80 Pounds
- Item Dimensions: 21.8 x 3.4 x 2.9 inches
- Condition: New
- Fitment Type: Direct Replacement
- SKU: 13054-31061
- Warranty: This genuine part is guaranteed by Toyota's factory warranty.

2009 Toyota Highlander Camshaft
Part Number: 13053-31061$533.55 MSRP: $781.93You Save: $248.38 (32%)Ships in 1-3 Business DaysProduct Specifications- Other Name: Camshaft Sub-Assembly
- Replaces: 13053-0P021, 13053-31080, 13053-0P020, 13053-31060
- Part Name Code: 13053
- Item Weight: 4.80 Pounds
- Item Dimensions: 21.4 x 3.6 x 3.0 inches
- Condition: New
- Fitment Type: Direct Replacement
- SKU: 13053-31061
- Warranty: This genuine part is guaranteed by Toyota's factory warranty.

2009 Toyota Highlander Camshaft
Part Number: 13502-20030$294.38 MSRP: $420.31You Save: $125.93 (30%)Ships in 1-3 Business DaysProduct Specifications- Other Name: Camshaft Sub-Assembly
- Replaces: 13502-0A040
- Part Name Code: 13512
- Item Weight: 6.30 Pounds
- Item Dimensions: 22.8 x 3.4 x 2.8 inches
- Condition: New
- Fitment Type: Direct Replacement
- SKU: 13502-20030
- Warranty: This genuine part is guaranteed by Toyota's factory warranty.

2009 Toyota Highlander Camshaft
Part Number: 13501-20060$294.38 MSRP: $420.31You Save: $125.93 (30%)Ships in 1-3 Business DaysProduct Specifications- Other Name: Camshaft Sub-Assembly
- Part Name Code: 13511
- Item Weight: 4.50 Pounds
- Item Dimensions: 20.5 x 3.5 x 3.1 inches
- Condition: New
- Fitment Type: Direct Replacement
- SKU: 13501-20060
- Warranty: This genuine part is guaranteed by Toyota's factory warranty.

2009 Toyota Highlander Camshaft Sub-Assembly
Part Number: 13053-20050$294.38 MSRP: $420.31You Save: $125.93 (30%)Ships in 1-3 Business DaysProduct Specifications- Other Name: Camshaft
- Part Name Code: 13053
- Item Weight: 4.70 Pounds
- Item Dimensions: 21.4 x 3.5 x 3.2 inches
- Condition: New
- Fitment Type: Direct Replacement
- SKU: 13053-20050
- Warranty: This genuine part is guaranteed by Toyota's factory warranty.

2009 Toyota Highlander Camshaft Sub-Assembly
Part Number: 13054-20030$311.39 MSRP: $444.60You Save: $133.21 (30%)Product Specifications- Other Name: Camshaft
- Replaces: 13054-0A040, 13054-0A041
- Part Name Code: 13054
- Item Weight: 5.50 Pounds
- Item Dimensions: 21.6 x 3.5 x 3.1 inches
- Condition: New
- Fitment Type: Direct Replacement
- SKU: 13054-20030
- Warranty: This genuine part is guaranteed by Toyota's factory warranty.
2009 Toyota Highlander Camshaft
Looking for affordable OEM 2009 Toyota Highlander Camshaft? Explore our comprehensive catalogue of genuine 2009 Toyota Highlander Camshaft. All our parts are covered by the manufacturer's warranty. Plus, our straightforward return policy and speedy delivery service ensure an unparalleled shopping experience. We look forward to your visit!
2009 Toyota Highlander Camshaft Parts Q&A
- Q: How to remove the camshaft on 2009 Toyota Highlander?A: The timing chain cover must be the first step before removing the camshaft. The crankshaft pulley bolt needs to be installed temporarily before clocking the crankshaft forward for camshaft and crankshaft timing gear mark alignment. Additional clockwise rotation of the crankshaft might be required when alignment marks are not visible. Unfasten the crankshaft pulley bolt after accomplishing correct timing gear alignment. The sequence begins with taking out the bolt from the timing chain guide followed by extending the plunger slightly to disassemble the No. 1 chain tensioner assembly. The stopper plate should be rotated counterclockwise for lock release before pushing the plunger into the tensioner. Following lock setting with stopper plate clockwise rotation, insert a pin into the stopper plate hole before removing the 2 bolts, chain tensioner and gasket. Here is the procedure to remove both pieces of this machine: You need to take out the chain tensioner stopper bolt then remove the chain sub-assembly with the No. 1 chain vibration damper after bolting removal. The hexagonal portion of the camshaft requires wrench operation to remove its bolt and timing gear so maintain the cylinder head and spark plug tube safety before disassembling the camshaft timing gear assembly. You should follow this procedure also for the camshaft timing exhaust gear assembly. Start by evenly loosening each of the 20 bearing cap bolts according to sequence before prying the camshaft housing loose from the cylinder head by using a screwdriver with attention to contact surface protection. Follow the specified sequence when removing the 11 bearing cap bolts to extract five bearing caps which must be organized in the proper order. Start by taking out the oil control valve filter followed by the No. 1 camshaft bearing after which remove the No. 1 and No. 2 camshafts. Remove the No. 2 camshaft bearing before taking out the 16 valve rocker arms from the cylinder head and the 16 valve lash adjusters from the cylinder head while maintaining proper part arrangement.
Related 2009 Toyota Highlander Parts
 2009 Toyota Highlander Timing Belt
 2009 Toyota Highlander Engine Cover
 2009 Toyota Highlander Cam Gear
 2009 Toyota Highlander Crankshaft Thrust Washer Set
 2009 Toyota Highlander Cylinder Head
 2009 Toyota Highlander Dipstick Tube
 2009 Toyota Highlander Engine Mount Torque Strut
 2009 Toyota Highlander Exhaust Valve
 2009 Toyota Highlander Harmonic Balancer
 2009 Toyota Highlander Oil Pump
 2009 Toyota Highlander Timing Cover Gasket
 2009 Toyota Highlander Timing Idler Gear