×
ToyotaParts- Hello
- Login or Register
- Quick Links
- Live Chat
- Track Order
- Parts Availability
- RMA
- Help Center
- Contact Us
- Shop for
- Toyota Parts
- Scion Parts
My Garage
My Account
Cart
OEM 2008 Toyota Land Cruiser Seat Belt
Seat Safety Belt- Select Vehicle by Model
- Select Vehicle by VIN
Select Vehicle by Model
orMake
Model
Year
Select Vehicle by VIN
For the most accurate results, select vehicle by your VIN (Vehicle Identification Number).
36 Seat Belts found


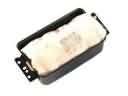
2008 Toyota Land Cruiser Belt Assembly, Front Seat
Part Number: 73210-60A40-B0$415.97 MSRP: $609.60You Save: $193.63 (32%)Ships in 1-3 Business DaysProduct Specifications- Other Name: BELT ASSY, FR SEAT
- Position: Front Passenger Side
- Replaces: 73210-60671-B2
- Condition: New
- SKU: 73210-60A40-B0
- Warranty: This genuine part is guaranteed by Toyota's factory warranty.
2008 Toyota Land Cruiser Lap & Shoulder Belt, Beige, Front Passenger Side
Part Number: 73210-60A40-E1$442.07 MSRP: $647.86You Save: $205.79 (32%)Ships in 1-3 Business DaysProduct Specifications- Other Name: Belt Assembly, Front Seat; Seat Belt Lap and Shoulder Belt, Front Right; Belt & Retractor
- Position: Front Passenger Side
- Replaces: 73210-60670-E0, 73210-60671-E0
- Condition: New
- SKU: 73210-60A40-E1
- Warranty: This genuine part is guaranteed by Toyota's factory warranty.
2008 Toyota Land Cruiser Belt Assembly, Front Seat Outer, Driver Side
Part Number: 73220-60550-B1$507.67 MSRP: $744.00You Save: $236.33 (32%)Ships in 1-3 Business DaysProduct Specifications- Other Name: Belt Assembly, Front Seat
- Manufacturer Note: PRE-COLLISION SYSTEM-INTERLOCKING BRAKE,BLACK,TRIM1#
- Position: Driver Side
- Replaces: 73220-60550-B0
- Part Name Code: 73220
- Item Weight: 5.40 Pounds
- Condition: New
- Fitment Type: Direct Replacement
- SKU: 73220-60550-B1
- Warranty: This genuine part is guaranteed by Toyota's factory warranty.
2008 Toyota Land Cruiser Lap & Shoulder Belt, Beige, Driver Side
Part Number: 73220-60560-E0$225.70 MSRP: $322.24You Save: $96.54 (30%)Ships in 1-3 Business DaysProduct Specifications- Other Name: Belt Assembly, Front Seat; Seat Belt Lap and Shoulder Belt, Front Left; Belt & Retractor; Belt Assembly, Front Seat Outer, Driver Side
- Manufacturer Note: SAND BEIGE,TRIM4#
- Position: Driver Side
- Part Name Code: 73220
- Item Weight: 4.50 Pounds
- Condition: New
- Fitment Type: Direct Replacement
- SKU: 73220-60560-E0
- Warranty: This genuine part is guaranteed by Toyota's factory warranty.
2008 Toyota Land Cruiser Belt Assembly, Front Seat
Part Number: 73210-60A50-B0$272.60 MSRP: $389.21You Save: $116.61 (30%)Ships in 1-3 Business DaysProduct Specifications- Other Name: BELT ASSY, FR SEAT
- Position: Front Passenger Side
- Replaces: 73210-60681-B2
- Condition: New
- SKU: 73210-60A50-B0
- Warranty: This genuine part is guaranteed by Toyota's factory warranty.
2008 Toyota Land Cruiser Lap & Shoulder Belt, Beige, Front Passenger Side
Part Number: 73210-60A50-E1$266.25 MSRP: $380.15You Save: $113.90 (30%)Ships in 1-3 Business DaysProduct Specifications- Other Name: Belt Assembly, Front Seat; Seat Belt Lap and Shoulder Belt, Front Right; Belt & Retractor
- Position: Front Passenger Side
- Replaces: 73210-60681-E0, 73210-60680-E0
- Condition: New
- SKU: 73210-60A50-E1
- Warranty: This genuine part is guaranteed by Toyota's factory warranty.
2008 Toyota Land Cruiser Belt Assembly, Front Seat Outer, Driver Side
Part Number: 73220-60560-B1$295.67 MSRP: $422.14You Save: $126.47 (30%)Ships in 1-3 Business DaysProduct Specifications- Other Name: Belt Assembly, Front Seat
- Manufacturer Note: BLACK,TRIM1#
- Position: Driver Side
- Replaces: 73220-60560-B0
- Part Name Code: 73220
- Item Weight: 4.50 Pounds
- Condition: New
- Fitment Type: Direct Replacement
- SKU: 73220-60560-B1
- Warranty: This genuine part is guaranteed by Toyota's factory warranty.

2008 Toyota Land Cruiser Lap & Shoulder Belt, Beige, Driver Side
Part Number: 73320-60070-E0$150.27 MSRP: $212.72You Save: $62.45 (30%)Ships in 1-3 Business DaysProduct Specifications- Other Name: Belt Assembly, Rear Seat; Center Seat Belt; Belt Assembly, Seat 3 Point Type, Driver Side
- Manufacturer Note: SAND BEIGE,TRIM4#
- Position: Driver Side
- Part Name Code: 73320A
- Item Weight: 2.40 Pounds
- Condition: New
- Fitment Type: Direct Replacement
- SKU: 73320-60070-E0
- Warranty: This genuine part is guaranteed by Toyota's factory warranty.

2008 Toyota Land Cruiser Lap & Shoulder Belt, Beige, Outer Passenger Side
Part Number: 73560-60190-E0$162.68 MSRP: $230.30You Save: $67.62 (30%)Ships in 1-3 Business DaysProduct Specifications- Other Name: Belt Assembly, Rear Seat; Seat Belt Lap and Shoulder Belt, Rear Right; Belt & Retractor; Belt Assembly, Rear Seat, Outer Passenger Side
- Manufacturer Note: SAND BEIGE,TRIM4#
- Position: Outer Passenger Side
- Part Name Code: 73560
- Item Weight: 2.10 Pounds
- Condition: New
- Fitment Type: Direct Replacement
- SKU: 73560-60190-E0
- Warranty: This genuine part is guaranteed by Toyota's factory warranty.

2008 Toyota Land Cruiser Lap & Shoulder Belt, Beige, Outer Driver Side
Part Number: 73570-60200-E0$161.33 MSRP: $228.38You Save: $67.05 (30%)Ships in 1-3 Business DaysProduct Specifications- Other Name: Belt Assembly, Rear Seat; Seat Belt Lap and Shoulder Belt, Rear Left; Belt & Retractor; Belt Assembly, Rear Seat, Outer Driver Side
- Manufacturer Note: SAND BEIGE,TRIM4#
- Position: Outer Driver Side
- Part Name Code: 73570
- Item Weight: 2.30 Pounds
- Condition: New
- Fitment Type: Direct Replacement
- SKU: 73570-60200-E0
- Warranty: This genuine part is guaranteed by Toyota's factory warranty.

2008 Toyota Land Cruiser Lap & Shoulder Belt, Beige, Rear
Part Number: 73510-60100-E0$163.97 MSRP: $232.13You Save: $68.16 (30%)Ships in 1-3 Business DaysProduct Specifications- Other Name: Belt Assembly, Rear Seat; Seat Belt Lap and Shoulder Belt, Rear Center; Center Seat Belt; Belt Assembly, Rear Seat, 3 Point Type
- Manufacturer Note: SAND BEIGE,TRIM4#
- Position: Rear
- Part Name Code: 73510A
- Item Weight: 2.30 Pounds
- Condition: New
- Fitment Type: Direct Replacement
- SKU: 73510-60100-E0
- Warranty: This genuine part is guaranteed by Toyota's factory warranty.

2008 Toyota Land Cruiser Inner Buckle, Beige
Part Number: 73307-60080-E0$25.74 MSRP: $35.83You Save: $10.09 (29%)Ships in 1-3 Business DaysProduct Specifications- Other Name: Belt Sub-Assembly, Seat; Seat Belt Receptacle, Rear Left Inner; Latch; Belt Sub-Assembly, Rear Seat, Inner
- Manufacturer Note: SAND BEIGE,TRIM4#
- Position: Inner
- Part Name Code: 73307
- Item Weight: 0.80 Pounds
- Condition: New
- Fitment Type: Direct Replacement
- SKU: 73307-60080-E0
- Warranty: This genuine part is guaranteed by Toyota's factory warranty.

2008 Toyota Land Cruiser Center Buckle, Beige, Inner
Part Number: 73306-60170-E0$25.99 MSRP: $36.18You Save: $10.19 (29%)Ships in 1-3 Business DaysProduct Specifications- Other Name: Belt Sub-Assembly, Seat; Seat Belt Receptacle, Center; Latch; Belt Assembly, Rear Seat, Inner
- Manufacturer Note: SAND BEIGE,TRIM4#
- Position: Inner
- Part Name Code: 73390A
- Item Weight: 0.90 Pounds
- Condition: New
- Fitment Type: Direct Replacement
- SKU: 73306-60170-E0
- Warranty: This genuine part is guaranteed by Toyota's factory warranty.

2008 Toyota Land Cruiser Outer Buckle, Beige, Inner
Part Number: 73580-60110-E0$25.99 MSRP: $36.18You Save: $10.19 (29%)Ships in 1-3 Business DaysProduct Specifications- Other Name: Belt Assembly, Rear Seat; Seat Belt Receptacle, Rear Outer; Latch; Belt Sub Assembly, Rear Seat, Inner
- Manufacturer Note: SAND BEIGE,TRIM4#
- Position: Inner
- Part Name Code: 73580A
- Item Weight: 0.90 Pounds
- Condition: New
- Fitment Type: Direct Replacement
- Require Quantity: 2
- SKU: 73580-60110-E0
- Warranty: This genuine part is guaranteed by Toyota's factory warranty.
2008 Toyota Land Cruiser Belt Sub-Assembly, Rear Seat, Inner
Part Number: 73307-60080-B0$26.28 MSRP: $36.58You Save: $10.30 (29%)Ships in 1-3 Business DaysProduct Specifications- Other Name: Belt Sub-Assembly, Seat
- Manufacturer Note: MD.GRAY,TRIM1#
- Position: Inner
- Part Name Code: 73307
- Item Weight: 0.80 Pounds
- Condition: New
- Fitment Type: Direct Replacement
- SKU: 73307-60080-B0
- Warranty: This genuine part is guaranteed by Toyota's factory warranty.

2008 Toyota Land Cruiser Inner Buckle, Beige, Outer
Part Number: 73302-60171-E0$26.53 MSRP: $36.93You Save: $10.40 (29%)Ships in 1-3 Business DaysProduct Specifications- Other Name: Belt Sub-Assembly, Seat; Seat Belt Receptacle, Rear Right Inner; Latch; Belt Sub-Assembly, Rear Seat Outer
- Manufacturer Note: SAND BEIGE,TRIM4#
- Position: Outer
- Replaces: 73302-60170-E0
- Part Name Code: 73302
- Item Weight: 0.80 Pounds
- Condition: New
- Fitment Type: Direct Replacement
- SKU: 73302-60171-E0
- Warranty: This genuine part is guaranteed by Toyota's factory warranty.
2008 Toyota Land Cruiser Outer Buckle, Gray, Inner
Part Number: 73580-60110-B0$26.53 MSRP: $36.93You Save: $10.40 (29%)Ships in 1-3 Business DaysProduct Specifications- Other Name: Belt Assembly, Rear Seat; Seat Belt Receptacle, Rear Outer; Latch; Belt Sub Assembly, Rear Seat, Inner
- Manufacturer Note: MD.GRAY,TRIM1#
- Position: Inner
- Part Name Code: 73580A
- Item Weight: 0.90 Pounds
- Condition: New
- Fitment Type: Direct Replacement
- Require Quantity: 2
- SKU: 73580-60110-B0
- Warranty: This genuine part is guaranteed by Toyota's factory warranty.
 Product Specifications
- Other Name: Belt Assembly, Rear Seat; Seat Belt Receptacle, Center Right Outer; Latch; Belt Assembly, Rear Seat, Inner Passenger Side
- Manufacturer Note: MD.GRAY,TRIM1#
- Position: Inner Passenger Side
- Part Name Code: 73380C
- Item Weight: 0.90 Pounds
- Condition: New
- Fitment Type: Direct Replacement
- SKU: 73390-60020-B0
- Warranty: This genuine part is guaranteed by Toyota's factory warranty.
 Product Specifications
- Other Name: Belt Assembly, Rear Seat
- Manufacturer Note: MD.GRAY,TRIM1#
- Position: Inner Driver Side
- Part Name Code: 73390C
- Item Weight: 0.90 Pounds
- Condition: New
- Fitment Type: Direct Replacement
- SKU: 73380-60220-B0
- Warranty: This genuine part is guaranteed by Toyota's factory warranty.

2008 Toyota Land Cruiser Belt Assembly, Front Seat Inner, Passenger Side
Part Number: 73240-60310-B0$66.59 MSRP: $93.47You Save: $26.88 (29%)Product Specifications- Other Name: Belt Assembly, Front Seat
- Manufacturer Note: MD.GRAY,TRIM1#
- Position: Passenger Side
- Part Name Code: 73230
- Item Weight: 1.50 Pounds
- Item Dimensions: 14.6 x 12.1 x 2.4 inches
- Condition: New
- Fitment Type: Direct Replacement
- SKU: 73240-60310-B0
- Warranty: This genuine part is guaranteed by Toyota's factory warranty.
| Page 1 of 2 |Next >
1-20 of 36 Results
2008 Toyota Land Cruiser Seat Belt
Looking for affordable OEM 2008 Toyota Land Cruiser Seat Belt? Explore our comprehensive catalogue of genuine 2008 Toyota Land Cruiser Seat Belt. All our parts are covered by the manufacturer's warranty. Plus, our straightforward return policy and speedy delivery service ensure an unparalleled shopping experience. We look forward to your visit!
2008 Toyota Land Cruiser Seat Belt Parts Q&A
- Q: How to install the rear No. 2 Seat Belt assembly and related components on 2008 Toyota Land Cruiser?A: Installation of the rear No. 2 seat outer belt assembly happens by fitting the claws into the seat belt positioning holes while installing the retractor in accordance with illustrations. Secure the seat belt using a bolt which needs torquing at 42 Nm (427 kgf-cm, 31 ft-lbf) while another bolt connects the seat belt shoulder anchor by reaching the same torque value. Fasten the seat belt shoulder anchor cover through the application of both claw mechanisms. The front quarter trim panel assembly requires operation of the reclining adjuster release handle to position the No. 1 rear seat correctly followed by connector attachment of thermistor and power outlet socket and rear seat lock control lever cable. Fasten the 18 clips then connect the 2 claws before installing the screw and bolt with a torque of 12 Nm (122 kgf-cm, 9 ft-lbf). Install the bolt to the rear No. 2 seat belt anchor LH while torquing it to 42 Nm (428 kgf-cm, 31 ft-lbf) and verify the anchor part avoids touching protruding vehicle body components. On the RH side, the rear No. 2 seat belt anchor requires installation with a bolt reaching 42 Nm (428 kgf-cm, 31 ft-lbf) torque before using the 3 claws to attach the cover. Use a bolt to install the rear No. 1 seat belt anchor and apply 42 Nm of torque until it reaches 428 kgf-cm or 31 ft-lbf. After that, secure the 3 claws to install the cover. The installation sequence begins with the rear seat cover cap followed by the No. 1 luggage compartment trim hook after which you should add the rear door scuff plate LH and rear step cover before positioning the rear floor mat rear support plate and concluding with the installation of the rear No. 2 seat assembly.
Related 2008 Toyota Land Cruiser Parts
 2008 Toyota Land Cruiser Air Bag
 2008 Toyota Land Cruiser Air Bag Sensor
 2008 Toyota Land Cruiser Coolant Temperature Sensor
 2008 Toyota Land Cruiser Door Jamb Switch
 2008 Toyota Land Cruiser Door Lock Actuator Motor
 2008 Toyota Land Cruiser Headlight Relay
 2008 Toyota Land Cruiser Neutral Safety Switch
 2008 Toyota Land Cruiser Relay
 2008 Toyota Land Cruiser Relay Block
 2008 Toyota Land Cruiser Spark Plug
 2008 Toyota Land Cruiser TPMS Sensor
 2008 Toyota Land Cruiser Turn Signal Flasher