×
ToyotaParts- Hello
- Login or Register
- Quick Links
- Live Chat
- Track Order
- Parts Availability
- RMA
- Help Center
- Contact Us
- Shop for
- Toyota Parts
- Scion Parts
My Garage
My Account
Cart
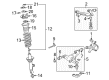
OEM 2006 Toyota Tacoma Shock Absorber
Suspension Shock Absorber- Select Vehicle by Model
- Select Vehicle by VIN
Select Vehicle by Model
orMake
Model
Year
Select Vehicle by VIN
For the most accurate results, select vehicle by your VIN (Vehicle Identification Number).
13 Shock Absorbers found


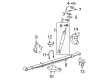
2006 Toyota Tacoma Shock Absorber
Part Number: 48530-09B50$66.11 MSRP: $92.79You Save: $26.68 (29%)Ships in 1-2 Business DaysProduct Specifications- Other Name: Absorber Assembly, Shock; Rear Shock Absorber; Suspension Kit; Strut Assembly; Shock Set; Strut Kit; Shock; Absorber Assembly, Shock, Rear Passenger Side; Absorber Assembly, Shock, Rear Driver Side
- Manufacturer Note: MARK 48530-04020
- Item Weight: 2.60 Pounds
- Item Dimensions: 25.6 x 6.8 x 5.7 inches
- Condition: New
- Fitment Type: Direct Replacement
- SKU: 48530-09B50
- Warranty: This genuine part is guaranteed by Toyota's factory warranty.


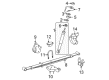
2006 Toyota Tacoma Shock Absorber, Rear Passenger Side
Part Number: 48530-A9330$57.47 MSRP: $79.99You Save: $22.52 (29%)Ships in 1-2 Business DaysProduct Specifications- Other Name: Absorber Assembly, Shock; Rear Right Shock Absorber; Suspension Kit; Strut Assembly; Shock Set; Strut Kit; Shock; Absorber Assembly, Shock, Rear Passenger Side
- Manufacturer Note: MARK 48530-AD040
- Position: Rear Passenger Side
- Part Name Code: 48530
- Item Weight: 7.10 Pounds
- Item Dimensions: 26.9 x 6.6 x 5.7 inches
- Condition: New
- Fitment Type: Direct Replacement
- SKU: 48530-A9330
- Warranty: This genuine part is guaranteed by Toyota's factory warranty.

2006 Toyota Tacoma Shock Absorber, Rear Driver Side
Part Number: 48540-A9200$56.99 MSRP: $79.33You Save: $22.34 (29%)Ships in 1-2 Business DaysProduct Specifications- Other Name: Absorber Assembly, Shock; Rear Left Shock Absorber; Suspension Kit; Strut Assembly; Shock Set; Strut Kit.; Shock; Absorber Assembly, Shock, Rear Driver Side
- Manufacturer Note: MARK 48540-AD040
- Position: Rear Driver Side
- Part Name Code: 48540
- Item Weight: 6.80 Pounds
- Item Dimensions: 26.1 x 6.5 x 5.7 inches
- Condition: New
- Fitment Type: Direct Replacement
- SKU: 48540-A9200
- Warranty: This genuine part is guaranteed by Toyota's factory warranty.

2006 Toyota Tacoma Shock Absorber, Rear Passenger Side
Part Number: 48530-09E40$50.18 MSRP: $69.84You Save: $19.66 (29%)Ships in 1-3 Business DaysProduct Specifications- Other Name: Absorber Assembly, Shock; Suspension Shock Absorber; Shock; Absorber Assembly, Shock, Rear Passenger Side
- Manufacturer Note: MARK 48530-04010
- Position: Rear Passenger Side
- Part Name Code: 48530
- Item Weight: 7.00 Pounds
- Item Dimensions: 26.6 x 6.6 x 5.8 inches
- Condition: New
- Fitment Type: Direct Replacement
- SKU: 48530-09E40
- Warranty: This genuine part is guaranteed by Toyota's factory warranty.

2006 Toyota Tacoma Shock Absorber, Rear Driver Side
Part Number: 48540-09530$49.46 MSRP: $68.85You Save: $19.39 (29%)Ships in 1-3 Business DaysProduct Specifications- Other Name: Absorber Assembly, Shock; Suspension Kit; Strut Assembly; Shock Set; Strut Kit; Complete Strut; Shock; Absorber Assembly, Shock, Rear Driver Side
- Manufacturer Note: MARK 48540-04010
- Position: Rear Driver Side
- Part Name Code: 48540
- Item Weight: 6.70 Pounds
- Item Dimensions: 26.6 x 6.7 x 5.7 inches
- Condition: New
- Fitment Type: Direct Replacement
- SKU: 48540-09530
- Warranty: This genuine part is guaranteed by Toyota's factory warranty.


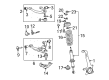
2006 Toyota Tacoma Shock Absorber
Part Number: 48510-09L90$155.09 MSRP: $219.54You Save: $64.45 (30%)Ships in 1-2 Business DaysProduct Specifications- Other Name: Absorber Assembly, Shock; Suspension Kit; Strut Assembly; Shock Set; Strut Kit; Complete Strut; Strut; Absorber Assembly, Shock, Front Passenger Side; Absorber Assembly, Shock, Front Driver Side; Shock
- Manufacturer Note: MARK 48510-04090
- Item Weight: 9.60 Pounds
- Item Dimensions: 27.1 x 8.6 x 7.6 inches
- Condition: New
- Fitment Type: Direct Replacement
- SKU: 48510-09L90
- Warranty: This genuine part is guaranteed by Toyota's factory warranty.


2006 Toyota Tacoma Shock Absorber
Part Number: 48510-09L80$146.28 MSRP: $207.08You Save: $60.80 (30%)Ships in 1-2 Business DaysProduct Specifications- Other Name: Absorber Assembly, Shock; Suspension Kit; Strut Assembly; Shock Set; Strut Kit; Complete Strut; Strut; Absorber Assembly, Shock, Front Passenger Side; Absorber Assembly, Shock, Front Driver Side; Shock
- Manufacturer Note: MARK 48510-04080
- Item Weight: 6.20 Pounds
- Item Dimensions: 26.6 x 8.4 x 7.6 inches
- Condition: New
- Fitment Type: Direct Replacement
- SKU: 48510-09L80
- Warranty: This genuine part is guaranteed by Toyota's factory warranty.

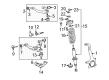
2006 Toyota Tacoma Shock Absorber
Part Number: 48510-A9630$128.89 MSRP: $182.46You Save: $53.57 (30%)Ships in 1-2 Business DaysProduct Specifications- Other Name: Absorber Assembly Set, S; Suspension Kit; Strut Assembly; Shock Absorber; Complete Strut; Strut; Absorber Assembly, Shock, Front Passenger Side; Absorber Assembly, Shock, Front Driver Side
- Replaces: 48510-A9490
- Item Weight: 9.80 Pounds
- Item Dimensions: 26.4 x 8.3 x 7.6 inches
- Condition: New
- Fitment Type: Direct Replacement
- SKU: 48510-A9630
- Warranty: This genuine part is guaranteed by Toyota's factory warranty.


2006 Toyota Tacoma Shock Absorber, Front Driver Side
Part Number: 48520-09F00$103.20 MSRP: $144.86You Save: $41.66 (29%)Ships in 1-3 Business DaysProduct Specifications- Other Name: Absorber Assembly, Shock; Suspension Kit; Strut Assembly; Shock Set; Strut Kit; Complete Strut; Strut; Absorber Assembly, Shock, Front Driver Side; Shock
- Manufacturer Note: MARK 48520-04010
- Position: Front Driver Side
- Part Name Code: 48520
- Item Weight: 6.40 Pounds
- Item Dimensions: 26.4 x 8.3 x 7.6 inches
- Condition: New
- Fitment Type: Direct Replacement
- SKU: 48520-09F00
- Warranty: This genuine part is guaranteed by Toyota's factory warranty.


2006 Toyota Tacoma Shock Absorber, Front Passenger Side
Part Number: 48510-09F40$109.13 MSRP: $153.18You Save: $44.05 (29%)Ships in 1-3 Business DaysProduct Specifications- Other Name: Absorber Assembly, Shock; Suspension Kit; Strut Assembly; Shock Set; Strut Kit; Complete Strut; Strut; Absorber Assembly, Shock, Front Passenger Side; Shock
- Manufacturer Note: MARK 48510-04060
- Position: Front Passenger Side
- Part Name Code: 48510
- Item Weight: 9.40 Pounds
- Item Dimensions: 26.4 x 8.5 x 7.7 inches
- Condition: New
- Fitment Type: Direct Replacement
- SKU: 48510-09F40
- Warranty: This genuine part is guaranteed by Toyota's factory warranty.

2006 Toyota Tacoma Shock Absorber, Front Passenger Side
Part Number: 48510-A9640$97.28 MSRP: $136.55You Save: $39.27 (29%)Ships in 1-3 Business DaysProduct Specifications- Other Name: Absorber Assembly, Shock; Front Right Shock Absorber; Suspension Kit; Strut Assembly; Shock Set; Strut Kit.; Strut; Absorber Assembly, Shock, Front Passenger Side
- Manufacturer Note: MARK 48510-AD080
- Position: Front Passenger Side
- Part Name Code: 48510
- Item Weight: 9.20 Pounds
- Item Dimensions: 26.1 x 8.4 x 7.7 inches
- Condition: New
- Fitment Type: Direct Replacement
- SKU: 48510-A9640
- Warranty: This genuine part is guaranteed by Toyota's factory warranty.

2006 Toyota Tacoma Shock Absorber
Part Number: 48530-A9340$71.09 MSRP: $99.79You Save: $28.70 (29%)Ships in 1-2 Business DaysProduct Specifications- Other Name: Absorber Assembly, Shock; Rear Shock Absorber; Suspension Kit; Strut Assembly; Shock Set; Strut Kit; Shock; Absorber Assembly, Shock, Rear Passenger Side; Absorber Assembly, Shock, Rear Driver Side
- Item Weight: 6.60 Pounds
- Item Dimensions: 26.9 x 6.8 x 5.7 inches
- Condition: New
- Fitment Type: Direct Replacement
- SKU: 48530-A9340
- Warranty: This genuine part is guaranteed by Toyota's factory warranty.
2006 Toyota Tacoma Shock Absorber, Front Driver Side
Part Number: 48520-A9310$97.28 MSRP: $136.55You Save: $39.27 (29%)Product Specifications- Other Name: Absorber Assembly, Shock; Front Left Shock Absorber; Suspension Kit; Strut Assembly; Shock Set; Strut Kit.; Strut; Absorber Assembly, Shock, Front Driver Side
- Manufacturer Note: MARK 48520-AD010
- Position: Front Driver Side
- Part Name Code: 48520
- Item Weight: 9.50 Pounds
- Item Dimensions: 26.4 x 8.4 x 7.8 inches
- Condition: New
- Fitment Type: Direct Replacement
- SKU: 48520-A9310
- Warranty: This genuine part is guaranteed by Toyota's factory warranty.
2006 Toyota Tacoma Shock Absorber
Looking for affordable OEM 2006 Toyota Tacoma Shock Absorber? Explore our comprehensive catalogue of genuine 2006 Toyota Tacoma Shock Absorber. All our parts are covered by the manufacturer's warranty. Plus, our straightforward return policy and speedy delivery service ensure an unparalleled shopping experience. We look forward to your visit!
2006 Toyota Tacoma Shock Absorber Parts Q&A
- Q: How to service and repair the rear shock absorber with coil spring on 2006 Toyota Tacoma?A: Start the service and repair of the rear shock absorber with coil spring by taking out the rear tire. Prop up the rear axle housing before disconnecting the bolt together with the nut and washer. A shock absorber separation from rear spring seats applies to 2WD while 4WD along with Pre-Runner requires separation from rear axle housing. You should start with the nut removal followed by removal of the 3 cushion retainers and subsequently the cushions numbered 1 and 3 and finally the shock absorber. The inspection of the rear shock absorber requires checking resistance and sounds as the rod moves back and forth. Any unusual findings should result in shock absorber change with a new unit. Use fresh nuts to assemble the rear shock absorber with 3 cushion retainers, cushion No. 1, cushion No. 3 before adding the shock absorber and bolt, nut, washer in which the final nut must achieve 20 Nm torque (204 kgf-cm / 15 ft.lbs). Install the rear wheel by torquing it to 113 Nm (1,152 kgf-cm, 83 ft. lbs.). Make the suspension stable through jacking down the vehicle and performing multiple bouncing movements. Finish the tightening process of the rear shock absorber nut so it reaches 100 Nm (1,020 kgf-cm, 74 ft. lbs.) torque. The disposal process features shock absorber rod extension before drilling a hole in the shaded cylinder area to release the interior gas; users must be cautious about avoiding metal fragments and should understand the gas has no smell, color or poisoning risks.
Related 2006 Toyota Tacoma Parts
 2006 Toyota Tacoma Ball Joint
 2006 Toyota Tacoma Leaf Spring
 2006 Toyota Tacoma Sway Bar Link
 2006 Toyota Tacoma Steering Knuckle
 2006 Toyota Tacoma Axle Beam Mount
 2006 Toyota Tacoma Bump Stop
 2006 Toyota Tacoma Control Arm Bushing
 2006 Toyota Tacoma Leaf Spring Shackle
 2006 Toyota Tacoma Shock And Strut Mount
 2006 Toyota Tacoma Shock and Strut Boot
 2006 Toyota Tacoma Sway Bar Kit
 2006 Toyota Tacoma Wheel Seal