×
ToyotaParts- Hello
- Login or Register
- Quick Links
- Live Chat
- Track Order
- Parts Availability
- RMA
- Help Center
- Contact Us
- Shop for
- Toyota Parts
- Scion Parts
My Garage
My Account
Cart
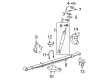
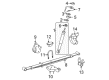
OEM 2006 Toyota Tacoma Leaf Spring
Leaf Helper Spring- Select Vehicle by Model
- Select Vehicle by VIN
Select Vehicle by Model
orMake
Model
Year
Select Vehicle by VIN
For the most accurate results, select vehicle by your VIN (Vehicle Identification Number).
10 Leaf Springs found

2006 Toyota Tacoma Leaf Spring, Rear Driver Side
Part Number: 48220-04290$571.12 MSRP: $836.99You Save: $265.87 (32%)Ships in 1-3 Business DaysProduct Specifications- Other Name: Spring Assembly, Rear Left-Hand; Leaf Spring, Rear Left; Leaf Spring Assembly; Spring Assembly, Rear Driver Side
- Manufacturer Note: MAIN 2-LEAF+HELPER 1
- Position: Rear Driver Side
- Replaces: 48220-04191, 48220-35040, 48220-04190
- Part Name Code: 48220
- Condition: New
- Fitment Type: Direct Replacement
- SKU: 48220-04290
- Warranty: This genuine part is guaranteed by Toyota's factory warranty.
2006 Toyota Tacoma Leaf Spring, Rear Passenger Side
Part Number: 48210-04650$571.12 MSRP: $836.99You Save: $265.87 (32%)Ships in 1-3 Business DaysProduct Specifications- Other Name: Spring Assembly, Rear Right-Hand; Leaf Spring, Rear Right; Leaf Spring Assembly; Spring Assembly, Rear Passenger Side
- Manufacturer Note: MAIN 2-LEAF+HELPER 1
- Position: Rear Passenger Side
- Replaces: 48210-04551, 48210-35A40, 48210-04550
- Part Name Code: 48210
- Item Weight: 62.10 Pounds
- Item Dimensions: 69.0 x 17.0 x 12.1 inches
- Condition: New
- Fitment Type: Direct Replacement
- SKU: 48210-04650
- Warranty: This genuine part is guaranteed by Toyota's factory warranty.
2006 Toyota Tacoma Leaf Spring, Rear Driver Side
Part Number: 48220-04280$568.85 MSRP: $833.66You Save: $264.81 (32%)Ships in 1-3 Business DaysProduct Specifications- Other Name: Spring Assembly, Rear Left-Hand; Leaf Spring, Rear Left; Leaf Spring Assembly; Spring Assembly, Rear Driver Side
- Position: Rear Driver Side
- Replaces: 48220-35030, 48220-04180, 48220-04181
- Part Name Code: 48220
- Condition: New
- Fitment Type: Direct Replacement
- SKU: 48220-04280
- Warranty: This genuine part is guaranteed by Toyota's factory warranty.
2006 Toyota Tacoma Leaf Spring, Rear Passenger Side
Part Number: 48210-04640$568.85 MSRP: $833.66You Save: $264.81 (32%)Ships in 1-3 Business DaysProduct Specifications- Other Name: Spring Assembly, Rear Right-Hand; Leaf Spring, Rear Right; Leaf Spring Assembly; Spring Assembly, Rear Passenger Side
- Manufacturer Note: 4-LEAF
- Position: Rear Passenger Side
- Replaces: 48210-35A30, 48210-04540, 48210-04541
- Part Name Code: 48210
- Condition: New
- Fitment Type: Direct Replacement
- SKU: 48210-04640
- Warranty: This genuine part is guaranteed by Toyota's factory warranty.

2006 Toyota Tacoma Leaf Spring, Rear Driver Side
Part Number: 48220-04170$539.79 MSRP: $791.08You Save: $251.29 (32%)Ships in 1-3 Business DaysProduct Specifications- Other Name: Spring Assembly, Rear Left-Hand; Leaf Spring, Rear Left; Leaf Spring Assembly; Spring Assembly, Rear Driver Side
- Manufacturer Note: MAIN 2-LEAF+HELPER 1
- Position: Rear Driver Side
- Part Name Code: 48220
- Item Weight: 18.80 Pounds
- Item Dimensions: 42.5 x 6.7 x 3.0 inches
- Condition: New
- Fitment Type: Direct Replacement
- SKU: 48220-04170
- Warranty: This genuine part is guaranteed by Toyota's factory warranty.
2006 Toyota Tacoma Leaf Spring, Rear Passenger Side
Part Number: 48210-04380$539.79 MSRP: $791.08You Save: $251.29 (32%)Ships in 1-3 Business DaysProduct Specifications- Other Name: Spring Assembly, Rear Right-Hand; Leaf Spring, Rear Right; Leaf Spring Assembly; Spring Assembly, Rear Passenger Side
- Manufacturer Note: MAIN 2-LEAF+HELPER 1
- Position: Rear Passenger Side
- Part Name Code: 48210
- Item Weight: 18.50 Pounds
- Item Dimensions: 41.3 x 6.9 x 3.0 inches
- Condition: New
- Fitment Type: Direct Replacement
- SKU: 48210-04380
- Warranty: This genuine part is guaranteed by Toyota's factory warranty.
2006 Toyota Tacoma Leaf Spring, Rear Driver Side
Part Number: 48220-04160$535.37 MSRP: $784.59You Save: $249.22 (32%)Ships in 1-3 Business DaysProduct Specifications- Other Name: Spring Assembly, Rear Left-Hand; Leaf Spring, Rear Left; Leaf Spring Assembly; Spring Assembly, Rear Driver Side
- Manufacturer Note: MAIN 2-LEAF+HELPER 1
- Position: Rear Driver Side
- Part Name Code: 48220
- Item Weight: 18.50 Pounds
- Item Dimensions: 43.4 x 6.9 x 3.0 inches
- Condition: New
- Fitment Type: Direct Replacement
- SKU: 48220-04160
- Warranty: This genuine part is guaranteed by Toyota's factory warranty.
2006 Toyota Tacoma Leaf Spring, Rear Passenger Side
Part Number: 48210-04370$535.37 MSRP: $784.59You Save: $249.22 (32%)Ships in 1-3 Business DaysProduct Specifications- Other Name: Spring Assembly, Rear Right-Hand; Leaf Spring, Rear Right; Leaf Spring Assembly; Spring Assembly, Rear Passenger Side
- Manufacturer Note: MAIN 2-LEAF+HELPER 1
- Position: Rear Passenger Side
- Part Name Code: 48210
- Item Weight: 18.60 Pounds
- Item Dimensions: 42.9 x 6.7 x 2.9 inches
- Condition: New
- Fitment Type: Direct Replacement
- SKU: 48210-04370
- Warranty: This genuine part is guaranteed by Toyota's factory warranty.
2006 Toyota Tacoma Leaf Spring, Rear Driver Side
Part Number: 48220-AD020$528.56 MSRP: $774.61You Save: $246.05 (32%)Ships in 1-3 Business DaysProduct Specifications- Other Name: Spring Assembly, Rear Left-Hand; Leaf Spring, Rear Left; Leaf Spring Assembly; Spring Assembly, Rear Driver Side
- Manufacturer Note: MAIN 2-LEAF+HELPER 1
- Position: Rear Driver Side
- Part Name Code: 48220
- Item Weight: 18.00 Pounds
- Item Dimensions: 42.9 x 6.7 x 2.9 inches
- Condition: New
- Fitment Type: Direct Replacement
- SKU: 48220-AD020
- Warranty: This genuine part is guaranteed by Toyota's factory warranty.
2006 Toyota Tacoma Leaf Spring, Rear Passenger Side
Part Number: 48210-AD020$528.56 MSRP: $774.61You Save: $246.05 (32%)Ships in 1-3 Business DaysProduct Specifications- Other Name: Spring Assembly, Rear Right-Hand; Leaf Spring, Rear Right; Leaf Spring Assembly; Spring Assembly, Rear Passenger Side
- Manufacturer Note: MAIN 2-LEAF+HELPER 1
- Position: Rear Passenger Side
- Part Name Code: 48210
- Item Weight: 17.30 Pounds
- Item Dimensions: 41.7 x 6.9 x 2.9 inches
- Condition: New
- Fitment Type: Direct Replacement
- SKU: 48210-AD020
- Warranty: This genuine part is guaranteed by Toyota's factory warranty.
2006 Toyota Tacoma Leaf Spring
Looking for affordable OEM 2006 Toyota Tacoma Leaf Spring? Explore our comprehensive catalogue of genuine 2006 Toyota Tacoma Leaf Spring. All our parts are covered by the manufacturer's warranty. Plus, our straightforward return policy and speedy delivery service ensure an unparalleled shopping experience. We look forward to your visit!
2006 Toyota Tacoma Leaf Spring Parts Q&A
- Q: How to service and repair the rear leaf spring on 2006 Toyota Tacoma?A: The first step to repair or service a rear leaf spring directs you to take off both the rear wheel and the spare tire that comes with 4WD and Pre-Runner models. The rear shock absorber separation process begins with bolt and washer removal along with the nut from the rear shock absorber housing for standard wheel drive but utilizes different methods to detach it from the rear spring seat for wheel drive models or rear axle housing for four wheel drive and pre-runner. Proceed with removing the parking brake cable assembly by unplugging its bolt before disconnecting the rear spring bumper on 2WD vehicles when their 2 nuts are detached. 2WD and 4WD/Pre-Runner models need to have their rear spring U-bolts removed through the process of first unscrewing four nuts with washers and then detaching the spring seat and two U-bolts and finally taking off the spring bumper for 4WD and Pre-Runner models. The process continues with leaf spring removal by initially unbolted the nuts, washers and through bolts yet maintain the spring from falling free. Disassemble the rear spring shackle sub-assembly by removing its nut followed by the washer after which through bolt followed by shackle. Secure the spring in a vise before you proceed to cut off both bushes with a hacksaw and remove them by using Special Service Tool: 09950-60010 (09951-00350) and 09950-70010 (09951-07100) with a press. Extract the 2 bushes before tapping out the 2 outer tubes using a chisel and hammer. To assemble the suspension use Special Service Tool: 09710-28012 (09710-07062), 09710-30041 (09710-03211) alongside a press for pressing in two new bushes. Secure the rear spring shackle assembly by affixing its through bolt with washer and nut before placing the spring inside the rear axle housing where the hole should align with the central spring bolt. Afterward, install the through bolts with washers and nuts. The spring seat installation requires 2 U-bolts and 4 washers and 4 nuts to be placed before torquing to 50 Nm (510 kgf-cm, 37 ft. lbs.). All U-bolts must have equal length positions under the spring seat. After placing the spring bumper followed by the spring seat you need to install 2 U-bolts with 4 washers and 4 nuts to the 4WD and Pre-Runner system before torquing everything to 50 Nm (510 kgf-cm, 37 ft. lbs.). Assemble the 2WD rear spring bumper by tightening 2 nuts to 15 Nm torque and then attach the parking brake cable assembly through the bolt with a torque of 12.5 Nm. The rear shock absorber installation requires placing its bolt and washer and nut in position before securing the wheel with a torque of 113 Nm (1,152 kgf-cm, 83 ft. lbs.). Complete the suspension process by lowering the vehicle after jacking then bouncing it multiple times followed by complete tightening of all rear suspension nuts and bolts and reattaching the spare tire for 4WD as well as Pre-Runner models.
Related 2006 Toyota Tacoma Parts
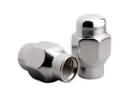 2006 Toyota Tacoma Lug Nuts
 2006 Toyota Tacoma Sway Bar Link
 2006 Toyota Tacoma Axle Beam Mount
 2006 Toyota Tacoma Bump Stop
 2006 Toyota Tacoma CV Joint
 2006 Toyota Tacoma Control Arm Bushing
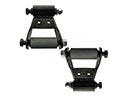 2006 Toyota Tacoma Leaf Spring Shackle
 2006 Toyota Tacoma Shock Absorber
 2006 Toyota Tacoma Shock and Strut Boot
 2006 Toyota Tacoma Sway Bar Bracket
 2006 Toyota Tacoma Sway Bar Bushing
 2006 Toyota Tacoma Sway Bar Kit