×
ToyotaParts- Hello
- Login or Register
- Quick Links
- Live Chat
- Track Order
- Parts Availability
- RMA
- Help Center
- Contact Us
- Shop for
- Toyota Parts
- Scion Parts
My Garage
My Account
Cart
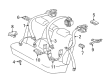
OEM 2006 Toyota Prius Seat Belt
Seat Safety Belt- Select Vehicle by Model
- Select Vehicle by VIN
Select Vehicle by Model
orMake
Model
Year
Select Vehicle by VIN
For the most accurate results, select vehicle by your VIN (Vehicle Identification Number).
12 Seat Belts found


2006 Toyota Prius Buckle, Gray, Driver Side GREY
Part Number: 73480-47040-B0$42.17 MSRP: $58.70You Save: $16.53 (29%)Ships in 1-3 Business DaysProduct Specifications- Other Name: Belt Assembly, Rear Seat I; Seat Belt Receptacle, Rear Left; Latch; Belt Assembly, Rear Seat Inner W/Center, Driver Side
- Manufacturer Note: MD.GRAY,TRIM1#
- Position: Driver Side
- Replaces: 73480-47040-E0, 73480-47040-A0
- Part Name Code: 73480
- Item Weight: 2.40 Pounds
- Item Dimensions: 14.3 x 10.3 x 5.2 inches
- Condition: New
- Fitment Type: Direct Replacement
- SKU: 73480-47040-B0
- Warranty: This genuine part is guaranteed by Toyota's factory warranty.


2006 Toyota Prius Buckle, Gray, Inner GREY
Part Number: 73380-47010-B0$22.93 MSRP: $31.92You Save: $8.99 (29%)Ships in 1-3 Business DaysProduct Specifications- Other Name: Belt Assembly, Rear Seat; Seat Belt Receptacle, Rear Right; Latch; Belt Assembly, Rear Seat, Inner
- Manufacturer Note: MD.GRAY,TRIM1#
- Position: Inner
- Replaces: 73380-47010-E0, 73380-47010-A0
- Part Name Code: 73380A
- Item Weight: 1.10 Pounds
- Condition: New
- Fitment Type: Direct Replacement
- SKU: 73380-47010-B0
- Warranty: This genuine part is guaranteed by Toyota's factory warranty.


2006 Toyota Prius Lap & Shoulder Belt, Rear
Part Number: 73360-47041-E0$174.97 MSRP: $249.82You Save: $74.85 (30%)Ships in 1-3 Business DaysProduct Specifications- Other Name: Belt Assembly, Rear Seat; Seat Belt Lap and Shoulder Belt, Rear Left Outer, Rear Right Outer; Outer Belt Assembly; Rear Seat 3 Point Type, Outer Passenger & Driver Side.
- Manufacturer Note: GREGE,TRIM4#
- Position: Rear
- Item Weight: 2.00 Pounds
- Item Dimensions: 12.1 x 11.2 x 8.4 inches
- Condition: New
- Fitment Type: Direct Replacement
- SKU: 73360-47041-E0
- Warranty: This genuine part is guaranteed by Toyota's factory warranty.


2006 Toyota Prius Lap & Shoulder Belt, Gray, Rear
Part Number: 73360-47041-B0$174.97 MSRP: $249.82You Save: $74.85 (30%)Ships in 1-2 Business DaysProduct Specifications- Other Name: Belt Assembly, Rear Seat; Seat Belt Lap and Shoulder Belt, Rear Left Outer, Rear Right Outer; Outer Belt Assembly; Rear Seat 3 Point Type, Outer Passenger & Driver Side.
- Manufacturer Note: GRAY,TRIM1#
- Position: Rear
- Replaces: 73360-47041-A0, 73360-47040-B0, 73360-47040-A0
- Item Weight: 3.20 Pounds
- Item Dimensions: 13.7 x 13.5 x 8.3 inches
- Condition: New
- Fitment Type: Direct Replacement
- SKU: 73360-47041-B0
- Warranty: This genuine part is guaranteed by Toyota's factory warranty.


2006 Toyota Prius Buckle, Gray, Driver Side charcoal
Part Number: 73240-47051-B0$66.47 MSRP: $93.29You Save: $26.82 (29%)Ships in 1 Business DayProduct Specifications- Other Name: Belt Assembly, Front Seat; Seat Belt Receptacle, Front Left; Latch; Belt Assembly, Front Seat Inner, Driver Side
- Manufacturer Note: MD.GRAY,TRIM1#
- Position: Driver Side
- Replaces: 73240-47050-B0, 73240-47051-A0, 73240-47051-E0, 73240-47050-A0
- Part Name Code: 73240
- Item Weight: 0.90 Pounds
- Condition: New
- Fitment Type: Direct Replacement
- SKU: 73240-47051-B0
- Warranty: This genuine part is guaranteed by Toyota's factory warranty.

2006 Toyota Prius Lap & Shoulder Belt, Center
Part Number: 73350-47011-E0$167.54 MSRP: $237.18You Save: $69.64 (30%)Ships in 1-3 Business DaysProduct Specifications- Other Name: Belt Assembly, Rear Seat; Seat Belt Lap and Shoulder Belt, Rear Center; Center Belt Assembly; Belt Assembly, Rear Seat, Outer Center
- Manufacturer Note: GREGE,TRIM4#
- Position: Center
- Part Name Code: 73350C
- Item Weight: 2.70 Pounds
- Condition: New
- Fitment Type: Direct Replacement
- SKU: 73350-47011-E0
- Warranty: This genuine part is guaranteed by Toyota's factory warranty.
2006 Toyota Prius Buckle, Gray, Passenger Side GREY
Part Number: 73230-47090-B0$66.70 MSRP: $93.63You Save: $26.93 (29%)Ships in 1-2 Business DaysProduct Specifications- Other Name: Belt Assembly, Front Seat; Seat Belt Receptacle, Front Right; Latch; Belt Assembly, Front Seat Inner, Passenger Side
- Manufacturer Note: MD.GRAY,TRIM1#
- Position: Passenger Side
- Replaces: 73230-47090-E0
- Part Name Code: 73230
- Item Weight: 1.50 Pounds
- Item Dimensions: 13.7 x 11.1 x 2.3 inches
- Condition: New
- Fitment Type: Direct Replacement
- SKU: 73230-47090-B0
- Warranty: This genuine part is guaranteed by Toyota's factory warranty.

2006 Toyota Prius Lap & Shoulder Belt, Driver Side
Part Number: 73220-47051-E0$271.08 MSRP: $387.04You Save: $115.96 (30%)Ships in 1-3 Business DaysProduct Specifications- Other Name: Belt Assembly, Front Seat; Seat Belt Lap and Shoulder Belt, Front Left; Belt & Retractor; Belt Assembly, Front Seat Outer, Driver Side
- Manufacturer Note: GREGE,TRIM4#
- Position: Driver Side
- Part Name Code: 73220
- Item Weight: 5.60 Pounds
- Item Dimensions: 11.7 x 7.3 x 7.4 inches
- Condition: New
- Fitment Type: Direct Replacement
- SKU: 73220-47051-E0
- Warranty: This genuine part is guaranteed by Toyota's factory warranty.
2006 Toyota Prius Lap & Shoulder Belt, Gray, Driver Side GREY
Part Number: 73220-47051-B0$271.08 MSRP: $387.04You Save: $115.96 (30%)Ships in 1-3 Business DaysProduct Specifications- Other Name: Belt Assembly, Front Seat; Seat Belt Lap and Shoulder Belt, Front Left; Belt & Retractor; Belt Assembly, Front Seat Outer, Driver Side
- Manufacturer Note: GRAY,TRIM1#
- Position: Driver Side
- Replaces: 73220-47051-A0, 73220-47050-B0, 73220-47050-A0
- Part Name Code: 73220
- Item Weight: 4.10 Pounds
- Condition: New
- Fitment Type: Direct Replacement
- SKU: 73220-47051-B0
- Warranty: This genuine part is guaranteed by Toyota's factory warranty.
2006 Toyota Prius Lap & Shoulder Belt, Passenger Side
Part Number: 73210-47060-E0$271.08 MSRP: $387.04You Save: $115.96 (30%)Ships in 1-3 Business DaysProduct Specifications- Other Name: Belt Assembly, Front Seat; Seat Belt Lap and Shoulder Belt, Front Right; Belt & Retractor; Belt Assembly, Front Seat Outer, Passenger Side
- Manufacturer Note: GREGE,TRIM4#
- Position: Passenger Side
- Part Name Code: 73210
- Item Weight: 3.80 Pounds
- Condition: New
- Fitment Type: Direct Replacement
- SKU: 73210-47060-E0
- Warranty: This genuine part is guaranteed by Toyota's factory warranty.
2006 Toyota Prius Lap & Shoulder Belt, Gray, Passenger Side GREY
Part Number: 73210-47060-B0$271.08 MSRP: $387.04You Save: $115.96 (30%)Ships in 1-3 Business DaysProduct Specifications- Other Name: Belt Assembly, Front Seat; Seat Belt Lap and Shoulder Belt, Front Right; Belt & Retractor; Belt Assembly, Front Seat Outer, Passenger Side
- Manufacturer Note: GRAY,TRIM1#
- Position: Passenger Side
- Replaces: 73210-47060-A0
- Part Name Code: 73210
- Item Weight: 4.40 Pounds
- Condition: New
- Fitment Type: Direct Replacement
- SKU: 73210-47060-B0
- Warranty: This genuine part is guaranteed by Toyota's factory warranty.
2006 Toyota Prius Lap & Shoulder Belt, Gray, Center
Part Number: 73350-47011-B0$181.15 MSRP: $258.64You Save: $77.49 (30%)Product Specifications- Other Name: Belt Assembly, Rear Seat; Seat Belt Lap and Shoulder Belt, Rear Center; Center Belt Assembly; Belt Assembly, Rear Seat, Outer Center
- Manufacturer Note: GRAY,TRIM1#
- Position: Center
- Replaces: 73350-47010-B0, 73350-47010-A0, 73350-47011-A0
- Part Name Code: 73350C
- Item Weight: 2.40 Pounds
- Condition: New
- Fitment Type: Direct Replacement
- SKU: 73350-47011-B0
- Warranty: This genuine part is guaranteed by Toyota's factory warranty.
2006 Toyota Prius Seat Belt
Looking for affordable OEM 2006 Toyota Prius Seat Belt? Explore our comprehensive catalogue of genuine 2006 Toyota Prius Seat Belt. All our parts are covered by the manufacturer's warranty. Plus, our straightforward return policy and speedy delivery service ensure an unparalleled shopping experience. We look forward to your visit!
2006 Toyota Prius Seat Belt Parts Q&A
- Q: How to Remove and Replace a Seat Belt on 2006 Toyota Prius?A: The process to remove the front seat outer belt from the right-hand side requires disconnecting the negative battery cable for a minimum 90-second period to deactivate Air Bags and seat belt pretensioners. Start by detaching the front door scuff plate RH and rear door scuff plate RH as well as front door opening trim Weather Strip RH and rear door opening trim Weather Strip RH from the vehicle. Follow this by removing center pillar garnish lower RH and center pillar garnish RH while using tools to eliminate anchor cover and floor anchor bolt along with the nut and shoulder anchor and disconnecting pretensioner connector and removing 2 bolts and outer belt. The next procedure involves taking out the bolt and removing the anchor adjuster assembly of the front shoulder belt anchor. The installation begins with the front shoulder belt anchor adjuster assembly where you must attach it with a bolt totalling 42 N.m (428 kgf.cm, 31 ft.lbf). Start by uniting the center pillar to the outer belt through two bolts while tightening the upper bolt to 5.0 N.m (51 kgf.cm, 44 in.lbf) and the lower bolt to 42 N.m (428 kgf.cm, 31 ft.lbf). Then join the pretensioner connector and secure the outer belt at the shoulder anchor side with 42 N.m (428 kgf.cm, 31 ft.lbf). Finally install the shoulder anchor cover. At the next step attach the center pillar garnish RH, center pillar lower garnish RH together with the floor anchor to the floor panel with a bolt torqued to 42 N.m (428 kgf.cm, 31 ft.lbf). Finish assembly by installing the front door scuff plate RH, rear door scuff plate RH, front door opening trim Weather Strip RH, and rear door opening trim Weather Strip RH. Verify the ELR function by rapidly pulling the belt outside and replace the outer belt assembly if the locking mechanism does not function properly. The initialization process must be performed following negative battery terminal cable reconnection because some systems demand it when the cable is disconnected then reconnected.
Related 2006 Toyota Prius Parts
 2006 Toyota Prius Antenna
 2006 Toyota Prius Coolant Temperature Sensor
 2006 Toyota Prius Ignition Coil
 2006 Toyota Prius Air Bag
 2006 Toyota Prius Air Bag Control Module
 2006 Toyota Prius Antenna Mast
 2006 Toyota Prius Brake Light Switch
 2006 Toyota Prius Camshaft Position Sensor
 2006 Toyota Prius Car Key
 2006 Toyota Prius Door Jamb Switch
 2006 Toyota Prius Oil Pressure Switch
 2006 Toyota Prius Power Window Switch