×
ToyotaParts- Hello
- Login or Register
- Quick Links
- Live Chat
- Track Order
- Parts Availability
- RMA
- Help Center
- Contact Us
- Shop for
- Toyota Parts
- Scion Parts
My Garage
My Account
Cart
OEM 2006 Toyota Land Cruiser Radiator
Cooling Radiator- Select Vehicle by Model
- Select Vehicle by VIN
Select Vehicle by Model
orMake
Model
Year
Select Vehicle by VIN
For the most accurate results, select vehicle by your VIN (Vehicle Identification Number).
1 Radiator found


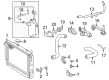
2006 Toyota Land Cruiser Radiator Assembly
Part Number: 16400-50290$490.55 MSRP: $718.90You Save: $228.35 (32%)Ships in 1-3 Business DaysProduct Specifications- Other Name: Radiator
- Part Name Code: 16400
- Item Weight: 28.10 Pounds
- Item Dimensions: 38.2 x 30.6 x 8.5 inches
- Condition: New
- Fitment Type: Direct Replacement
- SKU: 16400-50290
- Warranty: This genuine part is guaranteed by Toyota's factory warranty.
2006 Toyota Land Cruiser Radiator
Looking for affordable OEM 2006 Toyota Land Cruiser Radiator? Explore our comprehensive catalogue of genuine 2006 Toyota Land Cruiser Radiator. All our parts are covered by the manufacturer's warranty. Plus, our straightforward return policy and speedy delivery service ensure an unparalleled shopping experience. We look forward to your visit!
2006 Toyota Land Cruiser Radiator Parts Q&A
- Q: How to remove and install a radiator on 2006 Toyota Land Cruiser?A: One must disconnect the cable from the negative battery terminal before waiting at least 90 seconds to stop Air Bag activation. After removing the No. 1 engine under cover you should drain engine coolant and detach both No. 1 and No. 2 radiator hoses. The radiator needs repair by starting with disconnection of the No. 1 oil cooler inlet and outlet tubes and afterwards removing the radiator reservoir components after removing the clamp and hose on the wire and unbolting the reservoir and its grommet. Proceed to remove the fan shroud by taking off the 2 nuts and disconnecting the 2 clamps on the A/C discharge tube, removing the 2 bolts and disconnecting the 2 wire harness brackets from the radiator, disconnecting the 2 oil cooler tubes from the clamp on the fan shroud, loosening the fan pulley mounting nuts, removing the drive belt, and finally removing the 3 bolts holding the fan shroud to the radiator and the 4 fan pulley mounting nuts before pulling out the fan with fluid coupling, fan pulley, and fan shroud. The radiator assembly removal process requires the disassembly of 2 nuts and 2 bolts to raise out the radiator from its place. The installation begins with fitting the radiator assembly to its side supports through 8 bolts at 12.7 Nm torque then adding the 2 brackets with 4 nuts at 20 Nm torque until securing the radiator to the body frame with 2 nuts at 20 Nm and 2 bolts at 12 Nm torque. Attach first the fan assembly with fluid coupling and fan pulley and fan shroud to its designated position and insert the four fan pulley mounting nuts without tightening and then screw the fan shroud into place using three bolts which should be tightened to 5.0 Nm. Begin by sealing the oil cooler tubes to these clamps on the fan shroud and then add the drive belt followed by tightening the 4 fan pulley mounting nuts. Install the 2 wire harness brackets to the radiator wire with 2 bolts (Torque: 5.0 Nm) before finishing with 2 clamps and 2 nuts (Torque: 5.0 Nm) on the A/C discharge tube. The radiator reservoir installation process requires installation of the grommet to the reservoir before attaching the reservoir to the fan shroud with 2 bolts at 8.0 Nm torque setting. Next, connect reserve tank hose to the radiator while applying the clamp to wire on the radiator. Proceed by attaching the No. 1 oil cooler outlet tubes to its inlet tubes before connecting both the No. 2 tube and the No. 1 radiator hoses. Engine coolant distribution should occur and the system must be checked for leaks before reattaching the No.1 engine under cover and negative battery cable connection with system initialization required due to cable removal.
Related 2006 Toyota Land Cruiser Parts
 2006 Toyota Land Cruiser Thermostat
 2006 Toyota Land Cruiser Water Pump
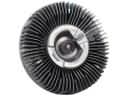 2006 Toyota Land Cruiser Fan Clutch
 2006 Toyota Land Cruiser Radiator Cap
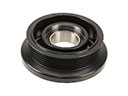 2006 Toyota Land Cruiser A/C Idler Pulley
 2006 Toyota Land Cruiser Coolant Reservoir
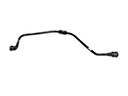 2006 Toyota Land Cruiser Coolant Reservoir Hose
 2006 Toyota Land Cruiser Cooling Fan Assembly
 2006 Toyota Land Cruiser Fan Blade
 2006 Toyota Land Cruiser Fan Shroud
 2006 Toyota Land Cruiser Radiator Hose
 2006 Toyota Land Cruiser Water Pump Gasket