×
ToyotaParts- Hello
- Login or Register
- Quick Links
- Live Chat
- Track Order
- Parts Availability
- RMA
- Help Center
- Contact Us
- Shop for
- Toyota Parts
- Scion Parts
My Garage
My Account
Cart
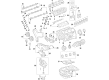
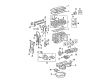
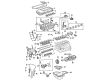
OEM 2005 Toyota Solara Crankshaft Seal
- Select Vehicle by Model
- Select Vehicle by VIN
Select Vehicle by Model
orMake
Model
Year
Select Vehicle by VIN
For the most accurate results, select vehicle by your VIN (Vehicle Identification Number).
3 Crankshaft Seals found


2005 Toyota Solara Rear Main Seal
Part Number: 90311-A0027$44.08 MSRP: $61.37You Save: $17.29 (29%)Ships in 1-3 Business DaysProduct Specifications- Other Name: Seal, Type T Oil; Engine Crankshaft Seal, Rear; Oil Seal; Rear Seal; Front Seal; Seal, Engine Rear Oil; Engine Crankshaft Seal; Crankshaft Seal
- Position: Rear
- Replaces: 90080-31053, 90311-92003, 90311-92010, 90311-92004, 90311-92006, 90311-92009
- Part Name Code: 11381A
- Item Weight: 0.50 Pounds
- Item Dimensions: 5.1 x 5.2 x 0.4 inches
- Condition: New
- Fitment Type: Direct Replacement
- SKU: 90311-A0027
- Warranty: This genuine part is guaranteed by Toyota's factory warranty.


2005 Toyota Solara Rear Main Seal
Part Number: 90311-89010$40.26 MSRP: $56.03You Save: $15.77 (29%)Ships in 1-3 Business DaysProduct Specifications- Other Name: Seal, Type T Oil; Engine Crankshaft Seal, Rear; Crankshaft Pulley Seal; Seal, Engine Rear Oil; Engine Crankshaft Seal; Crankshaft Seal
- Manufacturer Note: 2AZ-FE,*195
- Position: Rear
- Replaces: 90311-89002, 90311-89001, 90080-31073, 90311-89007, 90311-89003, 90311-89004, 90311-C0001
- Part Name Code: 11401L
- Item Weight: 0.50 Pounds
- Item Dimensions: 5.1 x 5.1 x 0.4 inches
- Condition: New
- Fitment Type: Direct Replacement
- SKU: 90311-89010
- Warranty: This genuine part is guaranteed by Toyota's factory warranty.


2005 Toyota Solara Oil Seal, Front
Part Number: 90080-31049$9.91 MSRP: $13.79You Save: $3.88 (29%)Ships in 1-3 Business DaysProduct Specifications- Other Name: Seal, Type T Oil; Engine Crankshaft Seal, Front; Timing Cover Gasket; Multi-Purpose Seal; Timing Cover Seal; Crankshaft Seal; Front Seal; Timing Cover Oil Seal; Cover Seal; Oil Seal for Timing Chain/Belt.
- Manufacturer Note: (L)
- Position: Front
- Replaces: 90311-38059, 90080-31060
- Part Name Code: 11302A
- Item Weight: 0.50 Pounds
- Item Dimensions: 2.2 x 2.2 x 0.5 inches
- Condition: New
- Fitment Type: Direct Replacement
- SKU: 90080-31049
- Warranty: This genuine part is guaranteed by Toyota's factory warranty.
2005 Toyota Solara Crankshaft Seal
Looking for affordable OEM 2005 Toyota Solara Crankshaft Seal? Explore our comprehensive catalogue of genuine 2005 Toyota Solara Crankshaft Seal. All our parts are covered by the manufacturer's warranty. Plus, our straightforward return policy and speedy delivery service ensure an unparalleled shopping experience. We look forward to your visit!
2005 Toyota Solara Crankshaft Seal Parts Q&A
- Q: How to replace the Crankshaft Seal on 2005 Toyota Solara?A: The first step to replace the engine rear oil seal involves separating the automatic transaxle assembly (A/T) or manual transaxle assembly (M/T) following engine transaxle removal. The A/T requires crankshaft fixation using Special Service Tool: 09960-10010 (09962-01000, 09963-01000) as the first step to remove drive plate and ring gear sub-assembly before bolting out the rear spacer and drive plate along with front spacer through eight bolts. Before bolt removal for the M/T you must use the same Special Service Tool to secure the crankshaft. Then remove the clutch cover assembly with clutch disc assembly as well as the flywheel sub-assembly. A combination of knife and screwdriver allows removal of the engine rear oil seal by cutting the lip first followed by prying the seal out using a taped screwdriver tip. Assess the crankshaft condition then prepare the surface with 400-grit sandpaper whenever necessary after removal. The installation of a new engine rear oil seal requires application of MP grease to the lip followed by cleaning it from foreign substances before using Special Service Tools 09223-15030 and 09950-70010 (09951-07100) with a hammer to tap in the oil seal until it reaches flush with the rear oil seal retainer edge. Finish by wiping off all remaining grease. When repairing A/T models reinstall the drive plate and ring gear sub-assembly through crankshaft fixation and clean the bolt hole while applying adhesive (Part No. 08833-00070 or Three Bond equivalent) to 2 or 3 threads of bolt end before installing front spacer and drive plate and rear spacer with 8 bolts torqued to 98 Nm (1,000 kgf-cm, 72 ft. lbs.). In M/T service we need to follow the same procedure for the flywheel sub-assembly by using adhesive on bolt ends before tightening 8 bolts to 130 Nm (1,330 kgf-cm, 96 ft. lbs.). Terminate the installation process by fitting the clutch disc assembly along with the clutch cover assembly while placing the correct transaxle assemblies.
Related 2005 Toyota Solara Parts
 2005 Toyota Solara Valve Cover Gasket
 2005 Toyota Solara Harmonic Balancer
 2005 Toyota Solara Oil Pump
 2005 Toyota Solara Cam Gear
 2005 Toyota Solara Crankshaft Pulley
 2005 Toyota Solara Cylinder Head
 2005 Toyota Solara Dipstick Tube
 2005 Toyota Solara Exhaust Valve
 2005 Toyota Solara Intake Valve
 2005 Toyota Solara Oil Pan
 2005 Toyota Solara Oil Pump Gasket
 2005 Toyota Solara Valve Stem Seal