×
ToyotaParts- Hello
- Login or Register
- Quick Links
- Live Chat
- Track Order
- Parts Availability
- RMA
- Help Center
- Contact Us
- Shop for
- Toyota Parts
- Scion Parts
My Garage
My Account
Cart
OEM 2005 Toyota RAV4 Wheel Bearing
Hub Bearing- Select Vehicle by Model
- Select Vehicle by VIN
Select Vehicle by Model
orMake
Model
Year
Select Vehicle by VIN
For the most accurate results, select vehicle by your VIN (Vehicle Identification Number).
6 Wheel Bearings found


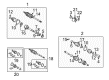
2005 Toyota RAV4 Bearing (For Front Drive Shaft)
Part Number: 90080-36133$31.18 MSRP: $43.39You Save: $12.21 (29%)Ships in 1-2 Business DaysProduct Specifications- Other Name: Bearing, Radial Ball; Wheel Bearing; Axle Bearing
- Replaces: 90363-41002, 90369-41001
- Part Name Code: 43410C
- Item Weight: 1.10 Pounds
- Item Dimensions: 3.2 x 1.0 x 3.4 inches
- Condition: New
- Fitment Type: Direct Replacement
- SKU: 90080-36133
- Warranty: This genuine part is guaranteed by Toyota's factory warranty.


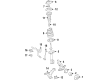
2005 Toyota RAV4 Front Hub
Part Number: 43502-42020$153.44 MSRP: $217.21You Save: $63.77 (30%)Ships in 1-2 Business DaysProduct Specifications- Other Name: Hub Sub-Assembly, Front Axle; Wheel Hub, Front; Wheel Hub Repair Kit; Hub Repair Kit; Hub; Hub Sub-Assembly, Front Axle, Passenger Side; Hub Sub-Assembly, Front Axle, Driver Side; Wheel Hub
- Position: Front
- Replaces: 43502-06030, 43502-33020
- Item Weight: 4.70 Pounds
- Item Dimensions: 7.4 x 6.4 x 4.9 inches
- Condition: New
- Fitment Type: Direct Replacement
- SKU: 43502-42020
- Warranty: This genuine part is guaranteed by Toyota's factory warranty.


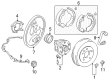
2005 Toyota RAV4 Bearing (For Front Axle Hub Passenger Side)
Part Number: 90369-43009$81.87 MSRP: $114.92You Save: $33.05 (29%)Ships in 1-3 Business DaysProduct Specifications- Other Name: Bearing; Front Axle Hub Driver Side; Wheel Hub Repair Kit; Wheel Bearing Kit; Axle Bearing
- Manufacturer Note: KOYO
- Item Weight: 2.30 Pounds
- Item Dimensions: 3.6 x 3.7 x 2.0 inches
- Condition: New
- Fitment Type: Direct Replacement
- SKU: 90369-43009
- Warranty: This genuine part is guaranteed by Toyota's factory warranty.

2005 Toyota RAV4 Hub & Bearing
Part Number: 42410-42050$309.42 MSRP: $441.78You Save: $132.36 (30%)Ships in 1-3 Business DaysProduct Specifications- Other Name: Hub&Bearing Assembly; Rear Wheel Bearing & Hub; Wheel Hub Repair Kit; Axle Bearing; Hub; Rear Axle Hub & Bearing Assembly, Passenger & Driver Side; Wheel Bearing Assembly.
- Replaces: 42410-42030
- Item Weight: 8.00 Pounds
- Item Dimensions: 6.7 x 6.8 x 6.2 inches
- Condition: New
- Fitment Type: Direct Replacement
- SKU: 42410-42050
- Warranty: This genuine part is guaranteed by Toyota's factory warranty.
2005 Toyota RAV4 Hub & Bearing
Part Number: 42410-42020$318.73 MSRP: $455.08You Save: $136.35 (30%)Ships in 1-3 Business DaysProduct Specifications- Other Name: Hub&Bearing Assembly; Rear Wheel Bearing & Hub; Wheel Hub Repair Kit; Axle Bearing; Hub; Rear Axle Hub & Bearing Assembly, Passenger & Driver Side; Wheel Bearing Assembly
- Item Weight: 8.20 Pounds
- Item Dimensions: 6.8 x 6.9 x 6.1 inches
- Condition: New
- Fitment Type: Direct Replacement
- SKU: 42410-42020
- Warranty: This genuine part is guaranteed by Toyota's factory warranty.
2005 Toyota RAV4 Hub & Bearing, Rear
Part Number: 42450-42030$560.00 MSRP: $820.68You Save: $260.68 (32%)Ships in 1-3 Business DaysProduct Specifications- Other Name: Hub&Bearing Assembly, Rear Axle; Wheel Bearing & Hub Assembly; Wheel Hub Repair Kit; Axle Bearing.; Hub; Rear Axle Hub & Bearing Assembly, Passenger & Driver Side; Wheel Bearing Assembly.
- Manufacturer Note: W(ABS)
- Position: Rear
- Item Weight: 8.00 Pounds
- Item Dimensions: 6.5 x 6.4 x 7.1 inches
- Condition: New
- Fitment Type: Direct Replacement
- SKU: 42450-42030
- Warranty: This genuine part is guaranteed by Toyota's factory warranty.
2005 Toyota RAV4 Wheel Bearing
Looking for affordable OEM 2005 Toyota RAV4 Wheel Bearing? Explore our comprehensive catalogue of genuine 2005 Toyota RAV4 Wheel Bearing. All our parts are covered by the manufacturer's warranty. Plus, our straightforward return policy and speedy delivery service ensure an unparalleled shopping experience. We look forward to your visit!
2005 Toyota RAV4 Wheel Bearing Parts Q&A
- Q: How to service and repair the wheel bearing on 2005 Toyota RAV4?A: Begin wheel bearing service and repair by detaching the lower ball joint using the Special Service Tool: 09628-62011 together with the elimination of the lower ball joint cotter pin and nut. extract the inner race from the axle hub by using Special Service Tool: 09950-40011 (09951-04020, 09952-04010, 09953-04020, 09954-04010, 09955-04061, 09957-04010, 09958-04011) with 09950-60010 and 09951-00370. You need to remove the dust cover by unfastening 4 torx socket bolts (T30). To remove the bearing from the steering knuckle start by taking out the snap ring with snap ring pliers and installing the inner race outside the bearing and then utilize Special Service Tool: 09527-17011, 09950-60010 (09951-00540), 09950-70010 (09951-07150) with a press. The installation of a new steering knuckle bearing requires tool 09606-32010 and tool 09950-70010 (09951-07150) with a press for assembly followed by snap ring plier use to add the new snap ring. After positioning the dust cover you should use a torx socket with T30 size to tighten the 4 bolts with a required torque value of 8.0 Nm (85 kgf-cm, 71 inch lbs.). You should install the front axle hub using Special Service Tool: 09527-17011, 09950-60010 (09951-00370), 09950-70010 (09951-07150) and a press. The final step involves attaching the lower ball joint using its nut at a torque of 133 Nm supplemented by 1,360 kgf-cm (98 ft. lbs.) and proceeding to install a new cotter pin while ensuring the hole alignment; lack of proper alignment requires additional nut tightening to reach a 60° angle.
Related 2005 Toyota RAV4 Parts
 2005 Toyota RAV4 Brake Caliper
 2005 Toyota RAV4 Speed Sensor
 2005 Toyota RAV4 Wheel Hub
 2005 Toyota RAV4 Brake Drum
 2005 Toyota RAV4 ABS Pump And Motor Assembly
 2005 Toyota RAV4 Brake Caliper Bracket
 2005 Toyota RAV4 Brake Caliper Piston
 2005 Toyota RAV4 Brake Line
 2005 Toyota RAV4 Brake Pad Set
 2005 Toyota RAV4 Brake Proportioning Valve
 2005 Toyota RAV4 Parking Brake Shoe
 2005 Toyota RAV4 Wheel Stud