×
ToyotaParts- Hello
- Login or Register
- Quick Links
- Live Chat
- Track Order
- Parts Availability
- RMA
- Help Center
- Contact Us
- Shop for
- Toyota Parts
- Scion Parts
My Garage
My Account
Cart
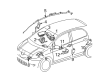
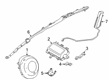
OEM Toyota Yaris Air Bag
Air Bag Module- Select Vehicle by Model
- Select Vehicle by VIN
Select Vehicle by Model
orMake
Model
Year
Select Vehicle by VIN
For the most accurate results, select vehicle by your VIN (Vehicle Identification Number).
27 Air Bags found

Toyota Yaris Head Air Bag, Driver Side
Part Number: 62180-52024$644.02 MSRP: $943.83You Save: $299.81 (32%)Ships in 1-3 Business Days
Toyota Yaris Head Air Bag, Passenger Side
Part Number: 62170-WB003$630.13 MSRP: $923.46You Save: $293.33 (32%)Ships in 1-3 Business DaysToyota Yaris Inflator Curtain, Driver Side
Part Number: 62180-52040$585.48 MSRP: $858.03You Save: $272.55 (32%)Ships in 1-3 Business Days
Toyota Yaris Passenger Air Bag, Upper
Part Number: 73960-52280$752.72 MSRP: $1103.12You Save: $350.40 (32%)Ships in 1-3 Business DaysToyota Yaris Inflator Curtain, Passenger Side
Part Number: 62170-52024$665.61 MSRP: $975.46You Save: $309.85 (32%)Ships in 1-3 Business DaysToyota Yaris Inflator Curtain, Passenger Side
Part Number: 62170-52040$585.48 MSRP: $858.03You Save: $272.55 (32%)Ships in 1-3 Business DaysToyota Yaris Passenger Air Bag, Upper
Part Number: 73960-52470$584.97 MSRP: $857.27You Save: $272.30 (32%)Ships in 1-3 Business DaysToyota Yaris Head Air Bag, Driver Side
Part Number: 62180-WB003$630.13 MSRP: $923.46You Save: $293.33 (32%)Ships in 1-3 Business Days
Toyota Yaris Passenger Air Bag, Upper
Part Number: 73960-52161$549.60 MSRP: $805.44You Save: $255.84 (32%)Ships in 1-3 Business DaysToyota Yaris Inflator Curtain, Driver Side
Part Number: 62180-52022$667.85 MSRP: $978.74You Save: $310.89 (32%)Ships in 1-3 Business Days
Toyota Yaris Side Impact Inflator Module, Passenger Side
Part Number: 73910-52191$355.41 MSRP: $520.87You Save: $165.46 (32%)Ships in 1-3 Business Days
Toyota Yaris Inflator Curtain, Driver Side
Part Number: 62180-52120$513.92 MSRP: $753.15You Save: $239.23 (32%)Ships in 1-3 Business Days
Toyota Yaris Occupant Sensor, Passenger Side
Part Number: 73905-52020$306.50 MSRP: $437.62You Save: $131.12 (30%)Ships in 1-3 Business Days
Toyota Yaris Knee Inflator Module, Lower
Part Number: 73900-52071-C0$807.76 MSRP: $1183.78You Save: $376.02 (32%)Ships in 1-3 Business DaysToyota Yaris Inflator Curtain, Passenger Side
Part Number: 62170-52120$513.92 MSRP: $753.15You Save: $239.23 (32%)Ships in 1-3 Business Days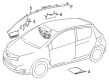
Toyota Yaris Head Air Bag, Passenger Side
Part Number: 62170-0D142$696.77 MSRP: $1021.12You Save: $324.35 (32%)Ships in 1-3 Business DaysToyota Yaris Head Air Bag, Driver Side
Part Number: 62180-0D132$721.27 MSRP: $1057.03You Save: $335.76 (32%)Ships in 1-3 Business Days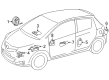
Toyota Yaris Knee Inflator Module, Lower
Part Number: 73900-0D031-C0$822.85 MSRP: $1205.90You Save: $383.05 (32%)Ships in 1-3 Business Days
Toyota Yaris Inflator Curtain, Driver Side
Part Number: 62180-WB002$421.56 MSRP: $617.81You Save: $196.25 (32%)Ships in 1-3 Business DaysToyota Yaris Inflator Curtain, Passenger Side
Part Number: 62170-WB002$479.72 MSRP: $703.03You Save: $223.31 (32%)Ships in 1-3 Business Days
| Page 1 of 2 |Next >
1-20 of 27 Results
Toyota Yaris Air Bag
Choose genuine Air Bag that pass strict quality control tests. You can trust the top quality and lasting durability. Shopping for OEM Air Bag for your Toyota Yaris? Our website is your one-stop destination. We stock an extensive selection of genuine Toyota Yaris parts. The price is affordable so you can save more. It only takes minutes to browse and find the exact fit. Easily add to cart and check out fast. Our hassle-free return policy will keep you stress-free. We process orders quickly for swift delivery. Your parts will arrive faster, so you can get back on the road sooner.
Toyota Yaris Air Bag Parts and Q&A
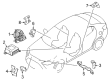
- Q: How to remove the curtain shield Air Bag assembly for the sedan on Toyota Yaris?A:The beginning procedure to remove the curtain shield Air Bag assembly for the sedan requires disconnecting the negative battery terminal. Start by separating the front seat headrest assembly before continuing with both front seat assembly removal from left and right sides. The necessary products for removal include the rear seat cushion cover pad sub-assembly, rear seatback assembly for fixed seats, along with the rear seatback assemblies for 60/40 split seats on both left and right sides. To remove the elements of the 60/40 split seat type you need to first dispose of the luggage compartment floor mat and spare wheel cover assembly and inner pad trim. The service procedure demands front door scuff plates together with instrument panel under cover sub-assemblies, cowl side trim boards, front door opening trim Weather Strips, rear door scuff plates, rear door opening trim Weather Strips and rear seat side covers to be removed. Start by disconnecting the roof side inner garnishes along with the center pillar lower garnishes then the Seat Belt anchor cover cap and front seat outer belt assemblies. Follow this by extracting the center pillar upper garnishes and front pillar garnishes in addition to the instrument panel lower center finish panel, shift lever knob sub-assembly for manual transaxle, rear console box upper front and rear panel sub-assemblies, rear console box carpet, and rear console box assembly. Start by removing the instrument panel finish panel ends and after that proceed with removing the instrument cluster finish panel No.1 along with the combination meter assembly and glove compartment door assembly. Then remove the upper instrument panel sub-assembly, instrument panel box, assist grip cover, assist grip sub-assembly, visor assemblies, visor holders, room light assembly, map light assembly and the roof headlining assembly. Separate the right side curtain shield Air Bag by using a thin-bladed screwdriver to free the locking button followed by disconnecting the Air Bag connector and removing 9 bolts while disconnecting 3 hooks and extracting the curtain shield Air Bag. To remove the curtain shield Air Bag bracket from its position on the right side you should first remove the bolt then separate the 2 hooks before extracting the bracket. The last roofing task involves removing two bolts followed by detaching two hooks from the right side roof side rail bracket and completing its removal.
- Q: How to install the curtain shield Air Bag assembly for the sedan on Toyota Yaris?A:Before installing the curtain shield Air Bag assembly for the sedan it is essential to learn all safety precautions related to SRS Air Bag systems. The right-hand side roof side rail bracket installation requires hooking the 2 components into body holes and securing the 2 bolts to reach a torque of 14 Nm (143 kgf-cm, 10 ft-lbf). The second step for installation consists of placing two hooks from the curtain shield Air Bag bracket into body holes before tightening a single bolt to match the required torque measurement. Proceed with installing the curtain shield Air Bag assembly through inserting its 3 hooks into the body holes before tightening 9 bolts to 14 Nm (143 kgf-cm, 10 ft-lbf) torque settings and connecting the Air Bag connector with proper locking button engagement. Afterward, install the roof headlining assembly, map light assembly, room light assembly, visor holders (both RH and LH), visor assemblies (both RH and LH), assist grip cover, instrument panel box, upper instrument panel sub-assembly, glove compartment door assembly, combination meter assembly, instrument cluster finish panel No.1, instrument panel finish panel ends (both RH and LH), rear console box assembly, rear console box carpet, rear console box upper rear panel sub-assembly, rear console box upper front panel sub-assembly, shift lever knob sub-assembly (for manual transaxle), instrument panel lower center finish panel, front pillar garnishes (both RH and LH), center pillar upper garnishes (both RH and LH), front seat outer belt assemblies (both RH and LH), Seat Belt anchor cover cap, center pillar lower garnishes (both RH and LH), roof side inner garnishes (both RH and LH), rear seat side covers (both RH and LH), rear door opening trim Weather Strips (both RH and LH), rear door scuff plates (both RH and LH), front door opening trim Weather Strips (both RH and LH), cowl side trim boards (both RH and LH), instrument panel under cover sub-assemblies (both RH and LH), front door scuff plates (both RH and LH), luggage compartment trim inner pad (for 60/40 split seat type), spare wheel cover assembly (for 60/40 split seat type), luggage compartment floor mat (for 60/40 split seat type), rear seatback assemblies (for fixed seat type and both sides of 60/40 split seat type), rear seat cushion cover pad sub-assembly, front seat assemblies (both RH and LH), front seat headrest assembly, and finally connect the cable to the negative battery terminal with a torque of 5.4 Nm (55 kgf-cm, 48 in-lbf). The SRS warning light requires complete inspection as the last step of the procedure.

Related Toyota Yaris Parts
 Toyota Yaris Clock Spring
 Toyota Yaris Horn
 Toyota Yaris Power Window Switch
 Toyota Yaris Air Bag Control Module
 Toyota Yaris Air Bag Sensor
 Toyota Yaris Back Up Light Switch
 Toyota Yaris Daytime Running Light Relay
 Toyota Yaris Fuse
 Toyota Yaris Hazard Warning Switch
 Toyota Yaris Knock Sensor
 Toyota Yaris Oil Pressure Switch
 Toyota Yaris Turn Signal Flasher