×
ToyotaParts- Hello
- Login or Register
- Quick Links
- Live Chat
- Track Order
- Parts Availability
- RMA
- Help Center
- Contact Us
- Shop for
- Toyota Parts
- Scion Parts
My Garage
My Account
Cart
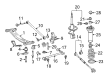
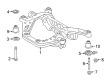
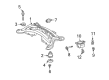
OEM Toyota Venza Rear Crossmember
Rear Suspension Crossmember- Select Vehicle by Model
- Select Vehicle by VIN
Select Vehicle by Model
orMake
Model
Year
Select Vehicle by VIN
For the most accurate results, select vehicle by your VIN (Vehicle Identification Number).
5 Rear Crossmembers found


Toyota Venza Suspension Crossmember, Rear Part Number: 51206-06104
$686.66 MSRP: $1006.31You Save: $319.65 (32%)Ships in 1-3 Business Days
Toyota Venza Suspension Crossmember, Rear Part Number: 51206-06103
$689.05 MSRP: $1009.81You Save: $320.76 (32%)Ships in 1-3 Business Days
Toyota Venza Member Sub-Assembly, Rear Suspension Part Number: 51206-42080
$1312.50 MSRP: $1923.49You Save: $610.99 (32%)Ships in 1-3 Business DaysToyota Venza Suspension Crossmember, Rear Part Number: 51206-06105

Toyota Venza Suspension Crossmember, Rear Part Number: 51206-0T021
Toyota Venza Rear Crossmember
Choose genuine Rear Crossmember that pass strict quality control tests. You can trust the top quality and lasting durability. Shopping for OEM Rear Crossmember for your Toyota Venza? Our website is your one-stop destination. We stock an extensive selection of genuine Toyota Venza parts. The price is affordable so you can save more. It only takes minutes to browse and find the exact fit. Easily add to cart and check out fast. Our hassle-free return policy will keep you stress-free. We process orders quickly for swift delivery. Your parts will arrive faster, so you can get back on the road sooner.
The Toyota Venza Rear Crossmember functions as a critical part which supports both reliability and performance capabilities in Toyota Venza vehicles. As part of the structural support system the Rear Crossmember maintains the vehicle's drivetrain in optimal position for optimal engine and transmission alignment and stability. Safety is a core strength of the Toyota Venza because the vehicle has received multiple awards as a Top Safety Pick from the IIHS. Different Venza models use structurally distinct Rear Crossmembers because engineers improve their design through material innovation for both strength retention and improved performance. Vehicle safety together with operational efficiency depends heavily on maintaining intact the integrity of the Rear Crossmember because damage to it harms both driving performance and safety characteristics of the Toyota Venza. The Rear Crossmember helps build Toyota Venza's structural strength while advancing its driving capabilities to make it stand out in automotive markets. The Rear Crossmember maintains versatile functionality by working with all first generation versions of the automobile which were produced from 2008 to 2015. The Toyota car's reliability standing grows stronger because of its resistance to substantial stress loads without degrading its alignment. The Rear Crossmember of the automaker model plays a vital role by enhancing vehicle performance and safety while making it a popular crossover SUV option for dependable driving.
Toyota Venza Rear Crossmember Parts and Q&A
- Q: How to install the Rear Crossmember on Toyota Venza?A:Install the stud bolt for the LH side of the rear suspension member by using Special Service Tool: 09817-33190 along with a 21 mm socket wrench until it reaches 180 Nm (1839 kgf-cm, 133 ft-lbf). Execute this installation procedure also on the RH side. Install the rear No. 2 body mounting bracket sub-assembly LH with bolts A and B while using the correct positioning for each bolt kind followed by the same procedure on the RH side. To install the new rear suspension member body mounting front cushion for the LH side, use Special Service Tool: 09830-01010, 09830-10010, 09830-01020, 09830-01030, and 09830-01060 to confirm the suspension member sub-assembly has no clearance while applying thread grease to the center bolt before use. Repeat this for the RH side. The technician should mount the rear suspension member body mounting rear cushion for the LH side using Special Service Tools: 09515-21010 and 09830-36010 while checking for proper fitting before installing the RH side's mounting. The installation process starts with placing rear No. 1 differential mount cushion and rear No. 2 differential mount cushion before using differential support to pre-tighten the rear differential carrier assembly until a final full tightening step. The technician must install the rear No. 1 suspension arm assembly LH to the rear suspension member by using the bolt and nut and facing the identification mark to the rear before setting the bolt to the specified position before final tightening to 80 Nm (816 kgf-cm, 59 ft-lbf). Repeat for the RH side. Following support of the rear suspension member with a jack and blocks, lift it carefully to install the member along with stoppers and retainers using specified nuts and bolts. Then tighten the two nuts (A) to 115 Nm (1173 kgf-cm, 85 ft-lbf). To complete the tightening procedure for the rear No. 2 body mounting bracket sub-assembly on the LH side, shake the rear suspension member lightly while torquing the three bolts to 90 Nm (918 kgf-cm, 66 ft-lbf), then repeat the same process for the RH side. The 19 mm socket wrench must be used with Special Service Tool: 09961-00950 to tighten the rear suspension member until the torque reaches 96 Nm (979 kgf-cm, 71 ft-lbf) without the tool or 71 Nm (724 kgf-cm, 52 ft-lbf) with it while using a torque wrench with 425 mm (1.39 ft.) fulcrum length. The frame wire install requires attaching six clamps while linking the connector with the hose while avoiding wire rotation. Begin with the installation of the floor wire on the No. 3 position followed by the rear Drive Shaft snap ring installation on the LH and assembly on both LH and RH sides. Put in differential oil before placing the rear differential carrier cover plug and connecting both rear No. 1 suspension arm assemblies LH and RH. First tighten the rear No. 2 suspension arm assemblies LH and RH with intermediate torque before installing the pair of rear strut rod assemblies for both sides. The HID headlight system requires installation of the rear height control sensor sub-assembly as the first step before adding the No. 3 Parking Brake Cable assembly and the No. 2 parking brake cable assembly. Both assemblies need to be torqued to 6.0 Nm (61 kgf-cm, 53 in-lbf). First install the rear axle shaft nuts on both sides before adding rear Speed Sensors LH and RH while maintaining wire untwisted condition and protecting sensor tips from debris. Tighten the propeller assembly with its center bearing shaft at a temporary torque setting followed by a full torque operation of the assembly. Complete the installation process of the No. 1 floor under cover before checking transfer oil pressure and adding center Exhaust Pipe components while inspecting exhaust gas leaks. Complete this phase by first installing the rear wheels to 103 Nm (1050 kgf-cm, 76 ft-lbf) torque then stabilize the suspension before fully tightening rear No. 2 suspension arm assemblies LH and RH while performing an inspection of rear wheel alignment followed by signal checks of speed sensors and an initialization process of height control sensors when HID headlight system exists along with headlight aiming checks.
- Q: How to remove the Rear Crossmember on Toyota Venza?A:The process to replace the rear suspension member for AWD begins by taking away the rear wheels and the center Exhaust Pipe assembly followed by removal of the propeller with center bearing shaft assembly. Start by dismounting both rear Speed Sensors after undoing their bolts and check for debris in their tips as well as installation openings. The repair process starts with removing both rear axle shaft nuts before separating the cable assemblies which contain No. 3 and No. 2 parking brake components. Proceed to eliminate the No. 1 floor under cover along with rear strut rod assemblies from both sides and the rear height control sensor sub-assembly when HID headlight system is present followed by removing the rear No. 2 suspension arm assemblies. Both sides require separation of their rear No. 1 suspension arm assemblies while operators drain differential oil and detach rear Drive Shaft assemblies with their snap rings. The procedure involves removing the No. 3 floor wire and the frame wire by both connector disconnection and clamp disengagement. A jack with three wooden blocks should support the rear suspension member before removing four nuts and the two bolts and two rear lower suspension member stopper retainers so that the member can be lowered with caution to prevent any damage. First disconnect rear upper suspension member stoppers then take away rear No. 1 suspension arm assemblies from both sides. You need Special Service Tool: 09830-10010 to eliminate the rear differential carrier assembly with differential support alongside the rear No. 1 and No. 2 differential mount cushions together with the rear suspension member body mounting front cushions from both sides. Apply grease on the threads before tightening each bolt gradually. To gain access to the rear suspension member body mounting rear cushions on both sides employ Special Service Tool: 09710-30050 according to the same safety measures. The hole plugs together with the rear No. 2 body mounting bracket sub-assemblies on both sides and the stud bolts on both sides need to be removed.


Related Toyota Venza Parts
 Toyota Venza Shock Absorber
 Toyota Venza Coil Spring Insulator
 Toyota Venza Coil Springs
 Toyota Venza Control Arm
 Toyota Venza Crossmember Bushing
 Toyota Venza Lateral Link
 Toyota Venza Strut Mounts
 Toyota Venza Sway Bar Bracket
 Toyota Venza Sway Bar Bushing
 Toyota Venza Sway Bar Link
 Toyota Venza Sway Bars
 Toyota Venza Trailing Arm