×
ToyotaParts- Hello
- Login or Register
- Quick Links
- Live Chat
- Track Order
- Parts Availability
- RMA
- Help Center
- Contact Us
- Shop for
- Toyota Parts
- Scion Parts
My Garage
My Account
Cart
OEM Toyota Venza Drive Shaft
Axle Shaft- Select Vehicle by Model
- Select Vehicle by VIN
Select Vehicle by Model
orMake
Model
Year
Select Vehicle by VIN
For the most accurate results, select vehicle by your VIN (Vehicle Identification Number).
1 Drive Shaft found

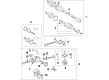
Toyota Venza Drive Shaft Part Number: 37100-33030
$833.65 MSRP: $1221.72You Save: $388.07 (32%)Ships in 1-3 Business Days
Toyota Venza Drive Shaft
Choose genuine Drive Shaft that pass strict quality control tests. You can trust the top quality and lasting durability. Shopping for OEM Drive Shaft for your Toyota Venza? Our website is your one-stop destination. We stock an extensive selection of genuine Toyota Venza parts. The price is affordable so you can save more. It only takes minutes to browse and find the exact fit. Easily add to cart and check out fast. Our hassle-free return policy will keep you stress-free. We process orders quickly for swift delivery. Your parts will arrive faster, so you can get back on the road sooner.
It is common to find parts like the Drive Shaft as the cornerstone of the vehicle and Toyota's promise of performance. Being responsible for transferring mechanical power and torque output of the drive train from the engine to the drive wheels, the Drive Shaft is to sustain torsion and shear stress, yet being relatively lightweight. This prime objective helps make the Venza very efficient in operation thereby improving on its fuel consumption as well as the driving characteristics. Smoothly working with different models of Venza and supporting both the front-wheel and the all-wheel drive, the Drive Shaft is one of the critical components in the car that affect its flexibility and security. Considering the drive shafts, the Venza has used both one and two part styles; the later modest the crash safety. In the design of the Drive Shaft, the Toyota Venza is fitted with some mechanisms such as universal joints which are capable of handling the alignment variation. Notably, this feature contributes to the performance aspect while at the same time increasing the safety aspect related to the Toyota brand. The Venza has received a lot of commendations particularly in the safety aspect especially the latest, IIHS Top Safety Pick hence the importance of the drive shaft in offering optimum safety in the car. The Toyota Venza Drive Shaft is known to have a solid build and a sleek design to boot.
Toyota Venza Drive Shaft Parts and Q&A
- Q: How to install the Drive Shaft assembly on Toyota Venza?A:Instalation begins by taking out Special Service Tool: 09325-20010 from the transfer before placing the propeller shaft assembly together with the center bearing shaft so you must avoid any contact that might harm the oil seal or universal joint boot. Attach the matchmarks on the rear propeller shaft and electromagnetic control coupling assembly before securely tightening 4 nuts and 4 washers yet avoiding contact of bolts or washers with grease. The propeller with center bearing shaft assembly must be attached via 4 bolts and 2 No. 1 support bearing washers and 2 No. 2 support bearing washers to the mounting points while repeating the practice of avoiding bolt and washer contact with grease. The four nuts need full tightening until they reach 37 Nm of torque (379 kgf-cm, 27ft-lbf). Inspecting the propeller and center bearing shaft assembly requires Special Service Tool: 09370-50010 while avoiding cloth in the universal joint area. The brake pedal must be depressed and held before tightening the 6 bolts with a 6 mm hexagon wrench to 26 Nm (265 kgf-cm, 19ft-lbf). After vehicle unloading adjust Length A to between 65.5 to 70.5 mm (2.579 to 2.776 in.) between the rear side of the cover and shaft while setting Length A to 11.5 to 13.5 mm (.453 to .532 in.) between the center support bearing and cushion edge surface before tightening the 4 bolts to 37 Nm (375 kgf-cm, 27ft-lbf). First install the center Exhaust Pipe assembly then the tail exhaust pipe assembly for both 1AR-FE and 2GR-FE engine types. The technician should check exhaust gas leaks before inspecting and adjusting both transfer oil amount and joint angle. Use a jack to elevate and lower the Differential after you stabilize the center support bearings through several hand rotations of the propeller shaft to eliminate any vibration or noise. Check the joint angle of a raised vehicle before eliminating the transfer dynamic damper and using Special Service Tool to verify the propeller shaft angle (A) against intermediate shaft angle (B) for an acceptable range of -3.69 degrees to -1.69 degrees. The measurement of angles C and D from the rear propeller shaft and rear differential should together create a No. 4 joint angle between 1.63 degrees and 3.63 degrees. The required adjustment calls for replacing the No. 2 center support bearing washer but requires one to use washers with equal thickness on each bolt side, and stacking washers must be avoided. Reinstall the transfer dynamic damper by tightening it to 26 Nm (265 kgf-cm, 19ft-lbf).

Related Toyota Venza Parts
 Toyota Venza Camshaft
 Toyota Venza Crankshaft Seal
 Toyota Venza Differential
 Toyota Venza Differential Bearing
 Toyota Venza Engine Mount Torque Strut
 Toyota Venza Exhaust Valve
 Toyota Venza Intake Valve
 Toyota Venza Pinion Bearing
 Toyota Venza Transfer Case
 Toyota Venza Transfer Case Bearing
 Toyota Venza Transfer Case Seal
 Toyota Venza Transmission Drain Plug