×
ToyotaParts- Hello
- Login or Register
- Quick Links
- Live Chat
- Track Order
- Parts Availability
- RMA
- Help Center
- Contact Us
- Shop for
- Toyota Parts
- Scion Parts
My Garage
My Account
Cart
OEM Toyota Timing Chain Tensioner
Engine Timing Chain Tensioner- Select Vehicle by Model
- Select Vehicle by VIN
Select Vehicle by Model
orMake
Model
Year
Select Vehicle by VIN
For the most accurate results, select vehicle by your VIN (Vehicle Identification Number).
49 Timing Chain Tensioners found


Toyota Tensioner Part Number: 13540-0D010
$40.98 MSRP: $57.04You Save: $16.06 (29%)Product Specifications- Other Name: Tensioner Assembly, Chain; Engine Timing Chain Tensioner; Belt Tensioner; Timing Chain Tensioner
- Manufacturer Note: ENGINE NO.=5001001-9XXXXXX OR CXXXXXX
- Replaces: 13540-22021, 13540-22022, 13540-0D020


Toyota Tensioner Part Number: 13540-0T020
$32.85 MSRP: $45.73You Save: $12.88 (29%)Ships in 1-2 Business DaysProduct Specifications- Other Name: Tensioner Assembly, Chain; Engine Timing Chain Tensioner; Belt Tensioner; Timing Chain Tensioner
- Manufacturer Note: (L)
- Replaces: 13540-37010, 13540-37030, 13540-37020


Toyota Tensioner Part Number: 13540-0V031
$33.21 MSRP: $46.22You Save: $13.01 (29%)Product Specifications- Other Name: Tensioner Assembly, Chain; Engine Timing Chain Tensioner; Belt Tensioner; Timing Chain Tensioner
- Replaces: 13540-0V010, 13540-0V030, 13540-36010


Toyota Tensioner Assembly, Chain Part Number: 13540-0H010
$100.48 MSRP: $141.04You Save: $40.56 (29%)Ships in 1 Business DayProduct Specifications- Other Name: Timing Chain Tensioner; Belt Tensioner
- Replaces: 13540-0H030, 13540-28010


Toyota Tensioner Assembly, Chain Part Number: 13540-20040
$84.12 MSRP: $118.08You Save: $33.96 (29%)Ships in 1-2 Business DaysProduct Specifications- Other Name: Tensioner Assembly, Timing Belt; Timing Chain Tensioner; Belt Tensioner
- Manufacturer Note: GREEN PAINTED


Toyota Chain Tensioner, Passenger Side Part Number: 13550-AD010
$102.25 MSRP: $143.53You Save: $41.28 (29%)Product Specifications- Other Name: Tensioner Assembly, Chain; Engine Timing Chain Tensioner, Right; Belt Tensioner; Tensioner; Timing Chain Tensioner
- Manufacturer Note: (L)
- Position: Passenger Side
- Replaces: 13550-31010


Toyota Belt Tensioner Part Number: 13540-20021
$83.89 MSRP: $117.75You Save: $33.86 (29%)Ships in 1-3 Business DaysProduct Specifications- Other Name: Tensioner Assembly, Timing Belt; Engine Timing Belt Tensioner; Timing Chain Tensioner; Timing Tensioner; Tensioner; Tensioner Assembly, Chain; Timing Belt Tensioner
- Replaces: 13540-20010, 13540-20020


Toyota Tensioner Part Number: 13540-21020
$39.66 MSRP: $55.21You Save: $15.55 (29%)Ships in 1-3 Business DaysProduct Specifications- Other Name: Tensioner Assembly, Chain; Engine Timing Chain Tensioner; Belt Tensioner; Timing Chain Tensioner
- Replaces: 13540-21010


Toyota Chain Tensioner Part Number: 13540-31010
$50.72 MSRP: $70.59You Save: $19.87 (29%)Product Specifications- Other Name: Timing Chain Tensioner; Tensioner Assembly, Chain
- Manufacturer Note: (J)


Toyota Tensioner Part Number: 13540-62020
$63.50 MSRP: $89.14You Save: $25.64 (29%)Ships in 1-3 Business DaysProduct Specifications- Other Name: Tensioner Assembly, Timing Belt; Timing Chain Tensioner; Tensioner Assembly, Chain
- Replaces: 13540-62011


Toyota Tensioner Assembly, Chain Part Number: 13540-20030
$84.12 MSRP: $118.08You Save: $33.96 (29%)Ships in 1-3 Business DaysProduct Specifications- Other Name: Tensioner Assembly, Timing Belt; Timing Chain Tensioner; Timing Belt Tensioner; Belt Tensioner


Toyota Chain Tensioner, Driver Side Part Number: 13560-AD010
$45.52 MSRP: $63.36You Save: $17.84 (29%)Product Specifications- Other Name: Tensioner Assembly, Chain; Engine Timing Chain Tensioner, Left; Belt Tensioner; Tensioner; Timing Chain Tensioner
- Manufacturer Note: (L)
- Position: Driver Side
- Replaces: 13560-31010

Toyota Chain Tensioner, Driver Side Part Number: 13560-0P010
$80.21 MSRP: $112.59You Save: $32.38 (29%)Ships in 1-2 Business DaysProduct Specifications- Other Name: Tensioner Assembly, Chain; Engine Timing Chain Tensioner, Left; Belt Tensioner; Tensioner; Timing Chain Tensioner
- Manufacturer Note: (L)
- Position: Driver Side
- Replaces: 13560-31020

Toyota Chain Tensioner, Passenger Side Part Number: 13550-0P010
$80.21 MSRP: $112.59You Save: $32.38 (29%)Ships in 1-2 Business DaysProduct Specifications- Other Name: Tensioner Assembly, Chain; Engine Timing Chain Tensioner, Right; Belt Tensioner; Timing Chain Tensioner
- Manufacturer Note: (L)
- Position: Passenger Side
- Replaces: 13550-31020


Toyota Chain Tensioner Part Number: 13540-31021
$77.84 MSRP: $109.26You Save: $31.42 (29%)Ships in 1 Business DayProduct Specifications- Other Name: Tensioner Assembly, Chain; Engine Timing Chain Tensioner; Timing Chain Tensioner
- Replaces: 13540-31020


Toyota Chain Tensioner Part Number: 13540-AD011
$105.33 MSRP: $147.86You Save: $42.53 (29%)Product Specifications- Other Name: Tensioner Assembly, Chain; Engine Timing Chain Tensioner; Tensioner; Timing Chain Tensioner
- Manufacturer Note: (L)
- Replaces: 13540-31011


Toyota Tensioner Part Number: 13540-22020
$41.22 MSRP: $57.37You Save: $16.15 (29%)Ships in 1-3 Business DaysProduct Specifications- Other Name: Tensioner Assembly, Chain; Timing Chain Tensioner; Belt Tensioner


Toyota Tensioner Assembly, Chain, Passenger Side Part Number: 13540-0S010
$67.18 MSRP: $94.30You Save: $27.12 (29%)Ships in 1-2 Business DaysProduct Specifications- Other Name: Timing Chain Tensioner
- Position: Passenger Side
- Replaces: 13540-38020


Toyota Tensioner Assembly, Chain Part Number: 13560-0S011
$80.69 MSRP: $113.26You Save: $32.57 (29%)Ships in 1 Business DayProduct Specifications- Other Name: Timing Chain Tensioner
- Replaces: 13560-38010, 13560-0S010, 13560-38021


Toyota Tensioner Part Number: 13550-0S011
$80.69 MSRP: $113.26You Save: $32.57 (29%)Ships in 1-3 Business DaysProduct Specifications- Other Name: Tensioner Assembly, Chain; Timing Chain Tensioner
- Replaces: 13550-0S010, 13550-38020, 13550-38010
| Page 1 of 3 |Next >
1-20 of 49 Results
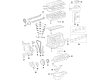
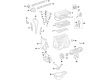
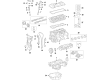
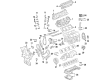
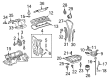
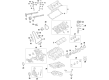
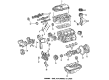
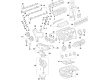
Toyota Timing Chain Tensioner
OEM parts deliver unmatched quality you can rely on. They pass extensive quality control inspections. Toyota produces them to the official factory specifications. This process helps prevent defects and imperfections. So you can get exceptional lifespan and a flawless fit. Need new OEM Toyota Timing Chain Tensioner? You'll love our wide selection of genuine options. Shop in minutes and skip the hunt. Our prices are unbeatable, you'll save time and money. It's easy to shop and find the right piece. Our committed customer service team gives professional help from start to finish. Every part includes a manufacturer's warranty. We ship quickly, your parts will arrive fast at your door.
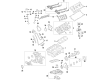
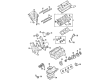
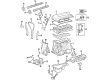
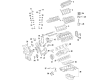
Toyota Timing Chain Tensioner is applied to maintain the chain in tension to ensure values and pistons are perfectly in order. Toyota was founded in 1937 and has grown to the entire world since it pursues waste, values speed, supports durability, executes lines in real time, redistributes savings into stronger steel, smarter electronics, and improved comfort without swelling price tags. The brand is aggressively developing hybrid technology, including Prius plug-ins, line electrification, and showing that efficiency is linear, and Toyota does it without putting batteries in the chassis to impair handling and crash protection to the driver. Toyota consolidated its platforms to TNGA, reduced center of gravity, increased safety ratings, and relaxed steering response in sedans and SUVs across the globe, and simplified parts lists and the ability of the company to implement changes more quickly than its competitors. Continuous improvement culture refers to employees stopping the line whenever any defect is identified, repairing it immediately, and the quality passing through each subsequent vehicle. Within each engine bay of a modern engine, the Timing Chain Tensioner fixes the chain to eliminate vibration and thermal stretch which causes gear slip, potentially damaging the combustion timing. Toyota also matches every Timing Chain Tensioner with chain metallurgy and oil passages that have been evaluated to last long during city crawl or highway pull. The Timing Chain Tensioner feeds the constant pressure through a spring and hydraulic plunger, therefore, the chain does not lash or miss teeth. When a Timing Chain Tensioner is broken, the rattles are heard warning of the risk, the drop of power is then experienced, and severe mechanical damage is imminent.
Toyota Timing Chain Tensioner Parts and Q&A
- Q: How to service and repair the timing chain tensioner on Toyota RAV4?A:Before servicing the timing chain tensioner start with oil drain and the removal of the RH engine under cover and all other listed components in sequence along with both PCV hoses detachments then 8 bolts and 2 nuts removal. First, set No. 1 cylinder to TDC/compression by adjusting the crankshaft pulley alignment to timing mark 0 then check both camshaft and VVT timing sprocket marks; if misalignment occurs adjust the crankshaft by one revolution for accuracy. You will need Special Service Tools 09213-54015 and 09330-00021 to detach the crankshaft pulley which leads to the removal of the chain tensioner and drive belt tensioner along with the crankshaft position sensor and oil pan and timing chain cover without causing damage to any contact areas. Starting at the crank angle sensor plate move to remove the chain tensioner slipper and chain vibration damper alongside the timing chain guide, timing chain, crankshaft timing sprocket, camshaft timing sprocket, and VVT timing sprocket followed by avoiding the disassembly of the VVT timing sprocket. The inspection includes checking timing chain elongation and sprocket wear levels so replacement is required when measurements exceed 1.0 mm. Also inspect chain tensioner slipper and vibration damper wear levels, and replace when above 1.0 mm. The installation of a crankshaft front oil seal requires tool 09309-37010 when the timing chain cover is taken off but uses tool 09308-10010 if the cover stays in place. Start installation by fitting the camshaft timing sprocket and VVT timing sprocket while maintaining ideal alignment and torque as per specifications followed by recurring the No. 1 cylinder to its TDC/compression position. During installation install the chain vibration damper with crankshaft timing sprocket and timing chain and timing chain guide as well as chain tensioner slipper and crank angle sensor plate and timing chain cover. Seal packing (Part No. 08826-00080) should be used properly alongside the tightening of all bolts and nuts to specified torque values. Secure the drive belt tensioner along with crankshaft position sensor and oil pan and crankshaft pulley by using Special Service Tools: 09213-54015, 09330-00021 according to torque specifications. Begin by installing the chain tensioner before setting chain tension and verifying valve timing then start the installation process by returning the cylinder head cover, ignition coils, vane pump, generator and all remaining components that include the RH engine mounting insulator, drive belt, ABS actuator, air cleaner assembly, and engine under cover. Complete the task by filling the engine with oil, starting the initial engine operation and leak detection followed by a second check of engine oil level.

Related Toyota Parts
 Toyota Oil Drain Plug Gasket
 Toyota Cylinder Head
 Toyota Oil Filler Cap
 Toyota Oil Pan
 Toyota Oil Pan Gasket
 Toyota Piston
 Toyota Cam Gear
 Toyota Camshaft Bearing
 Toyota Dipstick Tube
 Toyota Oil Pump Gasket
 Toyota Rod Bearing
 Toyota Timing Idler Gear
Browse Toyota Timing Chain Tensioner by Models
Tacoma 4Runner Camry Tundra Corolla RAV4 Highlander Prius Sienna Land Cruiser Pickup FJ Cruiser 86 Sequoia T100 Avalon Celica Supra Yaris Matrix Solara Venza GR86 Echo C-HR Grand Highlander Previa Prius C Prius Prime Corolla Cross Corolla iM Crown Crown Signia MR2 Spyder Prius V Van Yaris iA Prius Plug-In GR Supra Prius AWD-e RAV4 Prime