×
ToyotaParts- Hello
- Login or Register
- Quick Links
- Live Chat
- Track Order
- Parts Availability
- RMA
- Help Center
- Contact Us
- Shop for
- Toyota Parts
- Scion Parts
My Garage
My Account
Cart
OEM Toyota Solara Fuel Injector
Gas Injector- Select Vehicle by Model
- Select Vehicle by VIN
Select Vehicle by Model
orMake
Model
Year
Select Vehicle by VIN
For the most accurate results, select vehicle by your VIN (Vehicle Identification Number).
5 Fuel Injectors found


Toyota Solara Injector Assembly, Fuel Part Number: 23209-0A020
$165.78 MSRP: $234.68You Save: $68.90 (30%)Ships in 1-2 Business Days


Toyota Solara Injector Part Number: 23209-0H030
$170.72 MSRP: $241.67You Save: $70.95 (30%)Ships in 1-3 Business Days


Toyota Solara Injector Assembly, Fuel Part Number: 23209-0H050
$186.39 MSRP: $266.12You Save: $79.73 (30%)Ships in 1-3 Business Days


Toyota Solara Injector Part Number: 23209-20010
$187.90 MSRP: $268.28You Save: $80.38 (30%)Ships in 1-3 Business DaysToyota Solara Injector Assembly, Fuel Part Number: 23209-0A010
$193.38 MSRP: $276.10You Save: $82.72 (30%)Ships in 1-3 Business Days
Toyota Solara Fuel Injector
Choose genuine Fuel Injector that pass strict quality control tests. You can trust the top quality and lasting durability. Shopping for OEM Fuel Injector for your Toyota Solara? Our website is your one-stop destination. We stock an extensive selection of genuine Toyota Solara parts. The price is affordable so you can save more. It only takes minutes to browse and find the exact fit. Easily add to cart and check out fast. Our hassle-free return policy will keep you stress-free. We process orders quickly for swift delivery. Your parts will arrive faster, so you can get back on the road sooner.
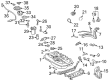
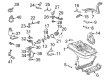
The Toyota Solara Fuel Injector is one of the car's fuel system that directly injects fuel into the engine cylinders with use of signals from the Engine Control Module so that to allow the right mixture of air and fuel. With the help of this system the engine gets fuel at the correct time and in required quantity, thereby increasing its efficiency and performance. Failure will result to poor idle, low turning power, and constraining of catalytic converters and oxygen sensors. To avoid these problems, it is recommended that bad fuel injectors be replaced as soon as possible. The mentioned part named Fuel Injector has a significant role to play in the health of the engines of Toyota Solara vehicles and in turn their performance.
Toyota Solara Fuel Injector Parts and Q&A
- Q: How to replace a fuel injector on Toyota Solara?A:As the first step to replace the fuel injector start by preventing gasoline loss then remove the air cleaner cap and attach air cleaner hose while simultaneously removing the engine cover sub-assy No.1. First disconnect the fuel tube sub-assy then extract the fuel delivery pipe with injector while maintaining continuous control to avoid dropping any injectors. First disconnect the 4 injector connectors before removing the ventilation hose No. 2 and disassembling the delivery pipe by removing its 2 clamps and wire harness. Remove the delivery pipe with its 4 injectors after completely removing the 2 bolts and set it aside. After that you can extract the 2 spacers from the cylinder head. Extract all four injectors from the delivery pipe after removing it. Place a new insulator on the injector then coat new O-rings with gas or grease before mounting them and use additional grease or gasoline on the O-ring area where the delivery pipe rests. The proper installation method for the fuel injector into the delivery pipe requires pushing it forward while twisting it clockwise and counter-clockwise motions but maintaining pressure on the O-ring. Perform a smoothness check on the injector right after installing it because non-smooth operation requires replacement with a new O-ring before repositioning the injector connector down. Set 2 spacers on the cylinder head while putting the 4-injector delivery pipe onto position before loosely tightening the bolts which secure the delivery pipe to the cylinder head. Ensure the injector operates without resistance after replacement. A new O-ring should be used if the injector hulls are not spinning freely. Position the 4 injector connectors to face outside while you tightly torque the 2 delivery pipe cylinder head retaining bolts to 20 N.m (204 kgf.cm or 15 ft.lbf). Then secure the 2 clamps and harness and link the 4 injector connectors before setting the ventilation hose Number 2. The process ends by connecting the fuel tube sub-assy while installing the air cleaner cap with its air cleaner hose then performing a leak inspection before inserting the engine cover sub-assy No. 1.
- Q: How to service and repair the fuel injector on Toyota Solara?A:Start the repair of the fuel injector by stopping the gasoline from leaking. First detach the air cleaner cap sub-assembly while removing the engine cover sub-assembly No.1 followed by disconnecting the fuel tube sub-assembly. The procedure involves removing the fuel delivery pipe with injectors while avoiding injector drops through ventilation hose No. 2 removal and disconnecting each of the 4 injector connectors before taking out the delivery pipe and 4 injectors as well as their 2 clamps and wire harness, followed by removing the 2 spacers from the cylinder head. The fuel injector assembly installation process begins with adding a new insulator to the injector followed by applying petroleum or grease to a new O-ring before installing it to the injector; additionally, apply petroleum or grease to the O-ring contact area on the delivery pipe. Insert the fuel injector into the delivery pipe and perform twisting motion forwards and backwards but take care to avoid rotating the O-ring. After installation verify smooth turning by the injector switch. A new O-ring should replace the original if this step cannot be achieved. The injector connector needs to be oriented toward the bottom of its position. First secure the 2 spacers to the cylinder head while placing the delivery pipe with its 4 injectors and loosely fasten the 2 bolts which hold the delivery pipe to the cylinder head until all 4 injector connectors face outward. The 2 bolts must be securely tightened to 20 N.m torque before installation of the 2 clamps and wire harness followed by 4 injector connector connection and placement of ventilation hose No. 2. The fuel tube sub-assembly requires connection while you install the air cleaner cap with air cleaner hose and identify fuel leaks before finishing with engine cover sub-assembly No.1.


Related Toyota Solara Parts
 Toyota Solara Fuel Filter
 Toyota Solara Fuel Pump
 Toyota Solara Fuel Tank
 Toyota Solara Gas Cap
 Toyota Solara Fuel Filler Hose
 Toyota Solara Fuel Filler Neck
 Toyota Solara Fuel Injector O-Rings
 Toyota Solara Fuel Level Sensor
 Toyota Solara Fuel Line Clamps
 Toyota Solara Fuel Pressure Regulator
 Toyota Solara Fuel Pump Gasket
 Toyota Solara Fuel Tank Strap