×
ToyotaParts- Hello
- Login or Register
- Quick Links
- Live Chat
- Track Order
- Parts Availability
- RMA
- Help Center
- Contact Us
- Shop for
- Toyota Parts
- Scion Parts
My Garage
My Account
Cart
OEM Toyota Solara Fuel Tank
Gas Tank- Select Vehicle by Model
- Select Vehicle by VIN
Select Vehicle by Model
orMake
Model
Year
Select Vehicle by VIN
For the most accurate results, select vehicle by your VIN (Vehicle Identification Number).
3 Fuel Tanks found

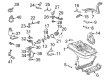
Toyota Solara Fuel Tank Part Number: 77001-33071
$744.32 MSRP: $1090.81You Save: $346.49 (32%)Ships in 1-3 Business DaysToyota Solara Fuel Tank Part Number: 77001-39415
$891.30 MSRP: $1306.22You Save: $414.92 (32%)Ships in 1-3 Business Days
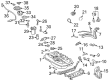
Toyota Solara Tank Assembly, Fuel Part Number: 77001-06112
Toyota Solara Fuel Tank
Choose genuine Fuel Tank that pass strict quality control tests. You can trust the top quality and lasting durability. Shopping for OEM Fuel Tank for your Toyota Solara? Our website is your one-stop destination. We stock an extensive selection of genuine Toyota Solara parts. The price is affordable so you can save more. It only takes minutes to browse and find the exact fit. Easily add to cart and check out fast. Our hassle-free return policy will keep you stress-free. We process orders quickly for swift delivery. Your parts will arrive faster, so you can get back on the road sooner.
Thus, the Toyota Solara Fuel Tank is the container of the fuel where the electric fuel pump and the fuel gauge sender are located. It has baffles to stop fuel sway and is essential for the Evaporative Emission Control System. These tanks are usually fashioned from steel or acrylic or a type of plastic and while a steel tank is easily corroded, the acrylic or plastic tank is easily fractured. On its manufacture, racing fuel cells therefore have to be made in a way that they cannot be easily punctured or spill the gas around in the event of an accident. Elongated driving ability is made possible with high-capacity fuel tanks that are made of military strength polymer. The tanks are leak tested and many have necessary components for fuel system repair included.
Toyota Solara Fuel Tank Parts and Q&A
- Q: How to service and repair the fuel tank on Toyota Solara?A:Service and repair of the fuel tank begins with discharging the fuel system pressure before moving on to remove the rear seat cushions for all models followed by the rear floor service hole cover. Begin the fuel tank service by removing the fuel pump tube sub-assembly together with the fuel tank vent tube set plate and fuel pump assembly while you drain the fuel. First remove the floor panel brace rear and the center Exhaust Pipe assembly by taking out 2 bolts, 4 nuts and the exhaust pipe together with its associated 2 gaskets. The No.2 and No.3 Parking Brake Cable assemblies should be disconnected by removing the set bolts and nuts from each component. Take four bolts out to remove the fuel tank protector lower center before pulling down the fuel pump tube by pinching its tab and removing the lock claws. Check the connector for any contamination during this process. After pinching the tube connector you should pull out the fuel tube No.1 while inspecting each connector for any sign of contamination. A transmission jack goes beneath the fuel tank and operators should remove the 2 watershed bolts securing the fuel tank bands and do a hose disconnect operation on both the fuel tank to filler pipe ( 1) and the fuel tank vent ( 2) from the charcoal canister through locking pin release then A pinching and connector extraction. The fuel tank removal procedure begins by removing 2 pins and 2 fuel tank bands and the 4 clip nuts successively. First disconnect the fuel tank from the fuel filler pipe hose and the fuel tank vent hose from the charcoal canister ( 2) by pushing the connector deep into the canister while using portion A to pinch. Then remove the fuel tank vent hose along with the fuel pump tube sub-assembly and the fuel main tube support. The first step involves installing seven new fuel tank cushions onto the fuel tank before tightening the fuel main tube support to 5.4 N.m (55 kgf.cm, 48 in.lbf). Then install the fuel pump tube sub-assembly and fuel tank vent hose. Install the fuel tank assembly through steps of securing 4 clip nuts and attaching 2 fuel tank bands with 2 pins while connecting the fuel tank vent hose and fuel tank inlet pipe to the fuel filler pipe clamp and tightening the set 2 bolts of the fuel tank bands to 39 N.m (400 kgf.cm, 29 ft.lbf). Connect Fuel Tube No.1 after pushing the connector until it clicks and inspect for any damage or foreign objects. Then connect the fuel pump tube by following the connector with the retainer lock installed. Begin by installing the fuel tank protector lower center with 5.4 N.m (55 kgf.cm, 48 in.lbf) torque after which you should attach the No.3 and No.2 parking brake cable assemblies using a torque of 5.4 N.m (55 kgf.cm, 48 in.lbf). Use 2 new gaskets to assemble the center exhaust pipe together with the exhaust pipe while using 2 bolts and 4 new nuts that need to be tightened to a torque value of 56 N.m (571 kgf.cm, 41 ft.lbf). The last steps include installing the fuel pump assembly while adding fuel and examining leakages then installing the rear floor service hole cover with rear seat cushion assembly for Coupe or without rear seat cushion assembly and installing the floor panel brace rear.

Related Toyota Solara Parts
 Toyota Solara Fuel Pump
 Toyota Solara Mass Air Flow Sensor
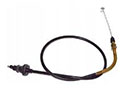 Toyota Solara Accelerator Cable
 Toyota Solara Air Duct
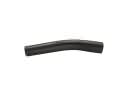 Toyota Solara Fuel Filler Hose
 Toyota Solara Fuel Filler Neck
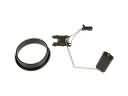 Toyota Solara Fuel Level Sensor
 Toyota Solara Fuel Line Clamps
 Toyota Solara Fuel Pump Seal
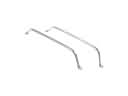 Toyota Solara Fuel Tank Strap
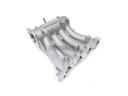 Toyota Solara Intake Manifold
 Toyota Solara Intake Manifold Gasket