My Garage
Cart
Make sure this part fits

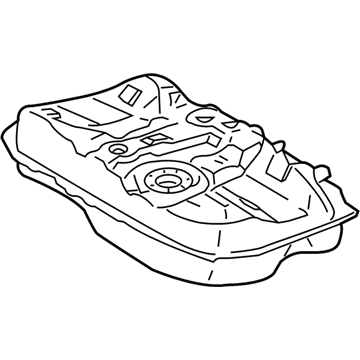
Toyota 77001-06112
Tank Assembly, Fuel

2004-2012 Toyota 7700106112

Customer Questions & Expert Answers (10)
Toyota 77001-06112 Tank Assembly, Fuel
  • Part Description
    Tank Sub-Assembly, Fuel; Fuel Tank
  • Part Name Code
    77100
  • Replaces
    77001-06111, 77001-33192
  • Manufacturer
    Toyota
  • Manufacturer's Notes
    This part is discontinued.
Make sure this part fits
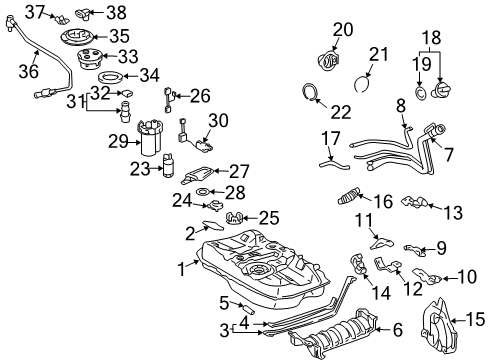
  • Related Parts
  • Product Specifications
  • Vehicle Fitment
  • Customer Questions & Expert Answers
  • Product Specifications

    BrandGenuine Toyota
    Part Name Code77100
    Manufacturer Part Number77001-06112
    Part DescriptionTank Sub-Assembly, Fuel; Fuel Tank
    Item Dimensions15.3 x 10.5 x 49.7 inches
    Item Weight36.90 Pounds
    ConditionNew
    Fitment TypeDirect Replacement
    Replaces77001-06111, 77001-33192
    ManufacturerToyota
    SKU77001-06112
    WarrantyThis genuine Toyota part is guaranteed by Toyota's factory warranty.
    Shipping & ReturnShipping Policy Return Policy
    Warning: California's Proposition 65
  • Vehicle Fitment

    Year Make Model Trim Engine
    2005-2012 Toyota AvalonBase, Limited, Touring, XL, XLS6 Cyl 3.5 L GAS
    2004-2011 Toyota CamryBase, CE, LE, SE, XLE4 Cyl 2.4 L GAS, 4 Cyl 2.5 L GAS, 6 Cyl 3.0 L GAS, 6 Cyl 3.3 L GAS, 6 Cyl 3.5 L GAS
    2004-2008 Toyota SolaraSE, SE Sport, SLE, Sport4 Cyl 2.4 L GAS, 6 Cyl 3.3 L GAS
  • Customer Questions & Expert Answers

    Q:
    Any advice on whether 77001-06112 is suitable for my car? Posted by ToyotaPartsNow Specialist
    A:
    Find out if part number 77001-06112 is the right fit for your car by Selecting Your Vehicle model.
    Posted by ToyotaPartsNow Specialist
    Q:
    How to remove the fuel tank on Toyota Avalon? Posted by Customer
    A:
    Initializing some systems after negative battery cable disconnection is mandatory before commencing the fuel tank removal process that starts by both lowering fuel system pressure and terminating the battery power. The first step involves taking out the rear seat cushion assembly together with the rear floor service hole cover and separating the fuel pump tube sub-assembly. Start by draining the fuel then disconnect the fuel suction tube assembly with pump and gauge along with the fuel tank vent tube set plate. Uninstall the exhaust pipe assembly center followed by disconnection of parking brake cable assemblies No. 2 and No. 3 through the removal of their set bolts and nuts. The low center bolt at the fuel tank protector needs removal followed by disconnecting the fuel pump tube through tab pinching and claw lock release to pull it down while maintaining connector cleanliness. Pull out the fuel tube connector No. 1 after pinching its tube connector while maintaining a clean area around the connector. You must place the transmission jack under the fuel tank and then detach the 2 set bolts which secure the fuel tank bands so you can take off the hose clamp to disconnect the fuel tank filter pipe hose and finally separate the fuel tank vent hose from the charcoal canister through connector deep locking pin engagement and pinching portion A before removing the connector. End the procedure by taking out the fuel tank and both pins and fuel tank bands and their associated 4 clip nuts.
    Posted by ToyotaPartsNow Specialist
    Q:
    How to service and repair the fuel tank on Toyota Solara? Posted by Customer
    A:
    Service and repair of the fuel tank begins with discharging the fuel system pressure before moving on to remove the rear seat cushions for all models followed by the rear floor service hole cover. Begin the fuel tank service by removing the fuel pump tube sub-assembly together with the fuel tank vent tube set plate and fuel pump assembly while you drain the fuel. First remove the floor panel brace rear and the center exhaust pipe assembly by taking out 2 bolts, 4 nuts and the exhaust pipe together with its associated 2 gaskets. The No.2 and No.3 parking brake cable assemblies should be disconnected by removing the set bolts and nuts from each component. Take four bolts out to remove the fuel tank protector lower center before pulling down the fuel pump tube by pinching its tab and removing the lock claws. Check the connector for any contamination during this process. After pinching the tube connector you should pull out the fuel tube No.1 while inspecting each connector for any sign of contamination. A transmission jack goes beneath the fuel tank and operators should remove the 2 watershed bolts securing the fuel tank bands and do a hose disconnect operation on both the fuel tank to filler pipe ( 1) and the fuel tank vent ( 2) from the charcoal canister through locking pin release then A pinching and connector extraction. The fuel tank removal procedure begins by removing 2 pins and 2 fuel tank bands and the 4 clip nuts successively. First disconnect the fuel tank from the fuel filler pipe hose and the fuel tank vent hose from the charcoal canister ( 2) by pushing the connector deep into the canister while using portion A to pinch. Then remove the fuel tank vent hose along with the fuel pump tube sub-assembly and the fuel main tube support. The first step involves installing seven new fuel tank cushions onto the fuel tank before tightening the fuel main tube support to 5.4 N.m (55 kgf.cm, 48 in.lbf). Then install the fuel pump tube sub-assembly and fuel tank vent hose. Install the fuel tank assembly through steps of securing 4 clip nuts and attaching 2 fuel tank bands with 2 pins while connecting the fuel tank vent hose and fuel tank inlet pipe to the fuel filler pipe clamp and tightening the set 2 bolts of the fuel tank bands to 39 N.m (400 kgf.cm, 29 ft.lbf). Connect Fuel Tube No.1 after pushing the connector until it clicks and inspect for any damage or foreign objects. Then connect the fuel pump tube by following the connector with the retainer lock installed. Begin by installing the fuel tank protector lower center with 5.4 N.m (55 kgf.cm, 48 in.lbf) torque after which you should attach the No.3 and No.2 parking brake cable assemblies using a torque of 5.4 N.m (55 kgf.cm, 48 in.lbf). Use 2 new gaskets to assemble the center exhaust pipe together with the exhaust pipe while using 2 bolts and 4 new nuts that need to be tightened to a torque value of 56 N.m (571 kgf.cm, 41 ft.lbf). The last steps include installing the fuel pump assembly while adding fuel and examining leakages then installing the rear floor service hole cover with rear seat cushion assembly for Coupe or without rear seat cushion assembly and installing the floor panel brace rear.
    Posted by ToyotaPartsNow Specialist
    Q:
    How do you attach the fuel tank bands for the 2008 Toyota Avalon? Posted by Customer
    A:
    Attach the 2 fuel tank bands using the 2 pins.
    Posted by ToyotaPartsNow Specialist
    See expert answers on similar Fuel Tank
    Q:
    What is the next step after securing the fuel main tube support for the 2007 Toyota Avalon? Posted by Customer
    A:
    Install the fuel pump tube to the fuel main tube support.
    Posted by ToyotaPartsNow Specialist
    See expert answers on similar Fuel Tank
    Q:
    What should be done after connecting the fuel pump tube sub-assembly for the 2009 Toyota Avalon? Posted by Customer
    A:
    Add fuel and then connect the cable to the negative battery terminal.
    Posted by ToyotaPartsNow Specialist
    See expert answers on similar Fuel Tank
    Q:
    What components should be reinstalled after the fuel main tube support for the 2006 Toyota Camry? Posted by Customer
    A:
    Reinstall the fuel pump tube sub-assembly and the fuel tank vent hose.
    Posted by ToyotaPartsNow Specialist
    See expert answers on similar Fuel Tank
    Q:
    What is the torque specification for the fuel tank bands for the 2005 Toyota Camry? Posted by Customer
    A:
    Tighten the 2 set bolts of the fuel tank bands to a torque of 39 N.m (400 kgf.cm, 29 ft.lbf).
    Posted by ToyotaPartsNow Specialist
    See expert answers on similar Fuel Tank
    Q:
    What is the first step to service and repair the fuel tank for the 2006 Toyota Avalon? Posted by Customer
    A:
    Prevent gasoline from spilling out and disconnect the cable from the negative battery terminal.
    Posted by ToyotaPartsNow Specialist
    See expert answers on similar Fuel Tank
    Q:
    What components should be separated and removed next for the 2005 Toyota Solara? Posted by Customer
    A:
    The fuel pump tube sub-assembly, fuel tank vent tube set plate, and the fuel suction tube assembly with pump and gauge.
    Posted by ToyotaPartsNow Specialist
    See expert answers on similar Fuel Tank
    If you have any questions about this product, please don't hesitate to ask us. We will be happy to help you!

OEM Toyota 77001-06112, Excellent Performance and Perfect Fitment

To ensure reliability, purchase Toyota part # 77001-06112 Tank Assembly, Fuel. It is sometimes referred to as Toyota Fuel Tank. OEM parts are unrivaled in terms of quality. They go through extensive quality control inspections and are produced in accordance with Toyota's official factory specifications. All of these remove defects and imperfections. So you can relax knowing they promise exceptional lifespan and flawless fitment.

ToyotaPartsNow.com is a leading supplier of genuine Toyota parts such as Toyota 7700106112 Tank Assembly, Fuel. At ToyotaPartsNow.com, we have a wide variety of OEM Toyota parts available at competitive prices. Our comprehensive range of genuine Toyota parts come with a manufacturer's warranty for peace of mind. We also prioritize customer satisfaction, providing a hassle-free return policy and expedited delivery for all our parts. For detailed Toyota parts information, click here.
Choose ToyotaPartsNow for discounted prices, exceptional service and fast delivery