×
ToyotaParts- Hello
- Login or Register
- Quick Links
- Live Chat
- Track Order
- Parts Availability
- RMA
- Help Center
- Contact Us
- Shop for
- Toyota Parts
- Scion Parts
My Garage
My Account
Cart
OEM Toyota Solara Clutch Master Cylinder
- Select Vehicle by Model
- Select Vehicle by VIN
Select Vehicle by Model
orMake
Model
Year
Select Vehicle by VIN
For the most accurate results, select vehicle by your VIN (Vehicle Identification Number).
3 Clutch Master Cylinders found


Toyota Solara Cylinder Kit, Clutch Master Part Number: 04311-12110
$42.65 MSRP: $59.36You Save: $16.71 (29%)Ships in 1-3 Business Days

Toyota Solara Master Cylinder Part Number: 31420-20070
$141.34 MSRP: $200.08You Save: $58.74 (30%)Ships in 1-3 Business Days
Toyota Solara Master Cylinder Part Number: 31410-33030
$154.38 MSRP: $218.55You Save: $64.17 (30%)
Toyota Solara Clutch Master Cylinder
Choose genuine Clutch Master Cylinder that pass strict quality control tests. You can trust the top quality and lasting durability. Shopping for OEM Clutch Master Cylinder for your Toyota Solara? Our website is your one-stop destination. We stock an extensive selection of genuine Toyota Solara parts. The price is affordable so you can save more. It only takes minutes to browse and find the exact fit. Easily add to cart and check out fast. Our hassle-free return policy will keep you stress-free. We process orders quickly for swift delivery. Your parts will arrive faster, so you can get back on the road sooner.
The Clutch Master Cylinder in the Toyota Solara vehicles helps in the setting off of hydraulic pressure needed to force the clutch when the clutch pedal is depressed. This component transfers the foot force into hydraulic pressure so that the slave cylinder can push the clutch release bearing to disengage the clutch from the flywheel. A few of the symptoms of a bad Clutch Master Cylinder include, soft pedal feel, fluid leakage and hard time shifting the gears. Hydraulic leaks are generally as a result of wore seals or cylinder bores, thus, rust and moisture absorb the hydraulic fluid. The Toyota Solara vehicles often incorporates a diagonally split hydraulic system whereby the system incorporates two separate circuits to allow efficient working and also protect the vehicle in case one of the circuits fails.
Toyota Solara Clutch Master Cylinder Parts and Q&A
- Q: How to reassemble the clutch master cylinder on Toyota Solara?A:The reassembly process begins with treating indicated parts with lithium soap base glycol grease before inserting the cylinder piston with its spring inside the cylinder while being cautious about body interior damage. The stop plate installation should precede the push rod attachment to the cylinder body. Use the snap ring pliers to add the snap ring with piston rod pressure before you install the boot onto the cylinder body along with the lock nut onto the push rod. Install the inlet union together with a new grommet after first attaching the push rod clevis to the push rod by means of the lock nut. Drive the slotted spring pin with a pin punch having a 5 mm diameter while hammering it until it protrudes 1.5 to 3.5 millimeters (0.059 to 0.138 inches). The clutch master cylinder assembly needs installation with two nuts before torque application reaches 12 Nm (120 kgf-cm, 9 ft-lbf). The hole pin requires MP grease on its contact points with the bush before connecting the clevis to the clutch pedal assembly through the hole pin by approaching from the left side of the vehicle. A clip should be used to secure it. Secure the flexible hose tube by using Special Service Tool 09023-00101 and torquing it to 15 Nm (155 kgf-cm, 11 ft-lbf). After that, clamp the clutch reservoir tube to the master cylinder assembly with the clip while checking for any appearance of tube twist. Mount the Brake Booster assembly next to the Brake Master Cylinder sub-assembly into place. Use Special Service Tool: 09023-00101 to bleed the brake master cylinder followed by bleeding the brake line and clutch pipe line during which the brake reservoir tank will receive clutch fluid before bleeding the clutch system while torquing it to 8.4 Nm (85 kgf-cm, 74 in-lbf). Check all present fluid levels in the reservoir while examining the brake and clutch pedal sub-assemblies for height adjustments. Also verify both systems for leakage properties.
- Q: How to overhaul the Clutch Master Cylinder on Toyota Solara?A:The overhaul process for the Clutch Master Cylinder starts with draining clutch fluid followed by removal of Brake Master Cylinder sub-assy and Brake Booster assy. The clutch reservoir tube requires disconnecting by loosening the clip while catching the fluid in a container. The task involves breaking the connection between the clutch master cylinder and flexible hose tube with Special Service Tool: 09023-00100 to collect expelled fluid in a container. To remove the clutch master cylinder you must first delete the clevis hole pin by taking away both the clip and hole pin followed by uncoupling the two nuts. To install the clutch master cylinder kit users must employ a 5 mm pin punch along with a hammer to drive out the slotted spring pin which allows access to the inlet union and grommet then loosen the lock nut so they can remove the push rod clevis along with the lock nut before pulling off the boot from the cylinder body. Install snap ring pliers to remove the snap ring while applying force on the piston rod and proceed by carefully removing the push rod along with the stop plate from the cylinder before extracting the piston with spring while maintaining the interior cylinder body free from damage. First coat specified parts with lithium soap base glycol grease and insert the spring-loaded piston into the cylinder afterward press the stop plate onto the push rod before installing the push rod inside the cylinder body. Snap ring pliers enable you to install the snap ring under piston rod pressure before adding the boot and lock nut and temporary push rod clevis installation with the lock nut. The inlet union requires a fresh grommet followed by installation of the slotted spring pin while driving its protrusion to a range of 1.5 to 3.5 mm. You should install the clutch master cylinder assy with its two nuts against a torque specification of 12 Nm (120 kgf-cm, 9 ft. lbs.). Fit MP grease to the hole pin contact area and bush before attaching the clutch pedal assembly to the pin (use left vehicle entrance) and anchor with the clip. Connect the clutch master cylinder to the flexible hose tube with Special Service Tool: 09023-00100 while torqueing to 15 Nm (155 kgf-cm, 11 ft. lbs.) before connecting the clutch reservoir tube to the clutch master cylinder assy through the clip without tube twisting. Before reattaching the brake components the system requires bleeding through Special Service Tool: 09023-00100 beginning with the master cylinder and continuing with the brake line and clutch pipe line by filling the brake reservoir with clutch fluid. When complete torque the clutch system to 8.4 Nm (85 kgf-cm, 74 inch lbs.) while checking brake pedal height for adjustments followed by examining and adjusting the clutch pedal sub-assy before verifying brake and clutch fluid levels and leakages in the reservoir.


Related Toyota Solara Parts
 Toyota Solara Automatic Transmission Shift Levers
 Toyota Solara Clutch Disc
 Toyota Solara Clutch Fork
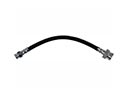 Toyota Solara Clutch Hose
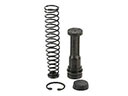 Toyota Solara Clutch Master Repair Kit
 Toyota Solara Clutch Release Bearing
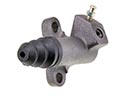 Toyota Solara Clutch Slave Cylinder
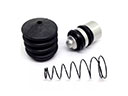 Toyota Solara Clutch Slave Repair Kit
 Toyota Solara Flywheel
 Toyota Solara Pressure Plate
 Toyota Solara Shift Cable
 Toyota Solara Torque Converter